|
|
Post by stan on May 26, 2018 22:07:56 GMT
Hi everyone please can you tell me if / what type of gasket there is between the exhaust manifold and intermediate pipe?
I cant find anything on Wadhams site nor ebay or general googling?
I am fairly certain its blowing slightly and wanted to fit new manifold gasket and this one too? Someone has been keen on the exhaust paste! Dont you love previous owners...
Thank you kindly.
Stan
|
|
|
|
Post by Phil Nottingham on May 27, 2018 6:14:12 GMT
Nothing - its a spherical joint. Some exhaust paste is useful but not essential. The manifold to engine block should never have anything on the gasket and make sure the clamps are refitted with the curved face to the block and the nut lands under the spring washer. Do not overtighten
|
|
|
|
Post by stan on May 27, 2018 9:26:52 GMT
Thank you Phil, that explains it then!
They have put paste on the exhaust manifold too! Better get it all cleaned off and start from scratch.
Thanks for your advice as always.
|
|
bobh
Rover Rookie

Posts: 29
|
Post by bobh on May 28, 2018 6:06:15 GMT
Hi - sorry to butt in - I'm having trouble getting a decent seal on this joint on my 1962 Three Litre. I have tried with the bottom mounts loosened and with them tight, to create some wiggle room. and I have cleaned off the joint faces. Nonetheless, I get a persistent leak on the edge closest to the firewall.
I am considering jacking up the exhaust under the car to try to change the angle of the pipe as it approaches the manifold - sort of tile it forward a fraction.
I would be grateful if you could let me know how you go fitting this joint up, whether you get a clean and tight fit, and how you approach it!
|
|
|
|
Post by stan on May 29, 2018 12:23:46 GMT
Hi - sorry to butt in - I'm having trouble getting a decent seal on this joint on my 1962 Three Litre. I have tried with the bottom mounts loosened and with them tight, to create some wiggle room. and I have cleaned off the joint faces. Nonetheless, I get a persistent leak on the edge closest to the firewall. I am considering jacking up the exhaust under the car to try to change the angle of the pipe as it approaches the manifold - sort of tile it forward a fraction. I would be grateful if you could let me know how you go fitting this joint up, whether you get a clean and tight fit, and how you approach it! Hi no problem I will let you know how I get on and post some pictures up. I am praying I dont find holes or rust all over it, hopefully some wire wool and a good clean up might all that it takes? Stan |
|
|
|
Post by stan on Jun 16, 2018 22:37:42 GMT
I finally sorted out my dreaded tappey tap noise. I removed the exhaust manifold and look at the old gasket?!! Blowing more than a Scottish Piper!  I decided to give the manifold a makeover whilst it was off.  I wirebrushed it then used the edge of a stanley knife on the pipe face to remove old gasket and paint, then wirewool to give a clean edge. This one thankfully was in excellent condition. Quick treatment with Metal Ready panel prep which dissolves surface rust then I sprayed Rustoleum Bbq paint rather than VHTP paint.  Results look great but a top tip, ensure you try a quick spray in the cap at the shop because mine didnt work so had to drive back to B&Q to change it. Annoying but just check.  I also sprayed some of the downpipe as much as I could reach, mask off the engine bay of course!  So I fitted the new gasket, again cleaning the block face with wirewool for a clean finish. I refitted the manifold but still found it blew slightly at the block end? I had a good think about this and realised the downpipe is probably pushing the manifold just enough to misalign or not push flat against the block? There is some movement due to the flexible pipe hanger. Back to the story, I removed the manifold again and looked at the gasket. As you know a lot of repro stuff today is cheap and not always well made I did think the gasket seemed a bit thin so ordered another one and decided to fit them together.  I used Granville exhaust fitting paste on the pipe connection, you smear it on the join assemble then run the engine for 10 mins where it expands and sets. Clever stuff. Well this time all reassembled and surprise all nice and quiet thankfully.  Dont know how long the paint will survive but lets see? Give it a try Bob double up on gaskets and paste, fit the manifold to the block first then tighten the pipe second it seemed to work for me? |
|
bobh
Rover Rookie
Posts: 29
|
Post by bobh on Jun 17, 2018 7:59:41 GMT
Good work. I'm getting a great seal up against the block, its the pipe connection that is causing me grief. Did you use any paste on that joint (eg manifold to the lower pipe)?
|
|
|
|
Post by stan on Jun 17, 2018 13:28:40 GMT
Good work. I'm getting a great seal up against the block, its the pipe connection that is causing me grief. Did you use any paste on that joint (eg manifold to the lower pipe)? Yes the Granville Exhaust fitting paste, I smeared it on the pipe end of the manifold and pipe itself. Btw I did a proper clean of those faces where they meet and put enough paste on there. I tightened up the manifold, jiggled the pipe a bit too until it all felt settled and then tightened up the pipe end. Seems to have worked?  Can you take a picture of the pipe face or where its blowing? Why not roll out some wirewool into a thin sausage and place that onto the pipe join, smear the paste too and as you refit it should compress into shape and seal it for you? What do you think? These cars are 50+ years old we have to improvise. You can forget about what Rover did when they sailed out of the factory I doubt they expected them to survive for so long plus the aftermarket pipe fittings are probably a bit out anyway which is why its not sealing for you? I invested in a full stainless exhaust for my VW camper as the steel ones dissolve when you look at them so stainleas all the way. Took me 3 hoirs and a lot of colloquial English to fit it!!! Rubbish fit but good materials. |
|
|
|
Post by enigmas on Jun 19, 2018 10:38:38 GMT
Yes...I suppose you can use steel wool and exhaust paste if nothing else is to hand. I don't believe you need to go there though unless you must.
I prefer to use red high temp silicone (the stuff that is oxygen sensor safe.) With vibration, exhaust paste/putty being a ceramic base will eventually fall out as it hardens creating exhaust leaks. If you've cleaned the coupling joints properly red high temp silicon will make a leak free seal. Leave it to cure overnight. I also use it instead of exhaust manifold gaskets (which erode over time) as the manifold flange is pulled hard up against the port face.
|
|
|
|
Post by stan on Jun 19, 2018 18:50:17 GMT
Yes...I suppose you can use steel wool and exhaust paste if nothing else is to hand. I don't believe you need to go there though unless you must. I prefer to use red high temp silicone (the stuff that is oxygen sensor safe.) With vibration, exhaust paste/putty being a ceramic base will eventually fall out as it hardens creating exhaust leaks. If you've cleaned the coupling joints properly red high temp silicon will make a leak free seal. Leave it to cure overnight. I also use it instead of exhaust manifold gaskets (which erode over time) as the manifold flange is pulled hard up against the port face. Ooh tell me what that magic stuff is called? Its not a Hylomar variant is it? I have to say it crossed my mind however the constant mention of the manifold gaskets move apparently by design I decided against it? Young Bob might be best using that for his pipe malfunction? |
|
|
|
Post by enigmas on Jun 20, 2018 3:08:33 GMT
I'll take a photo of the product for you...tonight Stan.
|
|
|
|
Post by Ken Nelson on Jun 20, 2018 3:10:09 GMT
Wire wool with its mild steel and large surface area will likely rust extremely easily and fall out or be blown out. I tried using it as you suggested in the past and it did not work well at all. I would go with the high temp silicone or similar.
|
|
|
|
Post by enigmas on Jun 20, 2018 9:36:19 GMT
Here are a couple of options available in OZ. Just look for a similar heat rating. The high temp premium copper silicone has a range from -80°F to +700°F. 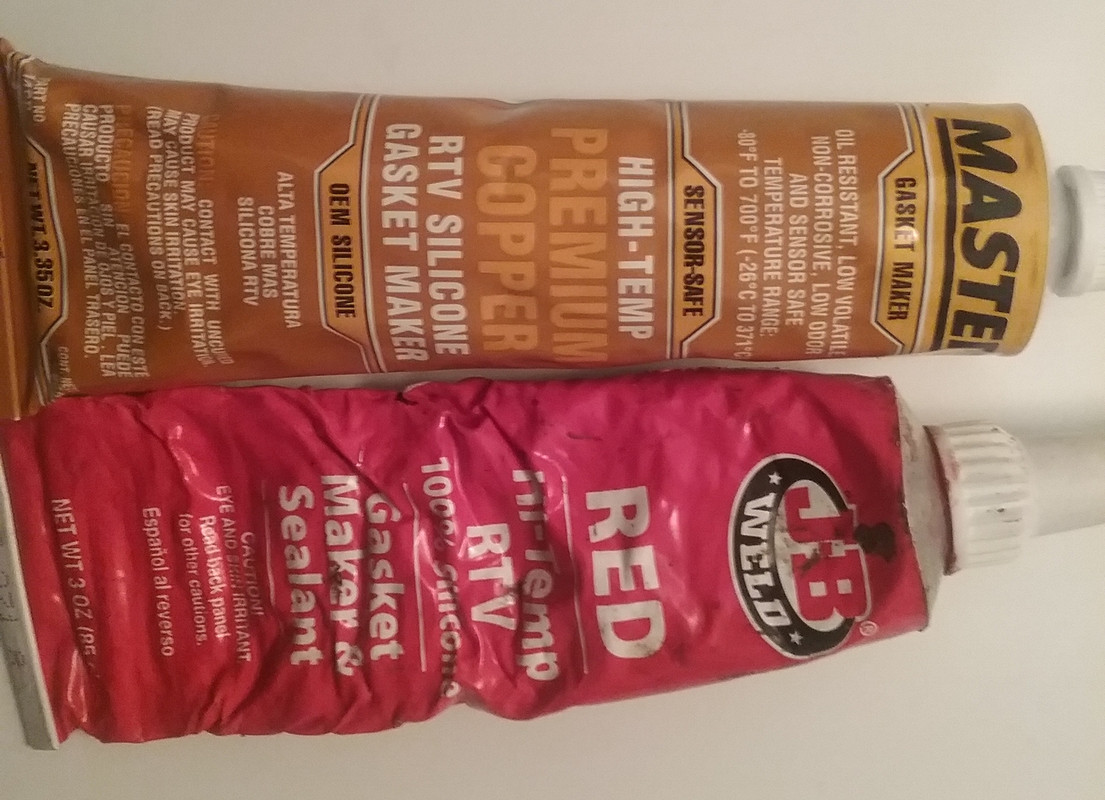 |
|
|
|
Post by stan on Jun 20, 2018 12:42:02 GMT
Here are a couple of options available in OZ. Just look for a similar heat rating. The high temp premium copper silicone has a range from -80°F to +700°F. Thanks I will see what there is, subject to how long the current repair lasts. |
|
|
|
Post by stan on Jun 20, 2018 12:45:05 GMT
Wire wool with its mild steel and large surface area will likely rust extremely easily and fall out or be blown out. I tried using it as you suggested in the past and it did not work well at all. I would go with the high temp silicone or similar. You are probably correct. However on the aircooled Vw parts scene they got rid of pressed (what used to be asbestos based) ring exhaust gaskets for some replacement material, that has gone and its pressed wire mesh bit like wirewool. Seems to work but agree eventually it will rust, everything bleedin rusts in this country, even the rust!😀😀 |
|
bobh
Rover Rookie
Posts: 29
|
Post by bobh on Jun 21, 2018 0:18:50 GMT
|
|
|
|
Post by djm16 on Jun 22, 2018 2:47:06 GMT
If your exhaust manifold was leaking despite being tightened (gently) against a new gasket, then it is warped and needs re-facing.
If you instead overtighten it against stacked up gaskets, it will fracture under the stress and leak. They are not cheap to replace.
My experience using either exhaust cement or silicon is that neither lasts. Cleanign off all the old sealant / cement / rust and carbon with 40 grit sandpaper usually gets me an acceptable seal between manifold and downpipe.
|
|
bobh
Rover Rookie
Posts: 29
|
Post by bobh on Jun 22, 2018 3:09:45 GMT
Getting a fine seal between the block and the manifold using a standard gasket, no additives necessary. It is the down pipe seal that is giving me grief. I suspect the pipe has dropped slightly under the body, changing the relationship between the down pipe and the manifold - this would be consistent with the placement of the leak - and that I should really undo it all and reconnect from the front going back. I’d like not to do that at this time if I could avoid it, as it might reveal other things that need replacement, but might have to bite the bullet.
|
|
|
|
Post by enigmas on Jun 22, 2018 9:29:32 GMT
Bob if the issue is with the engine pipe and the manifold coupling...the first task is to get the alignment correct. This may mean releasing/repositioning clamps on the front engine pipe (other than the coupling itself) until the manifold and engine pipe coupling seats correctly. No weird angles or trying to correct alignment by pulling a poorly fitted joint together with the securing bolts of the manifold flange.
The high temp sealant works well and permanently if used correctly on a well fitted joint. It's not a gap filler for misaligned components. Spend the time, do it properly and you'll be rewarded with a leak free system.
One last thing...the engine pipe shouldn't be allowed to pivot in any direction on the coupling. There should be a bracket to hold it firmly and securely somewhere on the bell housing or gearbox case...NOT on the body. If the latter, the pipe will work against the flange with engine torque rather than move in unison with the engine gearbox assembly! This will create the same issue ad infinitum.
The flange design is typical of many English cars of the 50s and 60s...so your issue is not unique to Rovers.
|
|
|
|
Post by djm16 on Jun 24, 2018 10:11:49 GMT
Enigma is right about the support bracket. There should be one supporting the down pipe to the bell housing.This is absolutely NOT to be tightened! It is meant to slide to allow for heat expansion. There is a wrap around clamp around the pipe with three bolts. This is linked to a support bracket on the bell housing by three bolts and lock washers loose enough to let it slide on its tufnol spacer.
YMMV but when I have tried either high temp silicon or exhaust paste on the manifold to downpipe jt, I get about 3000 miles before it starts blowing. Tightened up without sealant works for me.
To get a good seal, I loosen off the manifold from the block, and I loosen off completely the downpipe support bracket as above. Then I fully tighten the jt and then re-tighten the manifold to the blok. Last, I secure the downpipe bracket at the bottom.
After several heat / cool cycles, the downpipe will conform to your chosen position for it.
|
|
bobh
Rover Rookie
Posts: 29
|
Post by bobh on Jun 24, 2018 10:19:38 GMT
Thanks for your advice on the sequence- I’m hoping to get to it this week.
|
|
|
|
Post by stan on Jun 26, 2018 16:50:13 GMT
Thanks for your advice on the sequence- I’m hoping to get to it this week. Good luck with it, sadly a lot of this is trial and error especially on 50 plus year old designs. I am new to Rover engineering with this car, some of it frankly is just annoying but once you get into their mindset its actually pretty simple and clever, although I still get fed up when I have to take half a dosen things out just to do a regular service item? 😀😀😀 |
|
break23m
Rover Rookie
Getting a 3 Litre Mk II automatic back on the road
Posts: 49
|
Post by break23m on Jan 2, 2024 13:03:07 GMT
A thank you to all contributers to this thread, very helpful to understand the problem. My car has the same problem, a leak at the joint between the outlet manifold and the downpipe. A generous helping of gun gum applied by the Rover specialist has fallen out. A rapair with some other Holts product is not exactly working as hoped for.
I understand this is a more or less flexible joint. Is there a risk if i try to fasten the three nuts on the flange a bit more?
|
|
|
|
Post by lagain on Jan 2, 2024 16:56:21 GMT
If it aligns correctly it should not leak and the bracket should tighten it up. Probably best to loosen everything off and see if the pipe is a good fit against the manifold. Support the exhaust system under the car, then get the down pipe to fit with the manifold, tighten that and then work to the rear.
|
|
break23m
Rover Rookie
Getting a 3 Litre Mk II automatic back on the road
Posts: 49
|
Post by break23m on Jan 4, 2024 19:41:25 GMT
I'm a bit confused about the clamps of the manifold. All the pictures I find on Google show the curved side in sight, flat side at the manifold. I read here they should sit the other way around? Can anyone post a picture of that?
|
|


