|
|
Post by lagain on Dec 14, 2021 19:35:26 GMT
A couple of times last summer I thought that my car pulled to the one side when braking. It only did it a couple of times, but when I took the front wheels off I noticed that the offside brake pads had worn more than the nearside and the offside wheel was dirtier on the inside. Rather than try to locate the problem, time for a complete re-rubber, even though I only did it about 5 years ago, apart from the Goodrige hoses. I thought that Goodridge hoses were 'fit for life' but as they were number one suspect I have bought some more as, I suppose 30 years is quite a long time ! I have now re-rubbered the rear wheel cylinders, which were already showing signs of sticking. It took longer to get the shoes back on than replacing the rubbers, why are the springs so strong - or am I getting weak. I have also done one front caliper and fitting the dust boots with the copper rings took ages. I would imaging that the dust boots are not always replaced.  |
|
|
|
Post by higgspeed on Dec 15, 2021 6:51:11 GMT
good move👍 i need to do the same. quite satisfying to do it all yourself. i am looking forward to doing mine
|
|
|
|
Post by lagain on Dec 15, 2021 21:20:35 GMT
I eventually found it easier to fit the rubber dust covers on the front calipers if the piston was 'up' and fitted the cover from below, which means that gravity keeps the copper ring in the cover until the cover is seated, but you need lots of patience !
|
|
|
|
Post by tarnowl on Jan 26, 2022 9:09:48 GMT
The two near side doors are now etch primered after the replacement of the lower 5 inches. I am really pleased with the result and alignment too. <button disabled="" class="c-attachment-insert--linked o-btn--sm">Attachment Deleted</button> Well, the repairs to the rear drivers side wing have caused more than a few headaches. After stripping, the top line showed evidence of a previous repair and some holes could be seen. It was decided that the best solution was to cut out the top line of the wing and weld in a replacement. The fabrication of the part is particularly difficult as it curves in three directions at the same time! Expansion and contraction can sort one, yet throw out another. Several attempts were made by someone with far greater experience than I and finally, we have arrived at the correct curvature allowing it to lie correctly, before being welded into place! Attachment Deleted |
|
|
|
Post by Phil Nottingham on Jan 26, 2022 9:13:40 GMT
A very neat job
|
|
|
|
Post by tarnowl on Feb 4, 2022 15:54:33 GMT
The replacement top edge of the rear wing is finally welded in position and lead loaded.  |
|
|
|
Post by johnwp5bcoupe on Feb 11, 2022 19:08:39 GMT
Winter start up time soon be spring  1 Unplug petrol pump 2 Crank until I have oil pressure 3 Connect petrol pump wait for the pump to prime the carbs 4 The best bit Fire her up! fired on first key turn then started second turn  still on AED  |
|
|
|
Post by tarnowl on Feb 23, 2022 7:45:58 GMT
Finally, the last of the door repairs, the driver’s door, receives it’s replacement lower quarter and repair to the inside corners where the rot had been. Just welding and attention to any resulting distortion from heat to do. Attachment Deleted Attachment Deleted Attachment Deleted |
|
|
|
Post by enigmas on Feb 23, 2022 22:00:43 GMT
Really nice work there Tarnowl. I wouldn't mind that anvil in my workspace. 😉 👍
|
|
|
|
Post by tarnowl on Feb 24, 2022 8:45:39 GMT
Sadly I cannot take credit for the excellent work Enigmas. It is the work of my skilled Dutch friend.😁
I am very lucky to have him helping me with this project.
|
|
|
|
Post by lagain on Mar 6, 2022 16:37:15 GMT
Took my coupe out for the first time this year, here she is at Fittleworth, in Sussex, she looks as lovely as she did when we first met 47 years ago.  |
|
|
|
Post by djm16 on Mar 16, 2022 0:54:56 GMT
Put a new piston and barrel in the chainsaw. Worryingly it started and ran well. These were Chinese manufactured copies of the Stihl components.
Then I replaced the burned-out motor start and run capacitors in the compressor and fixed the non-functional overheat cutout. I am sure the compressor runs quieter now too.
|
|
|
|
Post by p5andrew on Mar 16, 2022 16:01:07 GMT
Always such a worry when things appear to be going well! As you seem to have the golden touch just now, I wonder if you fancy solving the misfire to my P5B?
|
|
|
|
Post by dmaxwell on Mar 21, 2022 16:09:03 GMT
Well, after having a period of good running, the transmission decided to start acting up last week. It started making some loud grinding noises last Tuesday on my way to work and I nursed it home slowly. Had the thought that it might be the throw-out bearing coming loose. Pulled the transmission this weekend (had Friday scheduled off anyway), verified the throw out bearing was ok, changed the gear oil in the transmission but no change in symptoms! This was a used transmission to begin with and has been gone through about a year ago so I decided that age was catching up with it. So, this morning, I ordered a replacement transmission, a clutch plate (with the proper number of splines to match the input shaft of the transmission), a yoke for the driveshaft with the correct number of splines on it and a shifter so all will be new! I expect to get every thing in around the end of this week or early next week. Will have to redo the rear transmission mount to fit the new transmission but that should be the biggest item to get done. In the meantime I'll be driving the '63 Dodge truck to and from work. Not always a bad thing as the transmission will be shipped to my work location so having the truck there will be handy to get it home! I'll keep you updated as the work progresses.
David
California
|
|
|
|
Post by lagain on Mar 29, 2022 20:12:11 GMT
Fitted a new sump gasket to my auto gearbox today. The cork gaskets are hopeless, as soon as the bolts are tightened they spread and can even split before the 8lb/ft is reached. Fortunately I found a composite gasket on ebay and have fitted it. As I torqued it up it did not spread at all, even when I got to 12lb/ft, which hopefully will stop the fluid seeping through it.
I wonder why no one has done composite gaskets before.
|
|
|
|
Post by enigmas on Mar 29, 2022 22:42:34 GMT
Most trans pan flange surfaces have been deformed over their life, allowing for a poor mating/sealing surface. Also too much torque on the trans gasket George, no matter what the manual states...lower the torque rating and use inch pounds of torque instead (if you really have to use a torque wrench) rather than foot pounds for an even, lower loading on the gasket.
If the (cork) seal weeps, carefully check and fettle the sealing surface of the trans pan with a hammer, file (flat bastard) and straight edge. This will take time and patience but the pan will not leak or weep ATF afterwards when correctly done. Check the pan inverted on a flat surface with a .010" feeler gauge. If the gasket is squashed/crushed, too much torque has been applied.
|
|
|
|
Post by johnwp5bcoupe on Mar 30, 2022 8:26:55 GMT
I fitted the later aluminum sump cover last year no gasket is needed! used Honda Bond sealer on Andy's advice  |
|
|
|
Post by Sam Bee on Mar 30, 2022 19:16:32 GMT
On chatting to the local Landy agents about buying a composite gasket they told me that Land Rovers have not used sump gaskets for many years and recomended an 'instant gasket', a black goo which forms a very effective seal and never fully dries out. The bolts are torqued to 14 Ft/lbs.
|
|
|
|
Post by lagain on Mar 30, 2022 20:49:28 GMT
It was one of those cases where I should have followed the advice of; 'if it ain't broke don't fix it' as the old gasket had minimal leakage, if any, but I did the one on the engine sump and thought that as the one on the gearbox had been on it for a long time I would put a fresh one on. I 'dressed' it with silicone and only nipped up the bolts, while she was laid up for the winter, so no fluid in the sump for a while. Re-visited the bolts a few times as the gasket settled and only tightened the bolts until the gasket started to spread, which was way below the 8ft/lb. I then put the fluid in and after a few days there was staining on the newspaper under the sump and signs of leakage all around the sump, which is why I went down the composite route, which now seems OK, time will tell. Being a belt and braces type not sure about the black goo so will be interested to hear how that goes, Sam.
|
|
|
|
Post by enigmas on Mar 30, 2022 22:00:54 GMT
I fitted the later aluminum sump cover last year no gasket is needed! used Honda Bond sealer on Andy's advice I've never seen an alloy pan cover for a BW35/40/51 John, I'd be interesting to see one if you have a picture of yours. Below this is my pressed steel trans pan. 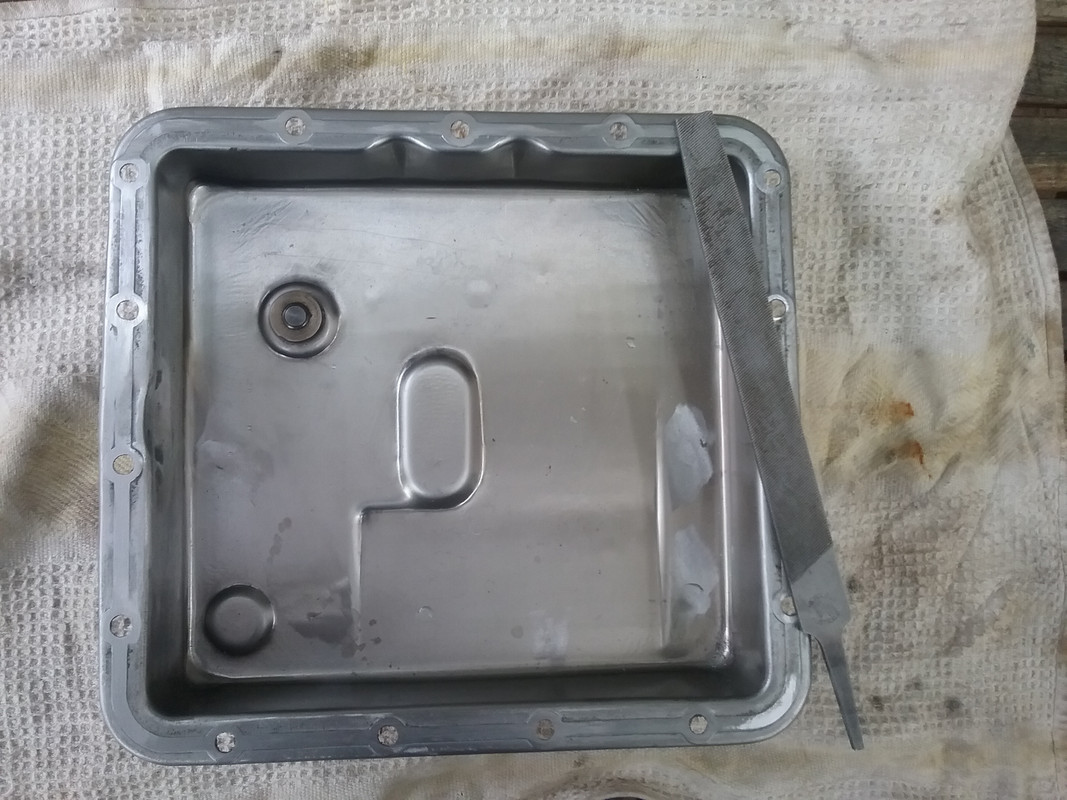 Some Blue Hylomar on the flange surface to retain the cork composite gasket. 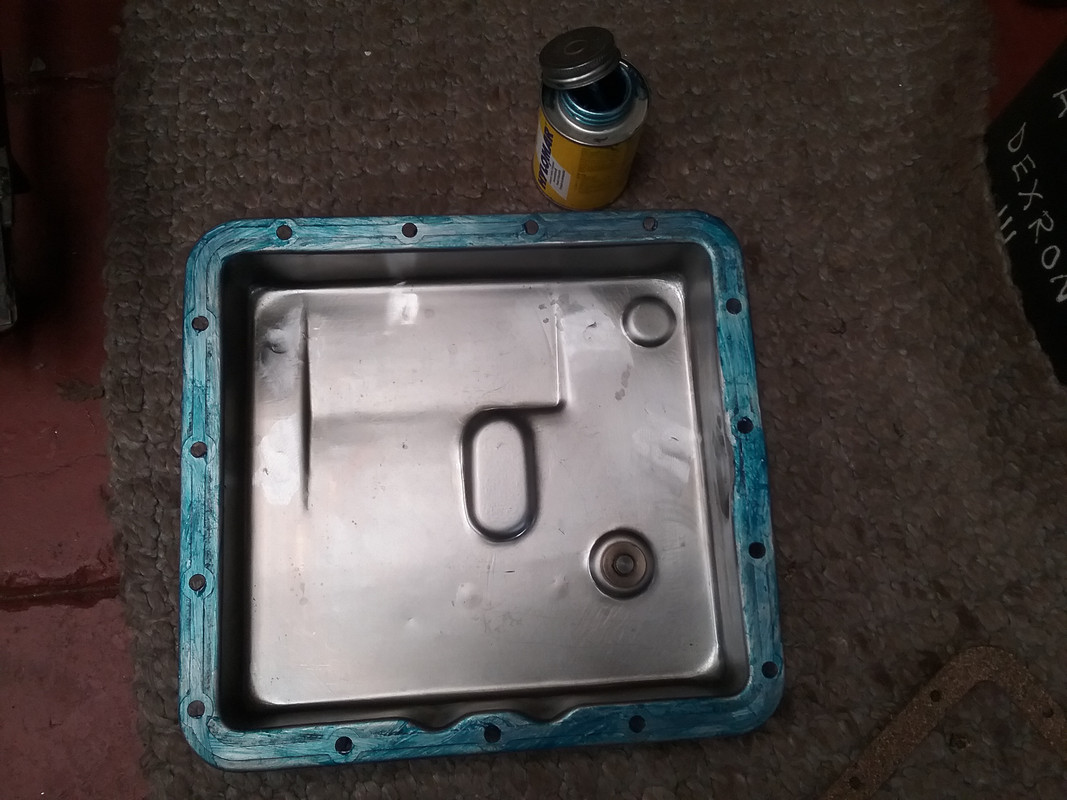 A smear of petroleum jelly on the surface that mates to the transmission flange. 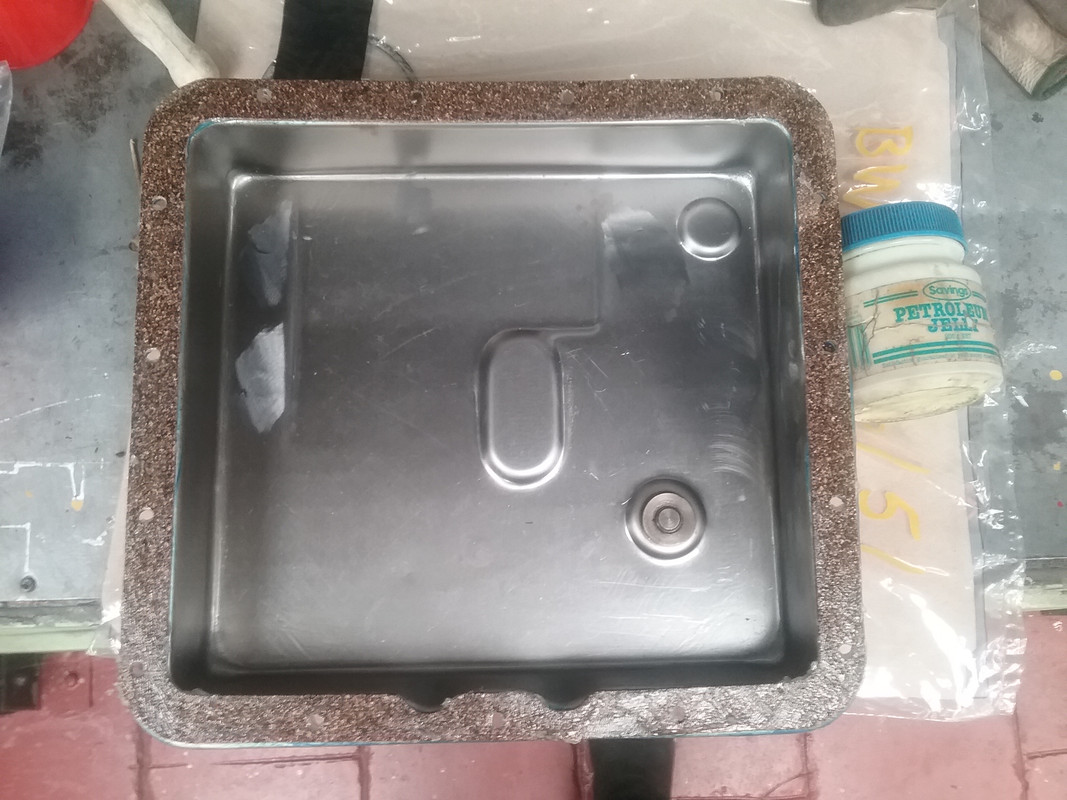 The transmission pan in situ...several years down the the track. No leaks. 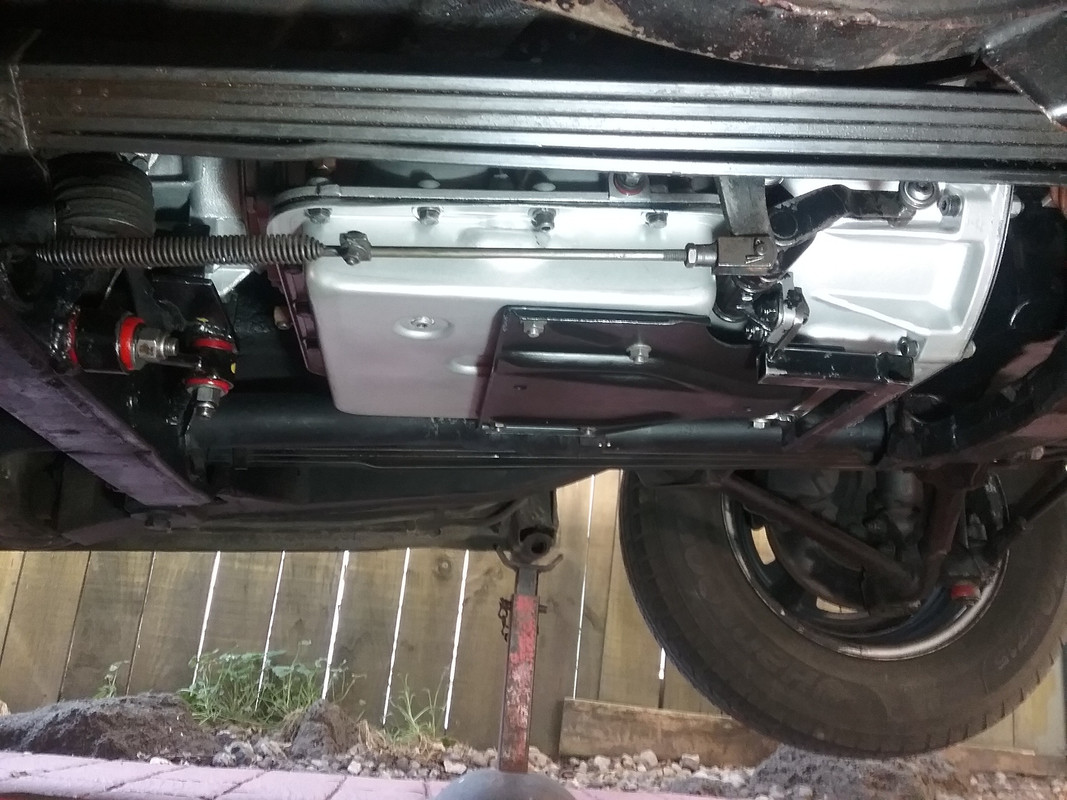 The remedy to a leaking pressed steel pan need not be arduous...simply some focused time spent ensuring the sealing/mating surfaces are made viable and the cork composite gasket is not over torqued or crushed. These steel pans over the decades have received considerable rough treatment. Obviously if you have an alloy pan at hand with a machined flange surface there's no excuse for a sealing issue. |
|
|
|
Post by johnwp5bcoupe on Mar 31, 2022 7:48:22 GMT
Morning Vince I didn't bother with pics sorry!
The thick cast ali pan is used on various cars like the Triumph Stag, it is a vast improvement! there is a port used for oil return which is easily sorted with a blank plug.
|
|
|
|
Post by tarnowl on Mar 31, 2022 7:54:02 GMT
I fitted the later aluminum sump cover last year no gasket is needed! used Honda Bond sealer on Andy's advice I've never seen an alloy pan cover for a BW35/40/51 John, I'd be interesting to see one if you have a picture of yours. Below this is my pressed steel trans pan. Some Blue Hylomar on the flange surface to retain the cork composite gasket. A smear of petrol jelly on the surface that mates to the transmission flange. The transmission pan in situ...several years down the the track. No leaks. The remedy to a leaking pressed steel pan need not be arduous...simply some focused time spent ensuring the sealing/mating surfaces are made viable and the cork composite gasket is not over torqued or crushed. These steel pans over the decades have received considerable rough treatment. Obviously if you have an alloy pan at hand with a machined flange surface there's no excuse for a sealing issue. |
|
|
|
Post by tarnowl on Mar 31, 2022 8:02:01 GMT
Hi Enigmas,
I will need to do this in due course, but I note that you have used Blue Hylamar on only one side of the cork gasket and Petrolium Jelly on the other. Why is this? I had assumed that one would use the Blue on both sides?
|
|
|
|
Post by enigmas on Mar 31, 2022 8:30:11 GMT
Hi Tarnowl,
I really could have used any good quality, sticky gasket goo type sealant (but definitely not silastic sealant) between the pan and the cork/composite gasket. I want it held permanently in place once it sets. The other side of the gasket, faces a smooth, alloy machined flange face. The smear of petroleum jelly is to ensure the pan with attached gasket releases easily from the transmission for any adjustment or cleaning if required. The gasket surface remains undamaged if not overly torqued down and conforms perfectly to the transmission flange face.
I hope that clarifies the process for you.
|
|
|
|
Post by tarnowl on Apr 1, 2022 7:11:04 GMT
Many thanks Enigmas. I had assumed that Hylamar would be needed on both faces to ensure that a seal was made, to avoid any leakage of ATF, but clearly, there is no sign of leakage evident and the compression at the correct torque with Petrolium Jelly appears sufficient.🤔
|
|


 still on AED


