|
|
Post by kiwip5b on Nov 24, 2012 3:57:52 GMT
I am far too lazy to refurbish my own springs so have just had a set of J R Wadhams new ones fitted, including new front and rear bushes and Spax adjustable dampers. All this was supposed to cure the rampant axle tramp but hasn't! I don't mind that the rear of the car now looks a little too high as I'm sure the springs will settle with time. Trouble is, now added to the axle tramp is a terrible howl from what sounds like a rear tyre between 30 & 35 mph. How did that get there?!
Any ideas for the source of the howl (I suspect a wheel may have lost a balance weight) and why I am still getting axle tramp would be gratefully received.
|
|
|
|
Post by johnwp5bcoupe on Nov 24, 2012 6:45:20 GMT
I am far too lazy to refurbish my own springs so have just had a set of J R Wadhams new ones fitted, including new front and rear bushes and Spax adjustable dampers. All this was supposed to cure the rampant axle tramp but hasn't! I don't mind that the rear of the car now looks a little too high as I'm sure the springs will settle with time. Trouble is, now added to the axle tramp is a terrible howl from what sounds like a rear tyre between 30 & 35 mph. How did that get there?! Any ideas for the source of the howl (I suspect a wheel may have lost a balance weight) and why I am still getting axle tramp would be gratefully received. If you had axle trap/spring wrap before, you have enhanced the problem by raising the height, tramp is caused by the prop trying to wind up the springs a bit like a starting handle action! Have you had the prop apart? if so did you put the centre flange back in the correct position? when you accelerate from standstill hard what effect do you get? The prop joints should look like this all the joint is the correct plain? you can if you dont mark the centre spigot get the rear prop 90 degrees out of phase looks ok but will cause tramp  roverp5.proboards.com/index.cgi?action=display&board=rover12&thread=5781&page=1 roverp5.proboards.com/index.cgi?action=display&board=rover12&thread=5781&page=1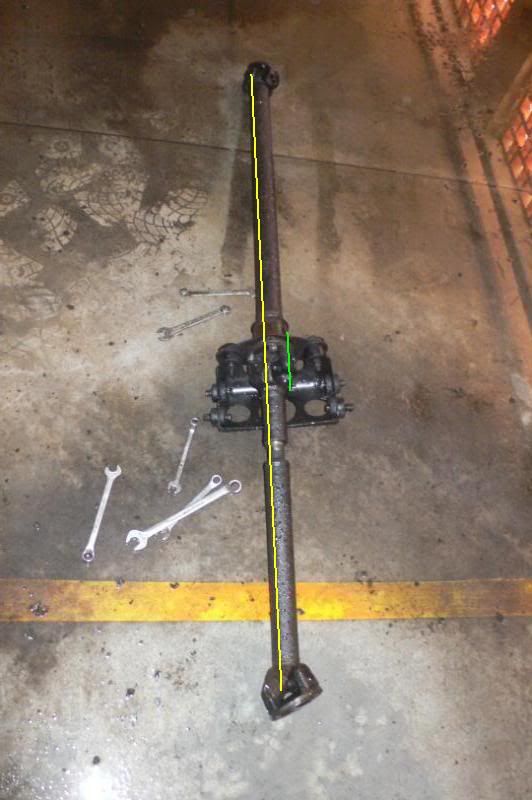 |
|
|
|
Post by kiwip5b on Nov 24, 2012 7:09:18 GMT
Thanks John, I've not had the propshaft apart but the car has suffered axle tramp since I bought it so the previous owner may have got the shafts out of phase. It's when accelerating away from rest and around slow corners that the tramp occurs.
|
|
|
|
Post by johnwp5bcoupe on Nov 24, 2012 7:50:22 GMT
Thanks John, I've not had the propshaft apart but the car has suffered axle tramp since I bought it so the previous owner may have got the shafts out of phase. It's when accelerating away from rest and around slow corners that the tramp occurs. It sounds like the prop is out of Phase? If you drop me an email I will send you some info  |
|
|
|
Post by stan on Nov 26, 2012 11:31:10 GMT
Excellent guide. Incidentally the plastic lids from Pringles crisps are probably a perfect size for those shims. I have used them in the past. Other options : plastic lids from powdered baby milk tins, Bisto gravy and more. The kitchen is a useful resource for the Classic restorer. The rubber seals from Grolsch bottle tops are the perfect size for Wolseley 15/50 steering rack mounts and many more cars! ;-)
|
|
|
|
Post by kiwip5b on Feb 7, 2013 22:31:25 GMT
Thanks John, I've not had the propshaft apart but the car has suffered axle tramp since I bought it so the previous owner may have got the shafts out of phase. It's when accelerating away from rest and around slow corners that the tramp occurs. It sounds like the prop is out of Phase? If you drop me an email I will send you some info Fitting new driveshaft bearings and centre mount bushes, as well the propshaft alignment suggested by John, have together cured my P5B's 'axle tramp' (which clearly wasn't that at all!). As a result, I was able to look objectively at the J R Wadhams 'heavy duty' rear springs that I'd fitted in an attempt to cure what I thought was axle tramp. The Wadhams springs have two fewer leaves for the same total thickness at the centre bolt, meaning that each leaf is thicker, altering the spring rate. I found they had a number of serious drawbacks, namely: - They raise the rear of the car, approx. 3.5cm at the rear axle centreline, which makes the car look very 'wrong'
- They are much harder than the originals and the only way I could get a decent ride was to drive around with the old springs in the boot!
- As a result of these first two points, they accentuate the effects of any wear in the driveline and, on my car at least, they created a terrible howl from what seemed to be the left rear tyre
Faced with these limitations, I had the old sprungs checked, refurbished and refitted, obviating all the problems described above. The only drawback of the old springs is that the car appears to sag slightly at the right-rear corner. I believe this is due to the large and heavy boat battery currently installed, which fills the available space in the battery box. Both of the original springs exhibit the same spring rate and unloaded dimensions when tested off the car, so the battery explanation seems highly plausible. As for the J R Wadhams springs, I would say they would be of use if you often have passengers in the rear seat, a heavy load in the boot or do a lot of unbalanced towing. Otherwise, they belong on a light truck (if any existed with Rover's peculiar spring end mounts). |
|
|
|
Post by enigmas on Feb 8, 2013 0:12:00 GMT
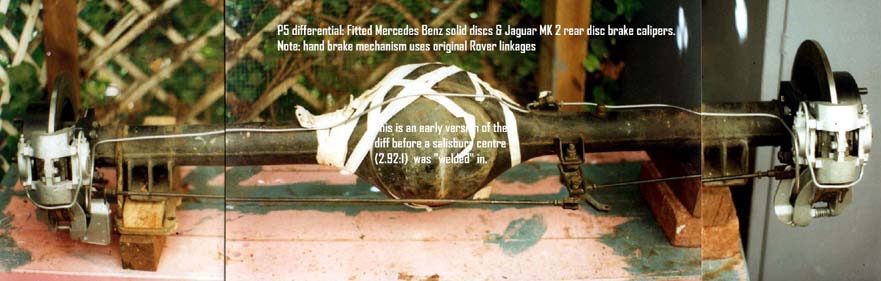
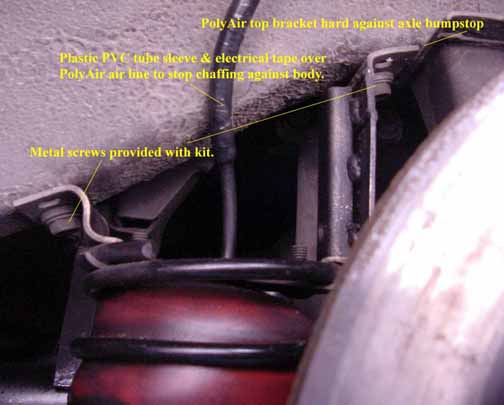
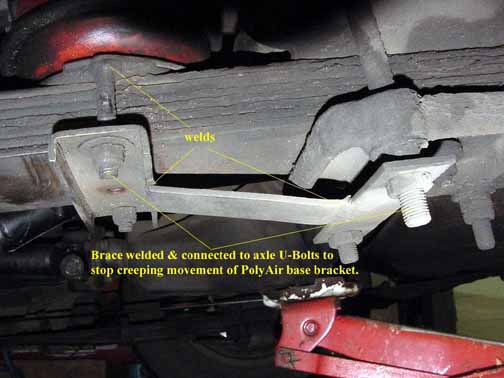
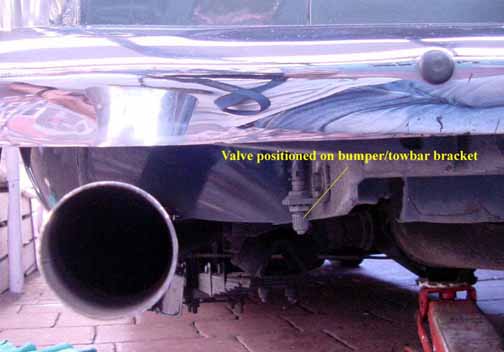
Why not fit a set of 'Polyairs' to your car. They perform several functions including: levelling the rear of the vehicle, acting as an overload spring when required, resisting spring wind-up under heavy torque or acceleration. They are also passive to the suspension as they are low pressure and can be inflated to recommended pressures with a bicycle pump...literally a few strokes. Polyairs are also long lasting...mine have been on my vehicle for 20years now and it is a daily driver. I stay away from the 'whole leaf spring drama' as few if any companies involved in refurbishing springs can ever get the camber correct. Here's a pic of my 'polyairs' in situ. 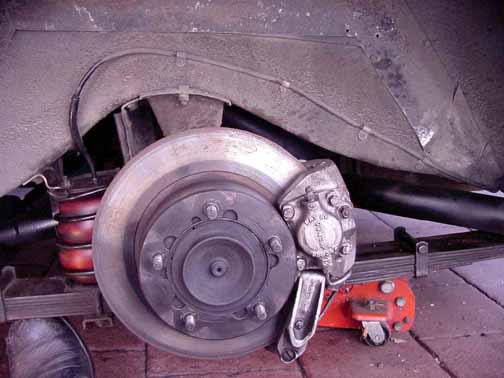 If you are interested I'll post more detail pix of the mounting method |
|
|
|
Post by kiwip5b on Feb 9, 2013 21:55:03 GMT
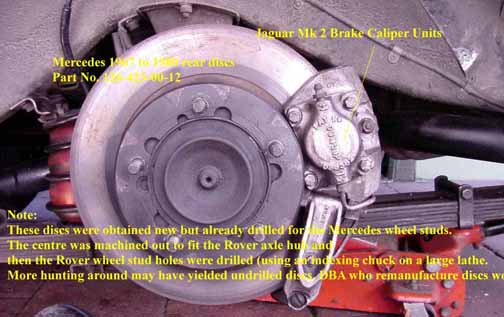
Thanks Enigmas, can the air springs be used to level side to side as well as front to rear? I like your disc brake conversion too, what are they from?
|
|
|
|
Post by enigmas on Feb 10, 2013 12:16:12 GMT
|
|
|
|
Post by barryr on Feb 10, 2013 16:15:49 GMT
Shame but I can't see any of the pics in pro boards on ipad. Is it just me?
|
|
|
|
Post by kiwip5b on Feb 13, 2013 6:55:20 GMT
Photos visible on this side of the world all is now clear regarding both the air springs and the brake mod's. thanks |
|
Deleted
Deleted Member
Posts: 0
|
Post by Deleted on Jan 17, 2014 9:23:20 GMT
Although the springs on my rover had only flattened slightly I was concerned they would put new Y mounts under strain from shear. I made the position of the new high tensile bolts adjustable and added a sliding 4mm plate inside the mount to make it stronger. Even with the boot full and passengers in the seats the mount is now only under compression and when I do get new springs etc it can be adjusted to suit.  |
|
Deleted
Deleted Member
Posts: 0
|
Post by Deleted on Jan 17, 2014 10:16:20 GMT
Although the springs on my rover had only flattened slightly I was concerned they would put new Y mounts under strain from shear. I made the position of the new high tensile bolts adjustable and added a sliding 4mm plate inside the mount to make it stronger. Even with the boot full and passengers in the seats the mount is now only under compression and when I do get new springs etc it can be adjusted to suit. Kev, I'm always interested in any mods to the "Y" mounts but I can't make out what you've done from the image you've posted. Can you point out how the sliding plate is working and what high tensile bolts you're referring to? Sorry if I'm a bit thick but I can't see how it's working from that image. Thanks. |
|
Deleted
Deleted Member
Posts: 0
|
Post by Deleted on Jan 17, 2014 12:08:23 GMT
The bolts in the bottom of the mount were removed and the holes turned into slots. A steel plate was placed inside the mount laying flat on the base and two holes were drilled in that to allow the bolts to drop through. You can see the underside of the plate through the holes in the top picture.The bolts are high tensile they fit very close to the sides of the mount and the heads were ground on one flat to allow them to slide backwards and forwards. The picture shows the bolts pushed through the holes,after this they were welded to the plate to stop them trying to turn as the nuts were fitted. 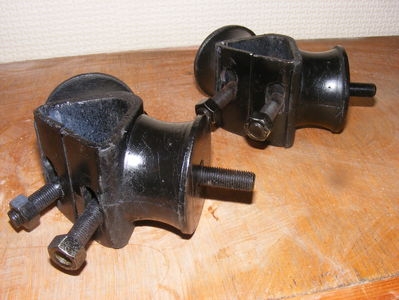 |
|
Deleted
Deleted Member
Posts: 0
|
Post by Deleted on Jan 17, 2014 12:59:55 GMT
The bolts in the bottom of the mount were removed and the holes turned into slots. A steel plate was placed inside the mount laying flat on the base and two holes were drilled in that to allow the bolts to drop through. You can see the underside of the plate through the holes in the top picture.The bolts are high tensile they fit very close to the sides of the mount and the heads were ground on one flat to allow them to slide backwards and forwards. The picture shows the bolts pushed through the holes,after this they were welded to the plate to stop them trying to turn as the nuts were fitted. Thanks for clarifying. A neat solution to reduce the shearing force. For even flatter springs the elongation could be increased considerably. |
|
Deleted
Deleted Member
Posts: 0
|
Post by Deleted on Jan 17, 2014 17:25:41 GMT
The old Y mounts were in a bit of a state.  |
|
Deleted
Deleted Member
Posts: 0
|
Post by Deleted on Jan 17, 2014 19:37:17 GMT
The old Y mounts were in a bit of a state. I can see that the modified bracket is about 1/4" inwards of the spring compared to this old image. That should take a good part of the shearing force away. Good solution. My old mountings looked very similar to yours but were still very sound and holding well to the metal. The rubber was still serviceable and there was less cracking than the new ones I fitted a couple of years ago have now. A testament to the quality of the original metalastic rubber formulation which has now been lost to us due to various regulations. In fairness to the new stuff, the rear springs on the majority of P5's have lost their camber to some degree so the new "Y" mountings have more shearing to contend with. Interestingly, your original mountings have the extra large washer inside as did mine but the new "Y" bush leaves no room inside the mounting bracket. I reused the large washers on the outside of the mounting bracket where you have used the original small washer. I don't suppose it matters. |
|
Deleted
Deleted Member
Posts: 0
|
Post by Deleted on Jan 18, 2014 9:47:50 GMT
The old mounts looked worse than they were as they had been covered with underseal which had gone hard and cracked,one was coming away from the metal.
I had tried making mounts from engine mountings and had found some machinery mounts that were strong enough. In the finish I bought the Y mounts from Wadhams and they do seem to be very well made.
|
|
onepick
Rover Rookie

Posts: 19  Location: Harrogate
|
Post by onepick on Mar 9, 2016 19:38:39 GMT
Looking to refurbish my coupe's rear springs and have approached Owens (Rotherham) for price etc. Owens have requested the OE part No for the springs - can anyone assist please, many thanks.
|
|
|
|
Post by johnwp5bcoupe on Mar 9, 2016 21:10:17 GMT
Looking to refurbish my coupe's rear springs and have approached Owens (Rotherham) for price etc. Owens have requested the OE part No for the springs - can anyone assist please, many thanks. As Per Parts Manual :- Main Leaf 600972 Road Spring 553899 |
|
onepick
Rover Rookie
Posts: 19
Location: Harrogate
|
Post by onepick on Mar 10, 2016 11:19:11 GMT
Looking to refurbish my coupe's rear springs and have approached Owens (Rotherham) for price etc. Owens have requested the OE part No for the springs - can anyone assist please, many thanks. As Per Parts Manual :- Main Leaf 600972 Road Spring 553899 Many thanks, need to get myself a parts manual sometime!! |
|
|
|
Post by Chuck Berry on Mar 11, 2016 7:43:22 GMT
Available to the membership from the P5 Regalia Shop £29 plus posting. Covers all models
|
|