Geoff
Rover Rookie

Posts: 46
|
Post by Geoff on Aug 8, 2012 9:12:31 GMT
Hello again from Adelaide. Well, after several calls for assistance from this forum, and all very helpful answers, after around 3 years I think I should share the results of your advice and local restoration. I went for a drive yesterday and would like to share some photos of the trip with all of you, as well as a very short travelogue of some local sights.  The first two photos were taken at a place called Woodhouse, an old farm house in the Adelaide Hills and now used by Scouting for their South Australian headquarters and camping grounds. 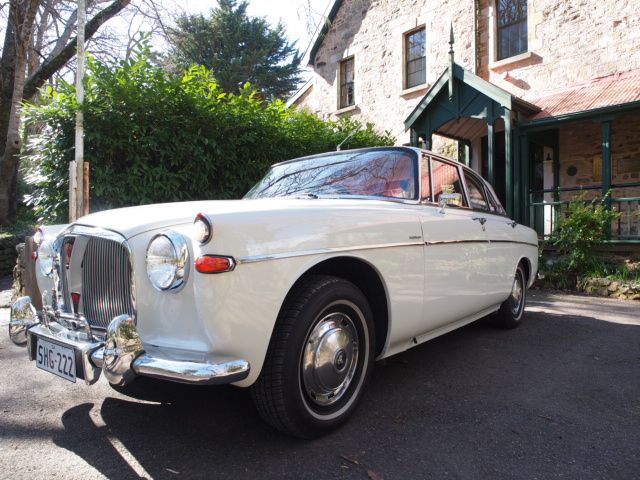 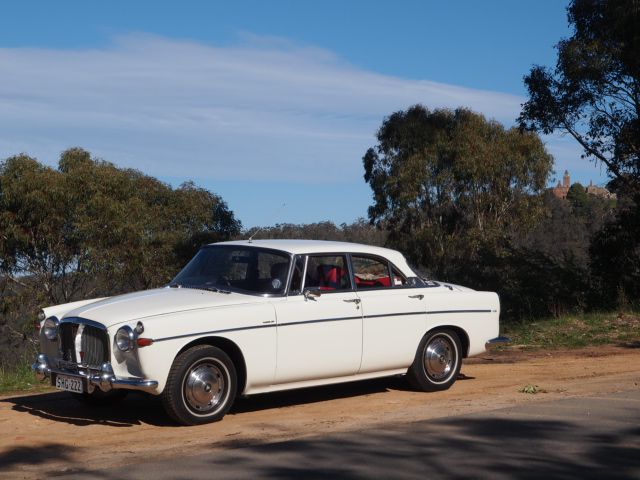 Photo of the car in the Adelaide Hills along Montacute Rd. Spot the castle! 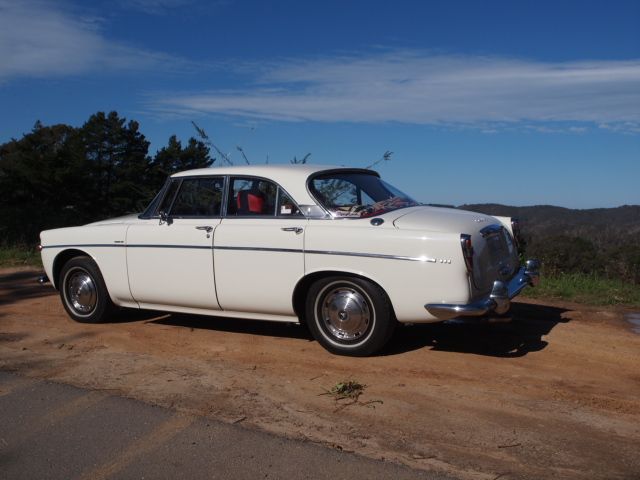 Same spot, but a rear aspect of the Rover. A nice sunny day. 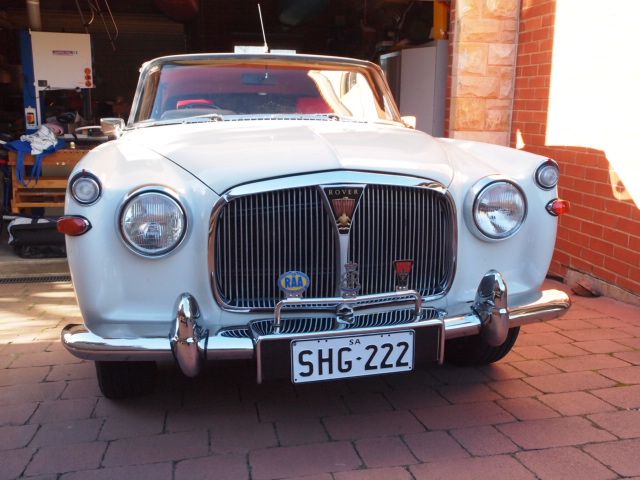 Front view of the car. Bit of a wide angle lens used, but the effect is good. 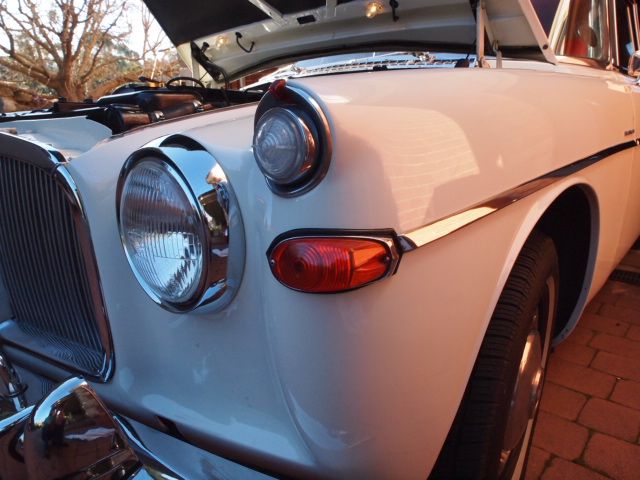 Front close-up of paint and chrome. 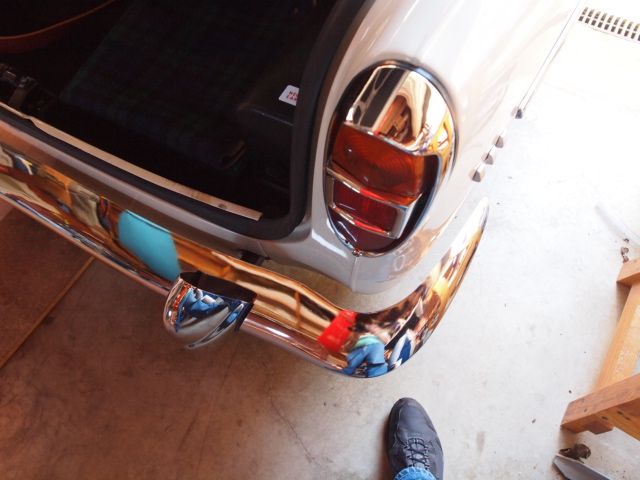 rear close-up of chrome and foot!  Photo of boot area. Scotch in the picnic basket last time I looked! 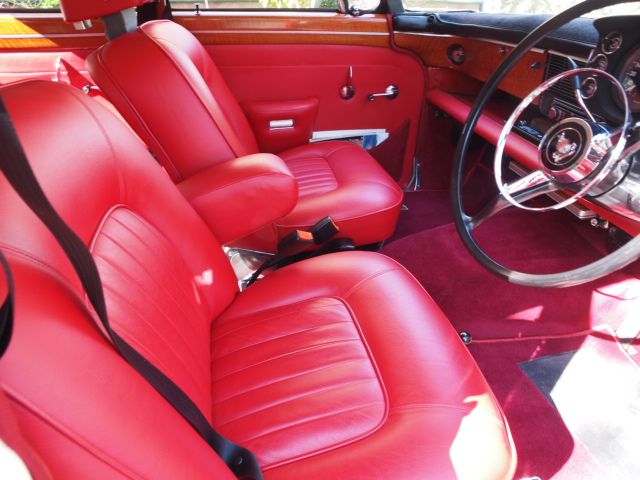 View of the interior. I re-veneered all the wood myself, but 6 red cows sacrificed themselves (via Andrew Muirhead) for the leather. Carpet is Wilton. 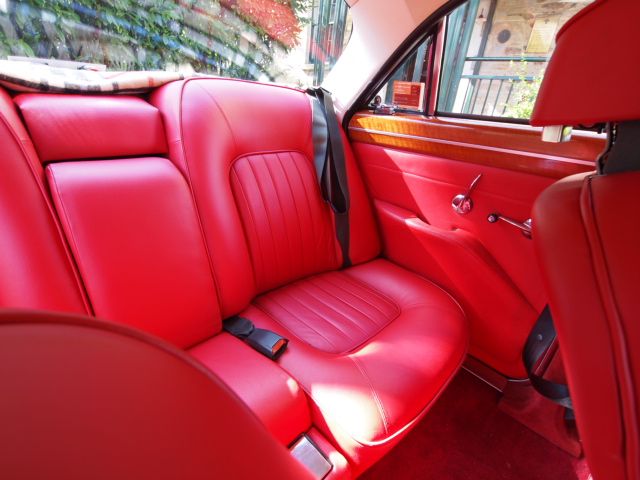 Interior photo of the rear seats.  Engine bay area. The engine has been completely stripped and reconditioned to as new specifications. Can you spot the variation from original?  If you couldn't, here it is. The luxury of a 123 Electronic Distributor, currently on curve 5 and the engine running well. 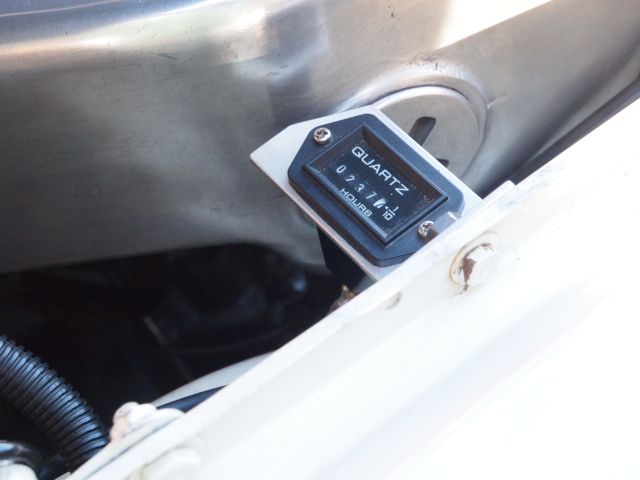 My "other" change, this time an Hourmeter which is indicating total engine run time. I think it is a good indicator of engine use and therefore service intervals. It started running once the reconditioned engine was re-installed. I hope you like these photos. Again, many thanks to all who have answered my several questions on this forum, and I am sure that I may have some more in the future. Now to get out and drive it some more..... ;D Cheers, Geoff. |
|
Deleted
Deleted Member
Posts: 0
|
Post by Deleted on Aug 8, 2012 9:36:02 GMT
A beautiful car in fantastic settings.  Thanks for posting those images. |
|
|
|
Post by Gordon Harrower on Aug 8, 2012 10:52:48 GMT
A really nice array of pictures of a beautiful car--thanks. I need to find some red cows...
|
|
|
|
Post by Warwick on Aug 8, 2012 11:19:05 GMT
Wow Geoff. Wow!
I suspect the purists may disagree but I've always preferred the look of the Rostyles (Phil reckons they're naff) over the 3-litre's wheel caps and trim. However, coupled with the narrow band whitewall, they look sensational. But I don't know why.
|
|
|
|
Post by Roy of the Rovers on Aug 8, 2012 12:18:11 GMT
Very nice indeed, love the look of the wheels and tyres along with the clean colour, chrome and interior.. Pleasing to the eye and I bet a dream to drive |
|
|
|
Post by bebopdeluxe on Aug 8, 2012 13:54:54 GMT
Love it. A superb example. Well done  I have sent you an e-mail I have sent you an e-mail  |
|
|
|
Post by stever on Aug 9, 2012 10:10:51 GMT
It's a fantastic looking car Geoff, the attention to detail shows. Great job on the wood too! They look great in white, I'd happily own a white one.
Is yours an export model?
Is '66 or '67?
I'm curious to know how close it is to mine.
Thanks
Steve
|
|
Geoff
Rover Rookie
Posts: 46
|
Post by Geoff on Aug 9, 2012 11:45:52 GMT
Hi Stever, The car is an export model, identified by the chassis number commencing in 811 which places it as a Rover 3-Litre Mk3 Coupe Export Model, Auto RH drive, which it is Actual number is 81100070A so I suppose it was the 70th export Coupe they built. maybe someone can confirm this? Build date was in 1966, but first registered on the road in 1967. In Adelaide, the local Agents were Champions Pty Ltd, long since gone. Now its just me and the Rover Car Club of South Australia ;D Cheers, Geoff. |
|
|
|
Post by Warwick on Aug 10, 2012 2:38:43 GMT
I've always preferred the look of the Rostyles (Phil reckons they're naff) over the 3-litre's wheel caps and trim. However, coupled with the narrow band whitewall, they look sensational. But I don't know why. Doesn't anyone else think that the white stripes somehow enhance the wheel covers? |
|
|
|
Post by stever on Aug 10, 2012 4:55:02 GMT
Hi Stever, The car is an export model, identified by the chassis number commencing in 811 which places it as a Rover 3-Litre Mk3 Coupe Export Model, Auto RH drive, which it is Actual number is 81100070A so I suppose it was the 70th export Coupe they built. maybe someone can confirm this? Build date was in 1966, but first registered on the road in 1967. In Adelaide, the local Agents were Champions Pty Ltd, long since gone. Now its just me and the Rover Car Club of South Australia ;D Cheers, Geoff. Hi Geoff, It looks like ours are 27 cars apart! I still don't know if I like this thing on the glove box or not, I have a spare glove box so I could always do a swap. Please ignore duct tape under dash it's no longer there  Cheers Steve |
|
Geoff
Rover Rookie
Posts: 46
|
Post by Geoff on Aug 12, 2012 4:16:59 GMT
Steve, In my opinion one of the features of the P5 cars is the "leather and wood" and the beautiful strip of polished walnut (or similar) wood across the facia stretching from door to door. When I got my car, there was a Rover logo stuck on the glovebox door, but I think it looks much better with it not being there, so it was removed. This way, the full beauty of the wood can be revealed. 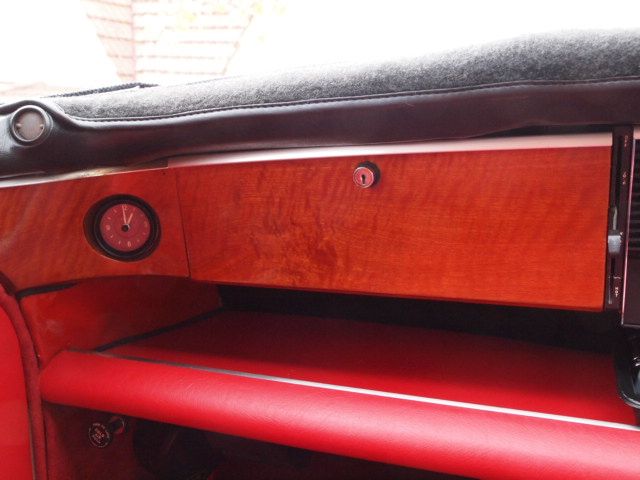 The photo above is how the glove box door now looks. The two holes left by the logo mounting have completely disappeared, they being well disguised through the application of a furniture restorer's secret trick  now revealed to all as "Liberon" brand restorers wax. These are hard wax strips coloured to the exact colour of your (finished) wood, (you can get many shades) and are rubbed in to the blemish with a small putty knife or similar, then polished over and the blemish has gone. Used all the time on tables and high polish surfaces. Maybe if you decide to remove the plaque the glove box door can be still look as new as original without any mounting marks seen . 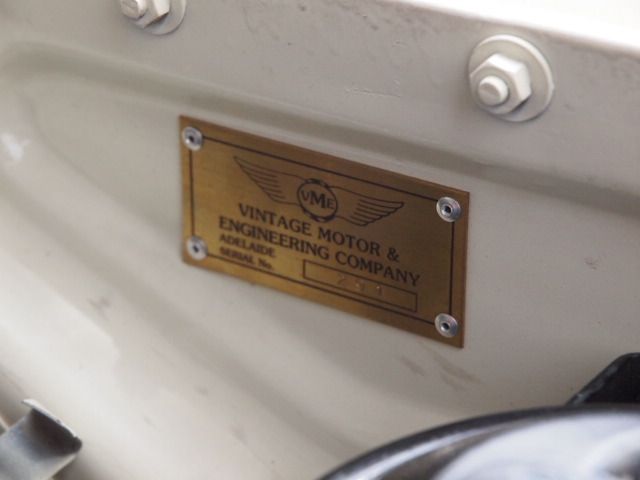 I also have a "plaque" which is placed in the engine bay by the engine restoration people. It's not too "bling", and in keeping with the typical Rover image of the period, discreet. Maybe this is where you can place yours if you do end up removing it? Cheers, Geoff. |
|
|
|
Post by bebopdeluxe on Aug 12, 2012 5:28:22 GMT
Personally I think that looks much better then before I like the engine bay plaque too |
|
|
|
Post by enigmas on Aug 12, 2012 5:33:04 GMT
Beautiful car Geoff. How is the engine hour meter hooked up? ~ Vince
|
|
Geoff
Rover Rookie
Posts: 46
|
Post by Geoff on Aug 12, 2012 10:32:14 GMT
Hello Vince, thanks for the comments If I remember correctly, the hourmeter is connected to the ignition switch position so it commences running when the ignition is on. This was achieved by connecting on the fused side of fuse 2, (the second one down from the top bank of fuses) which is only active once the ignition switch is in "on" position 1. It was relatively easy because there was a spare spade connector there. If you just have the ignition on without having the car running, you can hear the hourmeter clicking away. I don't have this condition on very much anyway, so I am OK with the hourmeter giving a relatively accurate reading of total engine hours. This connection in the Rover P5 was relatively easy to do. I put one also into my Discovery 4, and this was an entirely more difficult can of worms  Cheers, Geoff |
|
|
|
Post by stever on Aug 13, 2012 3:14:15 GMT
Steve, In my opinion one of the features of the P5 cars is the "leather and wood" and the beautiful strip of polished walnut (or similar) wood across the facia stretching from door to door. When I got my car, there was a Rover logo stuck on the glovebox door, but I think it looks much better with it not being there, so it was removed. This way, the full beauty of the wood can be revealed. The photo above is how the glove box door now looks. The two holes left by the logo mounting have completely disappeared, they being well disguised through the application of a furniture restorer's secret trick now revealed to all as "Liberon" brand restorers wax. These are hard wax strips coloured to the exact colour of your (finished) wood, (you can get many shades) and are rubbed in to the blemish with a small putty knife or similar, then polished over and the blemish has gone. Used all the time on tables and high polish surfaces. Maybe if you decide to remove the plaque the glove box door can be still look as new as original without any mounting marks seen . I also have a "plaque" which is placed in the engine bay by the engine restoration people. It's not too "bling", and in keeping with the typical Rover image of the period, discreet. Maybe this is where you can place yours if you do end up removing it? Cheers, Geoff. Hi Geoff Thanks for posting photo of glove box and tips on restorers wax. I agree with your opinion on the P5 interior and I believe they need no further embellishment. So I'll be removing the plaque and I'll look for a suitable place in the engine bay, maybe just above the fan motor on the bulkhead, it's a bit too big to go anywhere else. (85mm x 100mm) Cheers Steve. |
|
|
|
Post by Phil Nottingham on Aug 13, 2012 19:30:51 GMT
Truly marvelous - the wood and especially look better than new but not "modern" either
|
|
tonys
Rover Fanatic

Posts: 419
|
Post by tonys on Aug 14, 2012 19:07:25 GMT
That looks absolutely fabulous, well done. The interior looks, in particular, looks superb. It's a long time since I've seen a Mk111 P5 looking that good.
|
|
Geoff
Rover Rookie
Posts: 46
|
Post by Geoff on Aug 15, 2012 7:53:03 GMT
Thanks all for your kind comments it has taken some time but has been worth it. Latest technical job was to get rid of an intermittent fault with the braking system, which infrequently let the brake pedal travel further than it should. A quick stab of the brake pedal restored it for some time. Problem was two ill-fitting seals in the master cylinder, one being too big and not sealing, and the other a reversed seal. So much for giving the job to "experts"  . Now functioning properly. 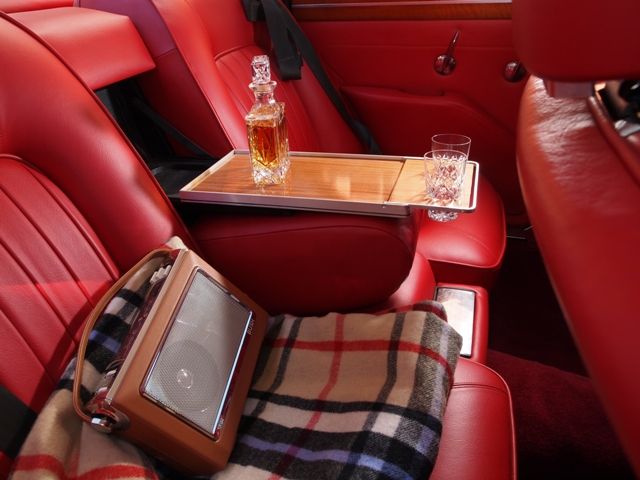 Just couldn't resist one more photo of the car, this time the rear interior showing the pull-out tray and "accessories". You need to know that finding two fitting glasses was quite expensive, not because the actual glasses were expensive, but because while looking in several antique shops for them, SWMBO found several other items of interest as well, none of which were for the car..... Yes, it's Scotch. Any Forum visitors are welcome to sample ;D Cheers, Geoff. |
|
Deleted
Deleted Member
Posts: 0
|
Post by Deleted on Aug 16, 2012 8:03:13 GMT
Great looking car Geoff. Enough to make anyone enthousiastic about the brand!
As for the whisky expect me sometime soon!!
|
|
|
|
Post by parispp on Aug 17, 2012 9:04:12 GMT
WOW - Can I say - inspirational. (or aspirational!). Im still ordering bit and pieces before starting! What I find interesting in one shot is the interior front door trim (red flock/rubber?). I found marks on the wood in these places and assumed some sort of trim was there - and was told the wood was 'added' which I thought was bollocks. I thought there would be trim there - and looking at your pic it seems there is..... this will be helpful when I take it in for the interior (exterior first) - the engine bay - again WOW
|
|
Geoff
Rover Rookie
Posts: 46
|
Post by Geoff on Aug 19, 2012 8:46:25 GMT
Hello Parispp, Thanks for the nice comments. The "red flock/rubber" is called "Furflex" and it is used as a draught sealer around the door edges. Photo attached shows the furflex close up. 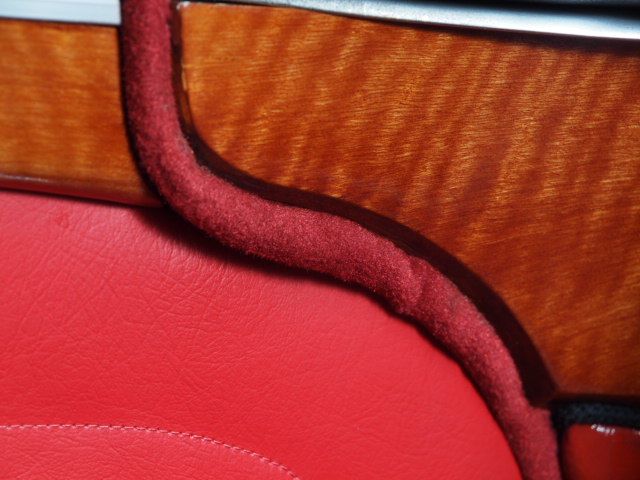 It's made from a velvet-type cloth and its cross-section is circular, with a cloth tab running the full length which is used to attach the furflex in place, usually stapled to the wood trim or glued to metal. The furflex seal in the photo above was put in place by inserting the tab between the wood and the steel of the car body. As it runs down it is stapled to the wood backing of the kick plate trim. This product is readily available from auto trimmers, or from J R Wadhams in the UK. Many colours are supplied. Cheers, Geoff. |
|
|
|
Post by bebopdeluxe on Aug 19, 2012 9:01:49 GMT
|
|
|
|
Post by parispp on Aug 19, 2012 9:55:46 GMT
Brilliant - thanks for this Glenn - I saw 'FurFlex' listed on the parts and couldnt see where it went and assumed it was just carpet - great help - thanks! |
|
|
|
Post by bebopdeluxe on Aug 19, 2012 10:31:23 GMT
No probs |
|
|
|
Post by Warwick on Aug 20, 2012 4:26:29 GMT
Paris,
It's called windlacing here. I presume Furflex is the UK brand name for the fluffy type.
|
|


 Thanks for posting those images.


 now revealed to all as "Liberon" brand restorers wax. These are hard wax strips coloured to the exact colour of your (finished) wood, (you can get many shades) and are rubbed in to the blemish with a small putty knife or similar, then polished over and the blemish has gone. Used all the time on tables and high polish surfaces. Maybe if you decide to remove the plaque the glove box door can be still look as new as original without any mounting marks seen


 . Now functioning properly.