|
|
Post by Sam Bee on Nov 24, 2019 16:41:54 GMT
I fully support the advice given by John. One obvious question that comes to mind - have you undone the nut on the forward end of the Radius Rod? If not then to ease removal of that nut I would jack up the Bottom Link. Has the Torsion Bar Adjusting Arm actually moved, as they do stick / rust up; one of mine was solid even when soaked with PlusGas for a couple of days, so use of a large crowbar was necessary to free it and 'tapping' (sic) with a 4 pound hammer.
|
|
|
|
Post by Ken Nelson on Nov 24, 2019 18:20:25 GMT
Hi Sam, yes I have removed the nut at the forward end of the radius rod. I think you may well be correct about the Torsion Bar Adjusting Arm being rusted in place, so I will try working on that more today. I would have thought that the torque of the TB won't let it rust solid, but it sounds as if mine might be just like yours.
|
|
|
|
Post by Ken Nelson on Nov 25, 2019 5:01:11 GMT
Work has progressed today, and thanks to a little acetylene I have removed the castle nut and adjusting bolt that goes through the trunnion bolt and I think I've freed up the rear swivel mount/adjuster arm for the torsion bar which appeared to be rusted solid before. Next I believe I need to whack the front lower link off the end of the torsion bar with a 4 lb hammer OR perhaps I could get a gear puller hooked up to pull it off? However at the rear adjuster arm the head of the trunnion bolt hits the mount on the frame and the nut comes off the clamping bolt, but the bolt seems to be solidly rusted in place. Is it welded to the frame or just rusted in there? Any advice on removing it, or perhaps I may not take the torsion bar out of the rear mount and work by taking the lower link off the front only. Thoughts?? Thanks. |
|
|
|
Post by johnwp5bcoupe on Nov 25, 2019 8:35:50 GMT
Nothing should be welded Ken
|
|
|
|
Post by Ken Nelson on Nov 25, 2019 23:43:03 GMT
After another afternoon of work, I have now removed the lower link arm and the radius rod. Whew, what a job this has been so far! Now I have to figure out what bits and bushes and boots I need to replace, clean it all, and then reassemble (Yeah!). I am going to put grease fittings in all the tie rod ends, but I am considering doing it in the 4 ball joints as well. My ball joints are in excellent condition, so rather than take them apart, is it reasonable to drill through the brass cap and tap a thread for a zerk fitting as with the TRE's? That way I could regrease them also, without taking the entire unit apart. What do you all think? Attachments:
|
|
|
|
Post by djm16 on Nov 26, 2019 0:28:53 GMT
You have my sympathy with working on the front suspension. It is a pig! Getting the ball joints off was for me the most difficult bit.
Regarding yours, I definitely would not drill and tap for a grease nipple. If you must, then use the filler hole, use a temporary nipple, then remove and replace the blinding bolt.
What would I do? I would take it apart, clean it and re-fill with oil. I realise not everyone would do the same.
|
|
|
|
Post by johnwp5bcoupe on Nov 26, 2019 8:59:43 GMT
Well done Ken it looks like the Lower Link Arm put up a fight  This was a picture of my efforts a few years ago it took a while but it was worth it! 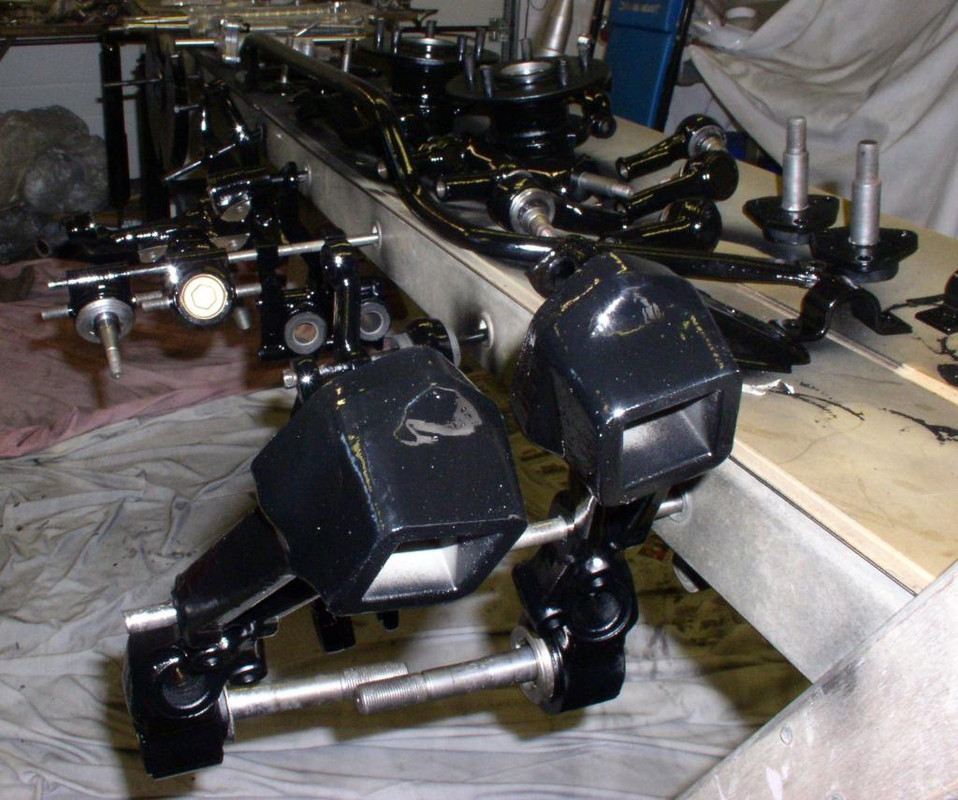 |
|
|
|
Post by enigmas on Nov 26, 2019 10:10:17 GMT
Ken there's no need to put grease nipples on the 2 front upright ball joints. They are very durable and easy to disassemble and relube using a good EP grease. If they've never been serviced...the swivels will be loose,so will need adjusting via the large brass plug. Don't just tighten it...disaasemble the ball joint and clean the parts properly. When reassembling do the brass plug up firmly so that swivel will only move back and forth with some effort whilst using say a 6" to 8" length of tube over the taper as a lever. If it wobbles around with little or no resistance it's definitely too loose. Don't forget to peen the plug into the recesses provided on the ball joint.
Consider that the weight of the front of the car is taken on these ball joints as well as reactions to road surfaces and conditions. If they're loose the synthetic inserts that cup the ball within the joint will be damaged by continuous pounding. The car's handling/braking will also be compromised.
I've rebuilt/regreased them 3 times in the course of 27 years mainly due to the repro boots disintegrating after a short time...and they're the original front upright ball joints. As a matter of fact I've never replaced any of the ball joints on my coupe.
|
|
|
|
Post by Ken Nelson on Nov 26, 2019 20:22:02 GMT
Thanks enigmas, John, and djm16. Actually, taking everything apart was a pig. Acetylene proved quite necessary, but I am amazed at the quality of steel used in the bolts and parts. Not one bolt broke or will need replacing (unlike my rusted out MGA restoration where almost every bolt broke). Rover is clearly an over-engineered quality car that couldn't be duplicated today! After reading your suggestions I will try to regrease the ball joints by unscrewing the brass cap instead of drilling. I'll keep you updated. I'm still awaiting my Polyboots from Bulgaria.
|
|
|
|
Post by Phil Nottingham on Nov 26, 2019 22:14:37 GMT
The first time is always the worst - rest assured the next 1, 2 3 or 4 etc. are never as bad and much faster!
I always thinked it a really bad design/cost cutting measure by Rover not to specify a removal rear link tie bar bracket which would have made replacement of the rubber doughtnuts which wear twice as fast as the rest of the bushes and make far quicker for the rest of of the bushes.
Rover did the same penny pinching in the early 50s with its Series Land Rovers in the welded gearbox X memb er which prevents gearbox removal under the vehicle. The Rover subframe and Land Rover chassis were subcontracted out to third party Thomson Pressingss so both were the easiest/cheapest options from the beancounters' viewpoint as to cash oulay initally.
I had a torsion bar rust into the end of the adjuster once and the only way to remove it was to drop the subframe to extract the bar and adjuster and heating it up and bashing off the adjuster with a 20Lb sledge hammer.
|
|
|
|
Post by Ken Nelson on Nov 27, 2019 23:10:28 GMT
I have managed to unscrew the brass cap from my upper ball joint finally with the use of an impact wrench. The ball and plastic inserts are excellent, but my efforts trying to undo the peened area of the cap damaged the threads somewhat. I think I can repair them with a thread chaser file though. Progress marches on, but the garage has gotten colder now, so there may be some delays. Attachments:
|
|
|
|
Post by enigmas on Nov 28, 2019 1:12:59 GMT
I wouldn't concern yourself too much with the slight damage caused to the threads on the plug where it was peened into the ball joint housing Ken. (It's not meant to be a decorative piece  ) The plug has a deep thread and undoing it generally tears that small section at the top. You'll find that when you refurbish it and screw the plug down fully it will sit slightly lower. You then peen the edges into the recess of the ball joint housing into its new position. In 20 years someone else can refurbish it again. |
|
|
|
Post by Ken Nelson on Nov 28, 2019 17:17:37 GMT
Thanks enigmas, I'm glad to hear I haven't destroyed it too badly!
|
|
|
|
Post by Ken Nelson on Nov 30, 2019 0:17:13 GMT
Phil was right. The 2nd ball joint went quickly without trouble. I also received my Bulgarian Polyboots and I think they will work well. I assume that the metal cap is fitted as in my picture below, outside the boot like an umbrella over the steering arm/stub axle piece, similar to the bottom ball joint going upside down from the top one? Attachments:

|
|
|
|
Post by enigmas on Nov 30, 2019 7:07:13 GMT
No...the second image (yellow boot) is incorrect Ken. That metal cap is supposed to go under (the original style) factory boot.I'd leave it out...I left mine off/out as they tend to add extra load to the repro boots currently available. They tear/erode very soon after fitting along the convolutions of the boot. Truly, I can't see any purpose for that cap!
PS. Could you post the part number/details of the top ball joint 'yellow' boot Ken.
|
|
|
|
Post by johnwp5bcoupe on Nov 30, 2019 10:40:08 GMT
The Disk is a dust/crud protector Vince Do they do the boots in black Ken? |
|
|
|
Post by enigmas on Nov 30, 2019 12:52:45 GMT
A friend sent me the pic below. Here you go Ken. This is how the steel 'umbrella' should fit in the top ball joint if using an OEM Factory boot. Of course the snug fit of your lovely yellow boots negate the need for this piece. PS. You've got to get in touch with you feminine side John! 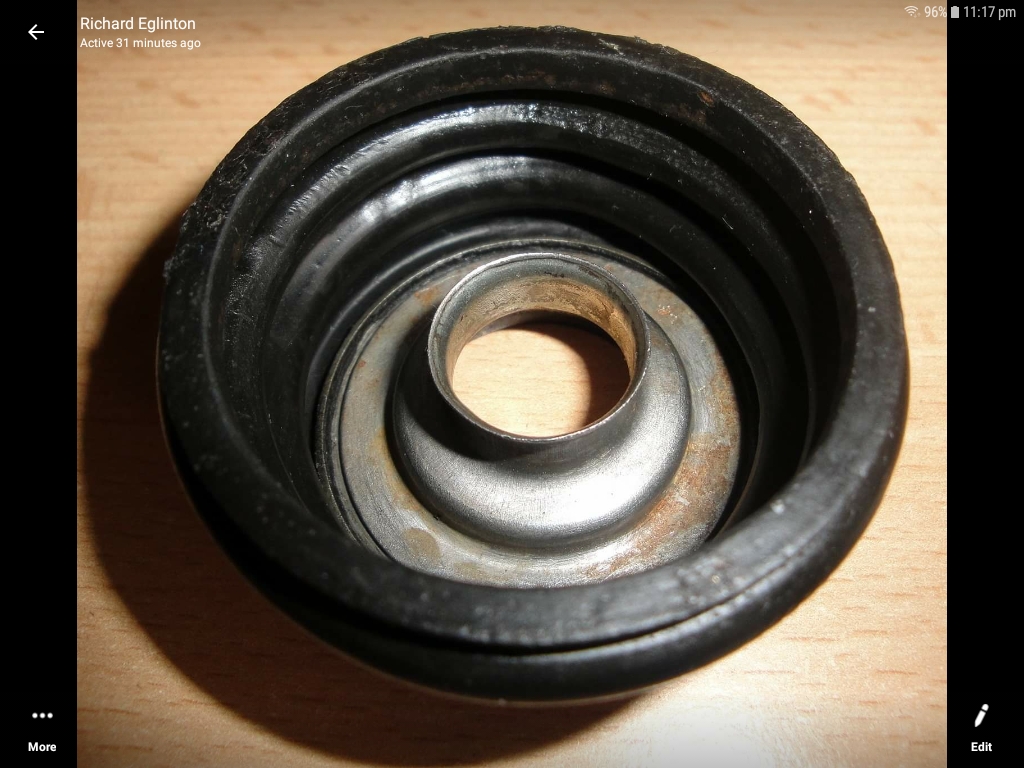 |
|
|
|
Post by johnwp5bcoupe on Nov 30, 2019 17:08:33 GMT
PS. You've got to get in touch with you feminine side John! I would have Pink ones Vince lol!! |
|
|
|
Post by Ken Nelson on Nov 30, 2019 17:28:18 GMT
OK enigmas, the Polyboot I used for the upper ball joint is 18x47x30 mm in size and I bought it on eBay from "dmemltd" at: www.ebay.com/itm/2-X-High-Quality-Rubber-Dust-Cover-18-47-30-Track-Rod-End-Ball-Joint-Dust-Boots/222403972558?_trkparms=aid%3D555018%26algo%3DPL.SIM%26ao%3D1%26asc%3D57921%26meid%3D86da88879e98484f96423be8907c4768%26pid%3D100005%26rk%3D3%26rkt%3D12%26mehot%3Dsb%26sd%3D151691938273%26itm%3D222403972558%26pmt%3D1%26noa%3D0%26pg%3D2047675&_trksid=p2047675.c100005.m1851 It does come in black also, and is a Polyboot brand, but the Polyboot site itself doesn't list this size. The bottom (large) hole is perfect, the top (small) hole could be 1-2 mm bigger. BUT, there is a significant thing to consider regarding the metal cap, because while the large hole is fixed tightly in place on the joint, the steering knuckle has to swivel in the small hole end of the boot. So I think the metal cap is there to be sure the boot will not catch on the knuckle and tear. With that in mind, while Rover designed the cup to go inside the boot, it could actually work the way I showed it (upside down) also. Either way, it is there to give freedom to swivel, I believe. Pictures below show the metal cap in the proper orientation and I think it should be used. Am I incorrect in these assumptions? Since my rubber original boots were pretty destroyed I'm trying to piece it together as best I can without another car to look at. Top picture is cap upside down (?), middle with cap inside boot, bottom with caps correct (?). See my next post for boot ball joint also. |
|
|
|
Post by Ken Nelson on Nov 30, 2019 17:48:09 GMT
Now on to the bottom ball joint. This also presents a concern about the metal cap, because the steering arm again has to swivel inside the small hole without tearing the boot. The size boot I bought was 27x46x32 mm from "Polyboots" on eBay, and also comes in black. Again, the large hole is about perfect, but the small hole is a bit large. I'm planning to use the metal cap and perhaps just use a bit of silicone sealer in the gap between boot and cap. Again, any thoughts? |
|
|
|
Post by Ken Nelson on Nov 30, 2019 17:48:35 GMT
See message above
|
|
|
|
Post by Ken Nelson on May 23, 2020 16:46:32 GMT
Ken there's no need to put grease nipples on the 2 front upright ball joints. They are very durable and easy to disassemble and relube using a good EP grease. If they've never been serviced...the swivels will be loose,so will need adjusting via the large brass plug. Don't just tighten it...disaasemble the ball joint and clean the parts properly. When reassembling do the brass plug up firmly so that swivel will only move back and forth with some effort whilst using say a 6" to 8" length of tube over the taper as a lever. If it wobbles around with little or no resistance it's definitely too loose. Don't forget to peen the plug into the recesses provided on the ball joint. Consider that the weight of the front of the car is taken on these ball joints as well as reactions to road surfaces and conditions. If they're loose the synthetic inserts that cup the ball within the joint will be damaged by continuous pounding. The car's handling/braking will also be compromised. I've rebuilt/regreased them 3 times in the course of 27 years mainly due to the repro boots disintegrating after a short time...and they're the original front upright ball joints. As a matter of fact I've never replaced any of the ball joints on my coupe. Regarding how tight to screw the brass plug into the ball joint on the lower suspension arm after cleaning and adding new EP grease-question for Enigmas/Vince and others. I have the plug screwed in likely to the same depth as it was before disassembly, which I hope is correct. I can move the pin with much pressure by hand, or moderate pressure using a 8" pipe over the pin. I hope that being this tight is correct? I assume that being slightly too tight is better than being loose enough to move with mild hand pressure? Looking forward to others' advice on this!  |
|
|
|
Post by enigmas on May 24, 2020 3:44:59 GMT
It would be nice if there was a tension reading for the ball joints using a fish weight scale or similar device but there isn't Ken...so unfortunately you'll need to judge it subjectively. Better firmer than looser considering the weight of the car and the other factors acting upon the joint IMHO. *If you then do one joint using a short tube lever and say a spring fish weight scale to gauge the tension you can then replicate it on the other joint and also post the particulars/details here as a reference for other restorers.  At the very least the details will act as a guide. |
|
|
|
Post by Sam Bee on May 24, 2020 10:40:18 GMT
That would be most useful as I am about to reassemble mine, too.
|
|
|
|
Post by Ken Nelson on May 24, 2020 18:08:44 GMT
Thanks Vince. I did end up backing the brass plug off slightly. A little bit of movement makes a fairly big difference. It's very hard to check the pressure on a scale, because it takes an extra bit of inertia to start it moving, so the measuring is pretty subjective. Using that and my best guesstimation (mainly the latter) I would say maybe 25-30 lbs max or so to move it in the socket. It is a heavy car, so I'm guessing that might be about right. I don't know if it will free up a bit more with use or not.
|
|


 )
) 


 At the very least the details will act as a guide.