|
|
P5C
Jun 2, 2017 15:46:54 GMT
Post by bissmire on Jun 2, 2017 15:46:54 GMT
Yep totally agree, it's a labor of love...I put my trust in the engineer that carried out the work, which was okish to a point. In all honesty, I never thought the car would be perfect straight out the box and knew it would take some time and fettling to get right, just not quite so much time and fettling. I've done all the resent work myself (which I enjoy doing) so just time really. Having said that, I've had the rear shocks off my car more times than I've enjoyed. Also, taken my front suspension apart a few times to, which is more or less the same unit sunbeam fanatic has posted. A Wisbech Engineering IFS. I'm learning all the time and just recently milled my first piece of billet alloy into a steering component. So, in a way, not having the perfect car has given me the impetus to learn this stuff myself.
Always look on the bright side.
|
|
|
|
Post by enigmas on Jun 2, 2017 21:41:43 GMT
Personally I'm pleased to realize that's it's purely not a cheque book exercise and that there's some mechanical literacy occurring as your car progresses.  |
|
|
|
Post by bissmire on Jun 3, 2017 6:29:04 GMT
Never has been, I can do mechanical stuff, it's the engineering that I'm learning.
|
|
|
|
Post by Sunbeam Fanatic on Jun 9, 2018 9:08:14 GMT
So it's been a while (a year) since I last posted on here so I thought it about time I upset the purists some more :-) There has been a lot going on not really worthy of an update as it's been the usual bodywork repairs, panel fitting/gapping etc, nothing out of the ordinary. However, the car has had a custom (read much stronger) front subframe made, it still bolts up to the OEM mounting points but it accepts the IFS and LS engine. Attachment DeletedAttachment DeletedAlso fitting a Watts linkage (such as sported by the SD1) and a spangly pivot section and arms have been made. The Ford 9" diff carrier was made with a pivot pin protruding from it along with some strengthening bracketry. Attachment Deleted |
|
|
|
Post by Sunbeam Fanatic on Jun 9, 2018 9:31:06 GMT
The really big news though is that I've taken the plunge and gone "Paddle Shift" ................ The TH400 going in the car is fitted with a full manual reverse pattern valve body which means the car shifts are PRN123, however, being a full manual valve body (hence no D position) you always have to select the gear you want. I've also had a Gear Vendors Overdrive fitted which operates on 2nd & 3rd, this effectively creates a 5sp OD transmission with the gear shifts changed to PRN1,2,2od,3,3od. There is a company that make a shift system which mechanically operates the shift lever on the side of the gearbox and interfaces with the OD electronics to also engage the OD on 2nd & 3rd. The shifts are activated from paddles behind the steering wheel, with the typical LH paddle for an upshift and RH paddle for a downshift. Also comes with 52mm gear position indicator. The paddles also have a button above each one that I'll likely configure for the Trans Brake and Line Lock. Already purchased and currently winging its way over from the USA, bye bye gear shifter in the center console (unless I decide to keep an OEM dummy one in place). www.mastershift.com |
|
|
|
P5C
Jun 9, 2018 9:39:21 GMT
Post by enigmas on Jun 9, 2018 9:39:21 GMT
Nice bit of work on the subframe, front suspension and brakes Sunbeam Fanatic. Looks both sturdy, functional and well constructed. I also noticed that the subframe mounts are now both solid and integral with the subframe. Having replaced my OEM mounts with solid versions several years ago, I've not noticed anything detrimental in ride or handling (if anything, the opposite) with the factory suspension, although your coil over version(?) should show much improvement in ride and handling. 👍
PS. Are you sure you won't miss a D option (at times)? Sounds like you'll be busy with the left and right paddles.
|
|
|
|
P5C
Jun 9, 2018 11:47:27 GMT
Post by Sunbeam Fanatic on Jun 9, 2018 11:47:27 GMT
Nice bit of work on the subframe, front suspension and brakes Sunbeam Fanatic. Looks both sturdy, functional and well constructed. I also noticed that the subframe mounts are now both solid and integral with the subframe. Having replaced my OEM mounts with solid versions several years ago, I've not noticed anything detrimental in ride or handling (if anything, the opposite) with the factory suspension, although your coil over version(?) should show much improvement in ride and handling. 👍 PS. Are you sure you won't miss a D option (at times)? Sounds like you'll be busy with the left and right paddles. Yes, solid mounts have been included, I was a bit worried about vibration creeping through so it's good to hear you've not noticed anything detrimental. The front (and rear) suspension will indeed be coil-over, the IFS has box section installed at the moment to keep the car in exact ride height configuration for set up purposes :-) I might miss the D option, it wouldn't be a big job to change the valve body to a reverse auto pattern which with the OD would operate as PRN1,2,2od,D+od, so I'd still be able to go up through the gears manually to D or just select D before I pull away and let the box do the rest. I'm wondering how quick the change will be when selecting gears, the drag race guys seem to do ok with a full manual "auto" selection TH400 so I'm hoping it's reasonably snappy. You've probably noticed the manual steering rack, from memory it's a 2.5 turn lock to lock "quick rack" but is not a power version ..... car is booked in for mid June to have electric assist installed in the column. |
|
|
|
P5C
Jun 9, 2018 14:10:24 GMT
Post by enigmas on Jun 9, 2018 14:10:24 GMT
|
|
|
|
Post by Sunbeam Fanatic on Jun 23, 2018 9:32:57 GMT
Hi All, You may have noticed from previous pictures of the new subframe and IFS that the old steering box has gone. The new steering rack on the IFS is manual so I've just had an electric power assist system fitted into the column, it fits quite neatly on the upper side of the parcel shelf and the new steering column link to the rack has been made to provide as much space as possible to allow exhaust routing. The new EPAS also comes with a control box to adjust the level of assistance it provides. Next jobs will be refitting the engine and transmission, fitting the new paddle shift system and steering wheel then having a drive shaft made. A bit more fabrication and it should be ready for prep. & primer. Attachment DeletedAttachment DeletedAttachment Deleted |
|
|
|
Post by Sunbeam Fanatic on Jun 23, 2018 9:33:59 GMT
|
|
|
|
P5C
Jul 8, 2018 17:28:47 GMT
Post by pipetech on Jul 8, 2018 17:28:47 GMT
Very interesting chaps.
I'm doing a job on my p5b at the moment.
And I'm interested in you're new sub frame mounts, are they available to buy?
I'm putting a jag xjs front and jag irs at the rear in my p5b .
I've also got a 350 chevy to go in with a 700r4 auto box, but first I have to finish the bodywork.
While I'm on have any of you chaps fitted electric windows and if so what did you use.
Many thanks
Len.
|
|
|
|
P5C
Jul 8, 2018 22:01:25 GMT
Post by enigmas on Jul 8, 2018 22:01:25 GMT
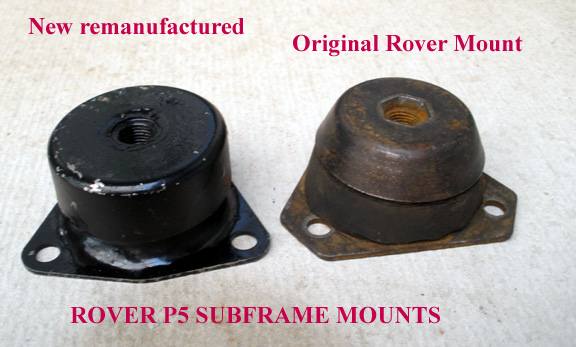
Hi Len...the new repro subframe mounts you see above were a project by a retired (now deceased) engineer for the Victorian branch of the RCCA. They are limited number production run manufactured for a small group of enthusiastic members who put money up front to have them made approximately 6 years ago. The outlay was around $600 for the set (6) at the time. I still have mine in a box and decided on solid mounts as you probably should with respect to the upgrades you're envisaging. |
|
|
|
P5C
Oct 10, 2020 3:31:53 GMT
Post by djm16 on Oct 10, 2020 3:31:53 GMT
Enigmas, can you give the height of the new and repro mounts?
Mine on the 3-litre are getting dodgy and I am planning to try to re-cast the rubber in Shore A45 or A60 polyurethane, but would like to get the height right.
I have seen the new repro ones from Wadhams. I am sure the price is justified, but with shipping it is going to be nearly $1,000 for 6 and take 4-6w to get here.
|
|
|
|
P5C
Oct 10, 2020 22:24:50 GMT
Post by enigmas on Oct 10, 2020 22:24:50 GMT
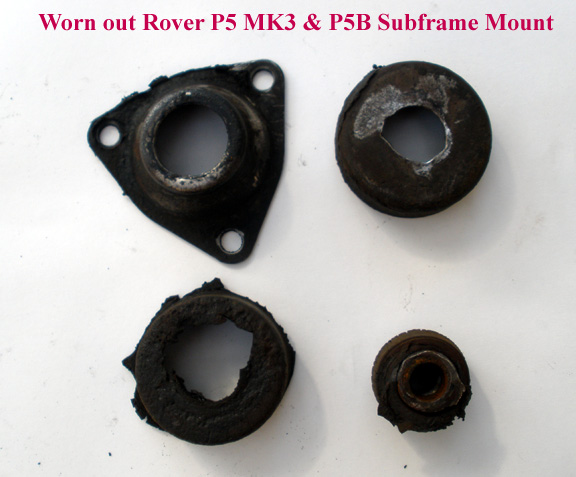
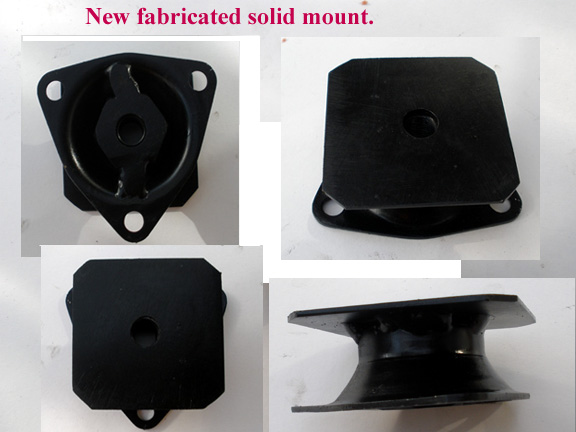
Enigmas, can you give the height of the new and repro mounts? Mine on the 3-litre are getting dodgy and I am planning to try to re-cast the rubber in Shore A45 or A60 polyurethane, but would like to get the height right. I have seen the new repro ones from Wadhams. I am sure the price is justified, but with shipping it is going to be nearly $1,000 for 6 and take 4-6w to get here. Hi David, I have no idea of the height of the any 'new' NOS mounts(?) I can certainly give you the height of the repro mounts organised by the RCCA (Victorian branch). One of the members was a retired engineer who oversaw the project. Truly the 'extreme' cost of 'new/repro' subframe mounts is not warranted in my view. I'd be more concerned with the engineering qualities of the rubber used in their manufacture. If it's anything like the repro boots for the front suspension ball joints only time (probably a very short time will tell!) Similarly the repro rear leaf spring contrasonic bushes are a failure from my reading. My advice is to convert your existing mounts (as I did) to solid if you can weld competently and use shims to make slight adjustments in height if needed. Generally though this is not required. Old original mounts are often like jelly allowing movement of the subframe in all directions. This 'absolutely' compromises the cars handling and ride quality. * Evidence of this is the steering wheel/column moving judiciously about like a drunken sailor on rough road surfaces due to the subframe squirming about on mushy mounts. Consider also why the Factory placed a loop in the brake line between the car frame and the subframe under the front DS?
* The specific info you require is on this link David...look for the images with the caliper.
roverp5.proboards.com/thread/9185/subframe-mounts-modified-alternative?page=1&scrollTo=73092 |
|
|
|
P5C
Oct 11, 2020 11:32:34 GMT
Post by Sam Bee on Oct 11, 2020 11:32:34 GMT
Enigmas, I go along with your thoughts on sub-frame mounts and have installed the solid ones. I have used very thin neoprene rubber washers to give a very slight cushion against the body. Attachment Deleted |
|
|
|
P5C
Oct 11, 2020 13:27:20 GMT
Post by enigmas on Oct 11, 2020 13:27:20 GMT
Nice clean and well presented subframe there Sam. I'm sure you'll also find both the ride and handling improved with the solid mounts.
|
|
|
|
P5C
Oct 11, 2020 13:29:11 GMT
Post by djm16 on Oct 11, 2020 13:29:11 GMT
Thanks for that link. I remember reading the thread years ago, but could I find it?
"The old mounts were also fully compressed beyond their original height of 37mm down to 30mm. "
Since posting, I have taken off all three mounts from one side. The rear one is in reasonable condition and is around 37mm in height, it identical to your measurement above.
I appreciate what you say about making them solid, but I will try the re-casting with PU approach first. The two squished mounts came apart quite easily. The trick was to heat each section with a blowtorch to detach the rubber first.
Sam: yes, very neat subframe. I notice you have used studs rather than bolts on the steering box. Will you still be able to remove it when the engine is in?
|
|
|
|
P5C
Oct 11, 2020 20:04:25 GMT
Post by Sam Bee on Oct 11, 2020 20:04:25 GMT
They are bolts, with the nuts on the engine bay side as was easier to install that way and may be not get gunged up as they do under the wings.
The sub-frame was stripped and powder coated. I drilled access holes, now plugged with blind grommets, so I could thoroughly Waxoyl it inside.
|
|
|
|
Post by enigmas on Oct 11, 2020 22:26:29 GMT
Thanks for that link. I remember reading the thread years ago, but could I find it? "The old mounts were also fully compressed beyond their original height of 37mm down to 30mm. " Since posting, I have taken off all three mounts from one side. The rear one is in reasonable condition and is around 37mm in height, it identical to your measurement above.
I appreciate what you say about making them solid, but I will try the re-casting with PU approach first. The two squished mounts came apart quite easily. The trick was to heat each section with a blowtorch to detach the rubber first. Sam: yes, very neat subframe. I notice you have used studs rather than bolts on the steering box. Will you still be able to remove it when the engine is in? David I'm not quite sure what you mean by, "trying the re-casting with the PU approach first?" If you're going to attempt to "self" recast the "rubber" with some type of synthetic compound I'd be on the cautious/wary side, as doing your own R/D and repeatedly, removing and replacing these mounts is not an easy nor straight forward task for a Saturday arvo. Truly though, if you can fabricate, measure and weld, it's quite easy to make a set of solid mounts from scratch. If your current rear mounts are still viable just do the front 4 mounts. The steering and braking will be greatly improved too as the subframe won't be squirming about under the monocoque. And if you're front suspension is in good order and not riding on the bump stops (like I've seen on quite a few P5Bs) the ride quality will be better than what you had before. |
|