|
|
Post by enigmas on Sept 8, 2017 9:37:17 GMT
Here's the engine leveller Warwick. 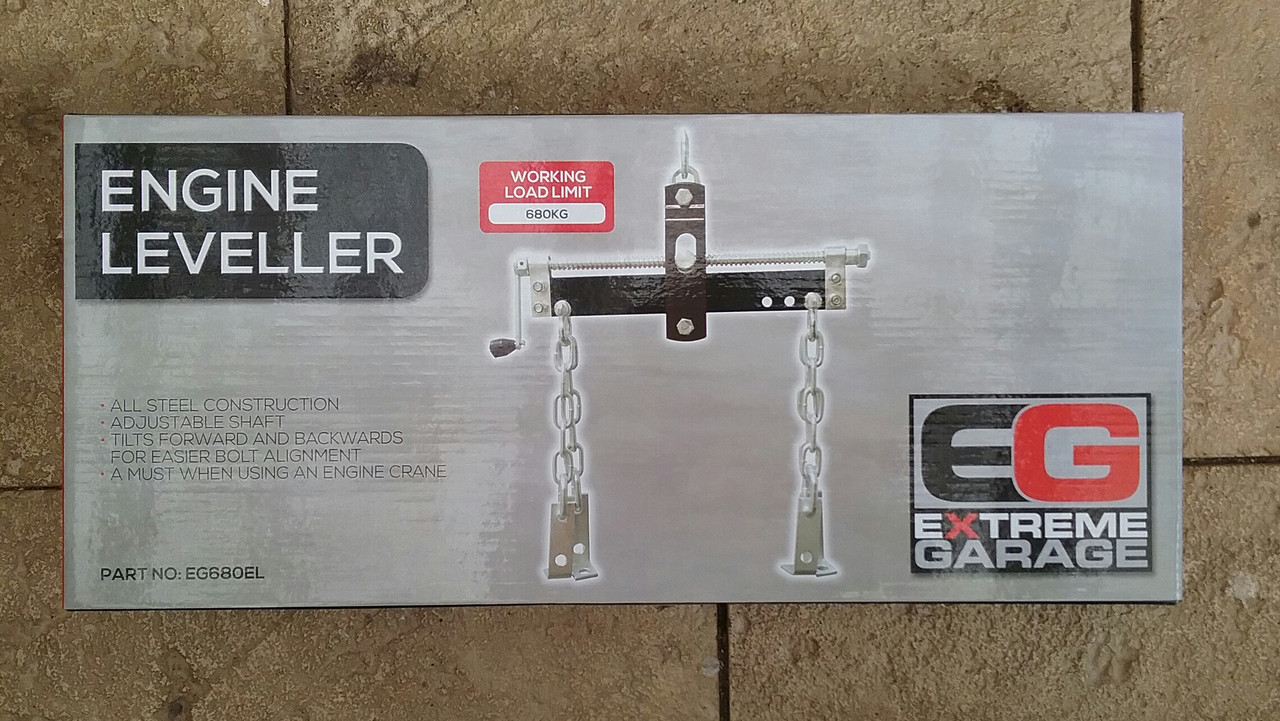 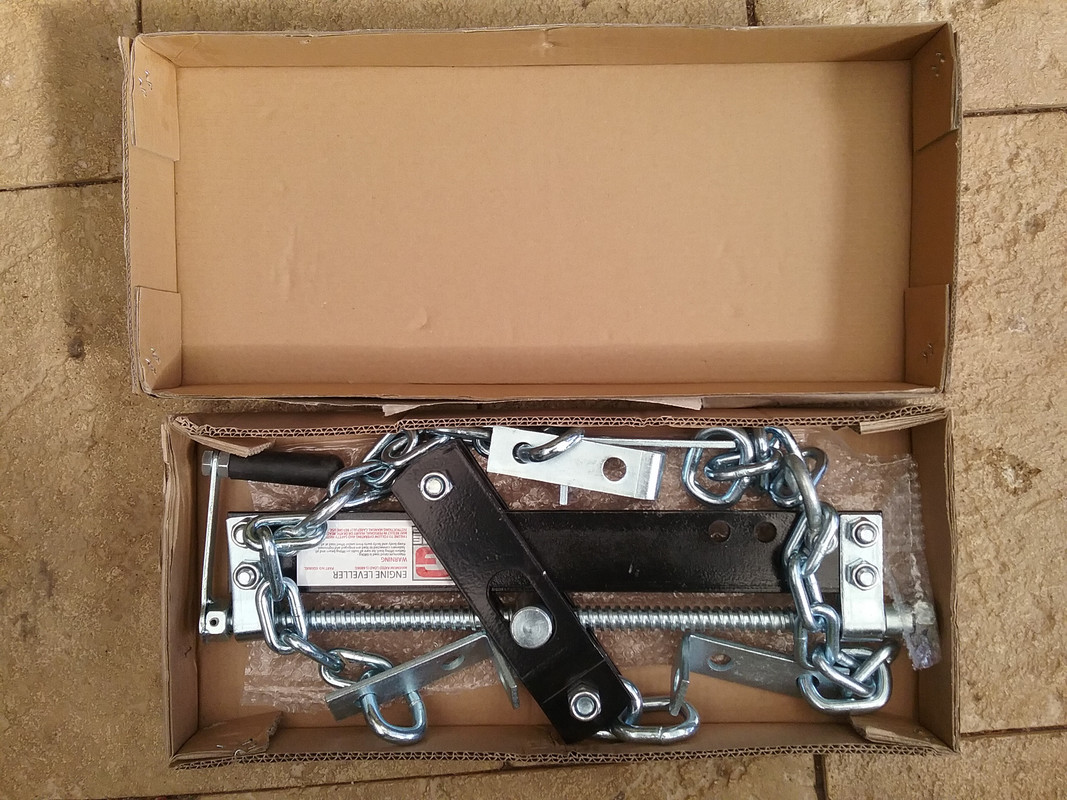 |
|
|
|
Post by Warwick on Sept 8, 2017 12:20:00 GMT
Thanks Vince. A clever idea. Never seen one before.
|
|
|
|
Post by ozriderp5 on Sept 8, 2017 21:09:50 GMT
Thanks Vince. A clever idea. Never seen one before. All the car resto shows use them, stick a power driver or air gun on the bolt and you can make some pretty quick angle changes as you're pulling the motor and trans out. |
|
|
|
Post by enigmas on Sept 9, 2017 9:08:39 GMT
Removed the front cover and replaced the timing chain and sprockets with a new set today. Interestingly the old set were both steel sprockets not fibre (camshaft sprocket). The chain had about 3/8" - 1/2" play either way...but the steel sprockets were in very good condition with slight marking on the camshaft sprocket and no wear marks on the crankshaft sprocket. The new sprocket has minimal chain slack. As an aside I could never see one of these sets jumping a tooth...no matter the wear or stretch on the chain. Here's some pix...the new set is on the engine. If you look closely at the first image you'll see a hole to the right just above the top of the camshaft sprocket. There's a similar hole on the other side but it can't be seen. These holes are drilled through to the lifter valley and allow oil to drain into the timing gear cover...extra lube for the chain and sprockets. 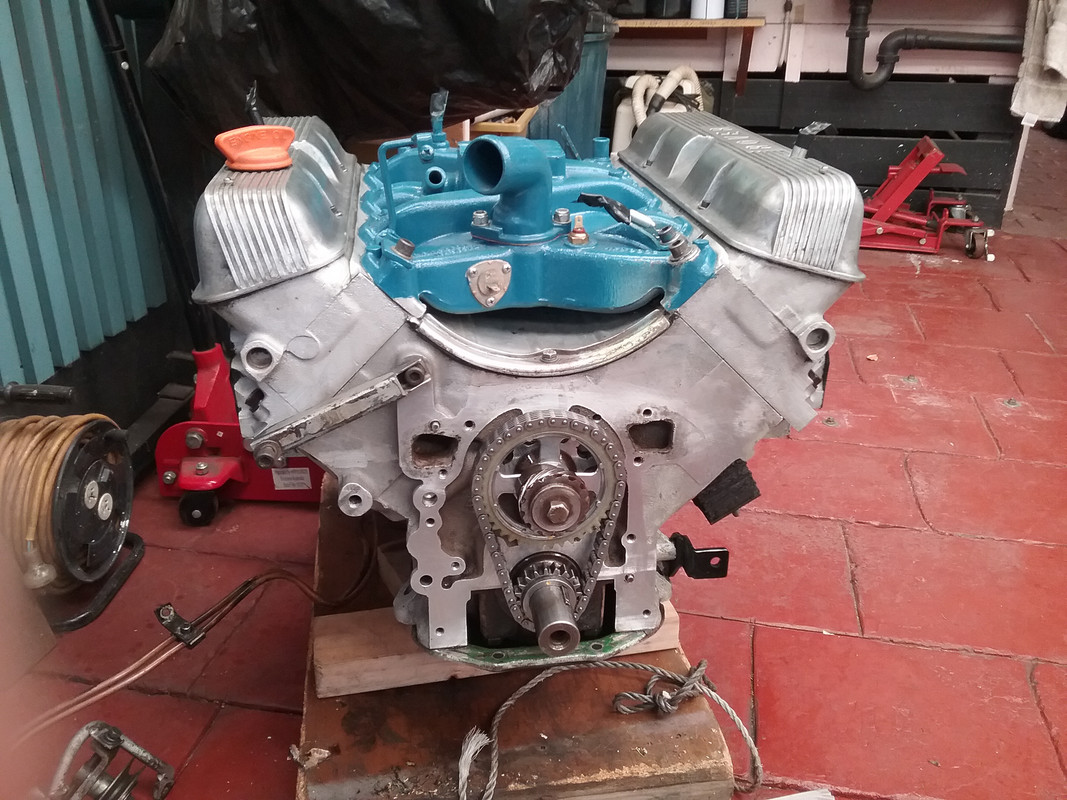  This is the old steel set. 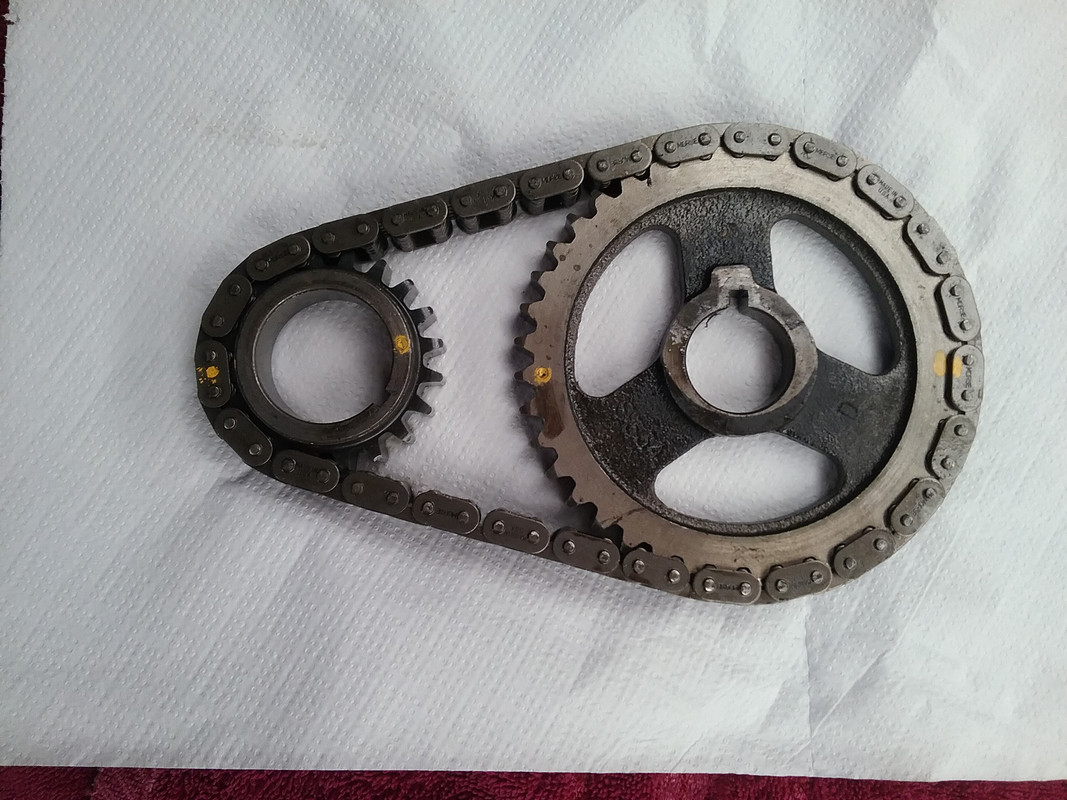 |
|
|
|
Post by Sam Bee on Sept 17, 2017 22:19:03 GMT
I would replace with a duplex timing chain and sprockets, I have used Cloyes, which comes as a kit (try 'V8tuner') - see attached photo. No probs with timing cover clearances, by the way. All but eliminates chain stretch in future - standard fit usually suffers after about 35,000 miles and from then on the timing is slightly 'out'. Attachment Deleted |
|
|
|
Post by enigmas on Sept 18, 2017 9:54:01 GMT
Hi Sam...unfortunately all chains, no matter the type increase in length due to pin, roller or link wear. If you read back several posts you'll see that I had a steel set of sprockets fitted with a OEM chain, this setup lasted a minimum 300,000 kms and the engine still ran very well despite considerable chain elongation. This link is worth a read...go down about half way and the 2 types of chains are discussed (Roller & 'Silent Type OEM) ...pros and cons. www.agcoauto.com/content/news/p2_articleid/338Consider the lubricant supply and how it arrives at the timing chain and sprocket. Primarily from mist and perhaps splash from the bottom on the crank gear. Why not drill 2 3/8" holes either side of the top sprocket through to the lifter valley and improve the lubrication to the chain and sprocket set. |
|
|
|
Post by enigmas on Sept 19, 2017 9:22:35 GMT
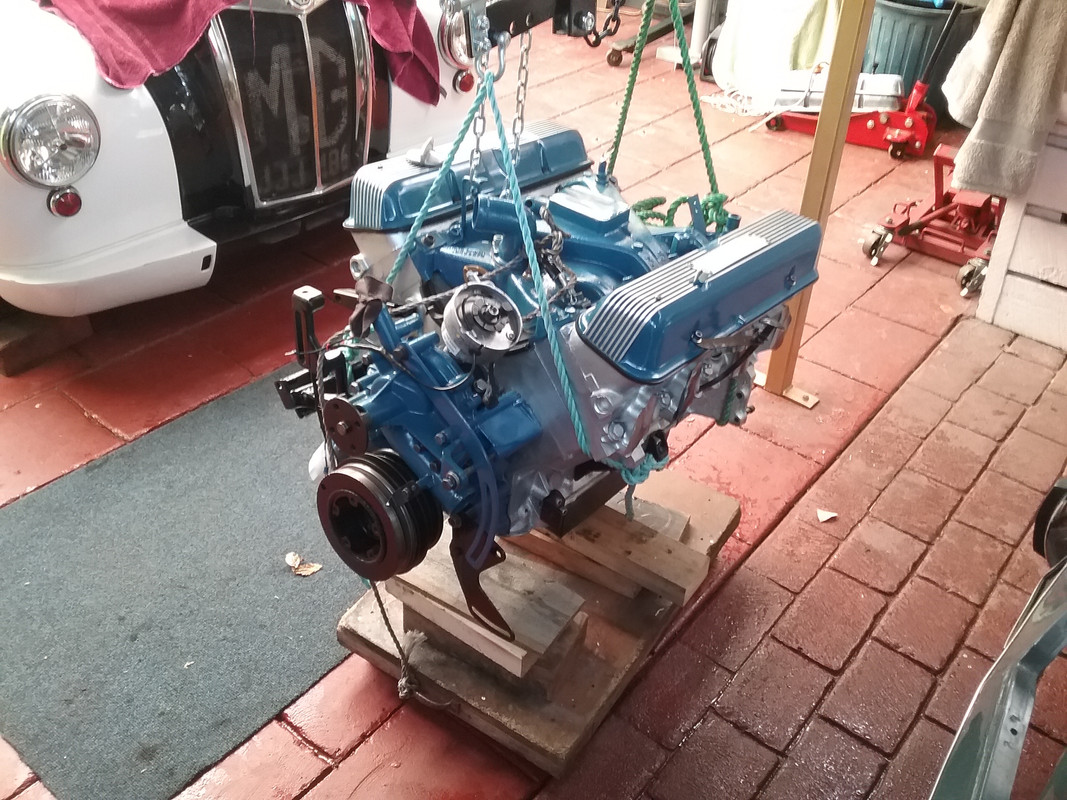
P5 Coupe Engine/Trans refurbishment update. To date I've finished most of the refresh work on the engine, having cleaned, painted, fitted brass welsh plugs, new timing chain sprocket assembly, front main seal, new waterpump, rebuilt the alternator, added a mechanical oil gauge line to the oil pump, plus sundry other small things. Yet to do, after removing the torque convertor is to fit a fresh rear main seal and to remove, clean and modify the sump slighty. Here are a few pix of the engine and some refurbishment related images. PS.This is the first time the rocker covers have been removed from the engine since a full engine rebuild 24 years ago. As can be seen, the engine is quite clean internally having been run primarily on LPG. 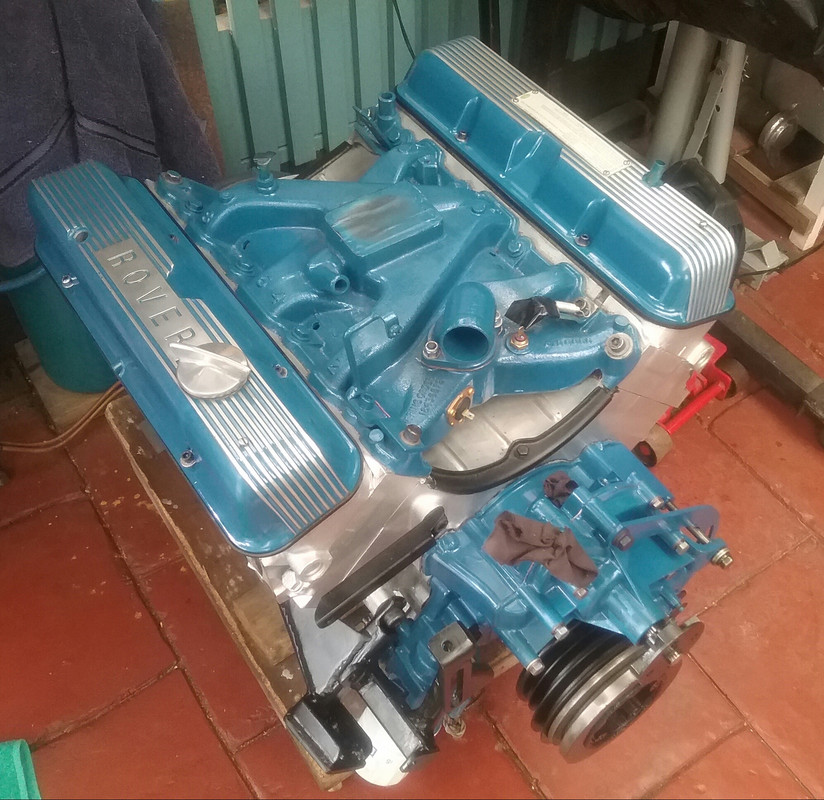 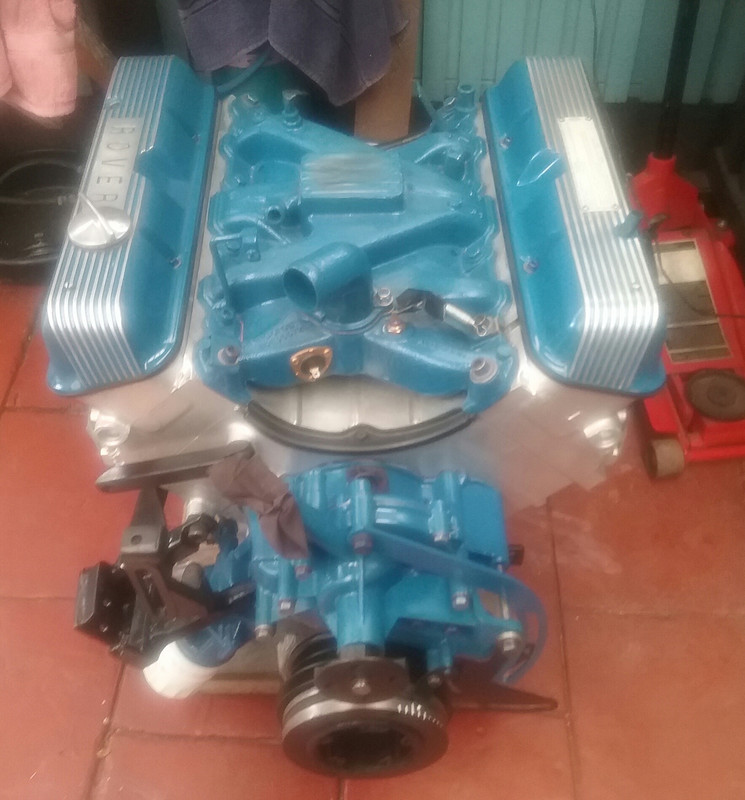 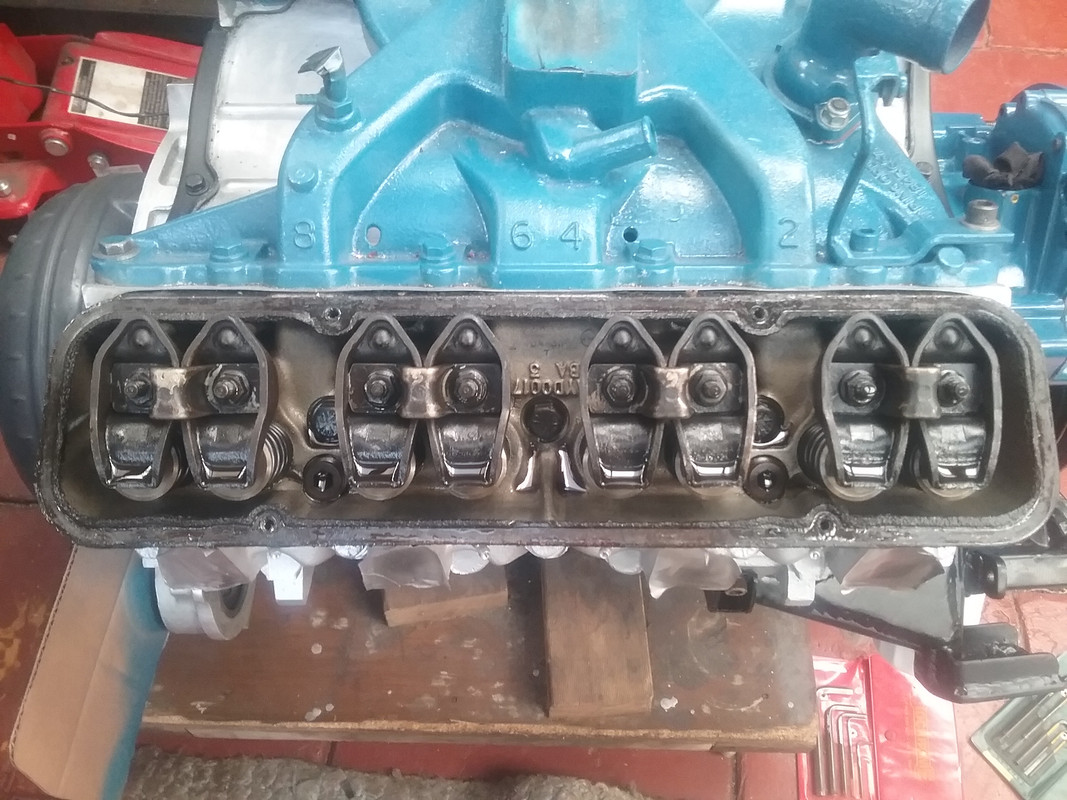 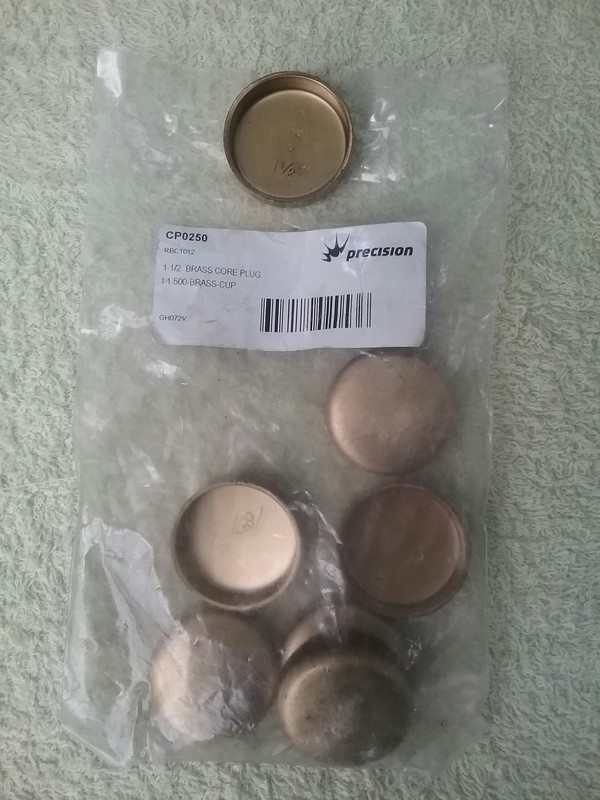 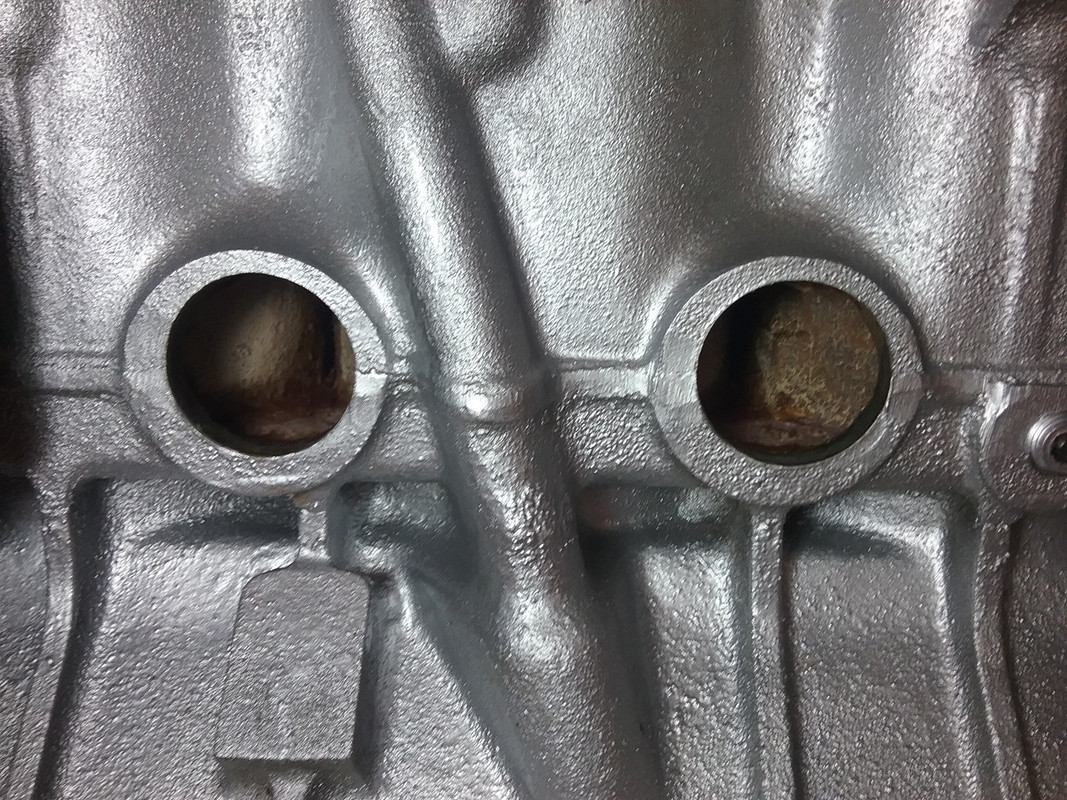 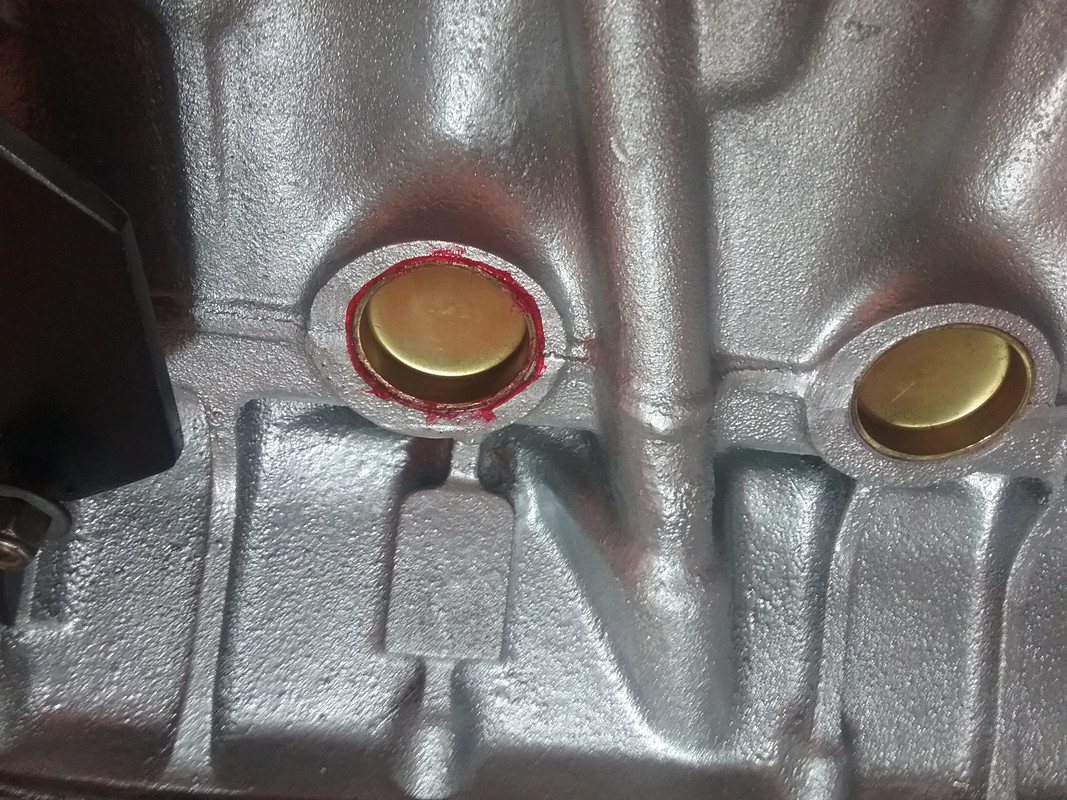 The red residue around one of the brass welch plugs is Loctite anaerobic flange sealant. 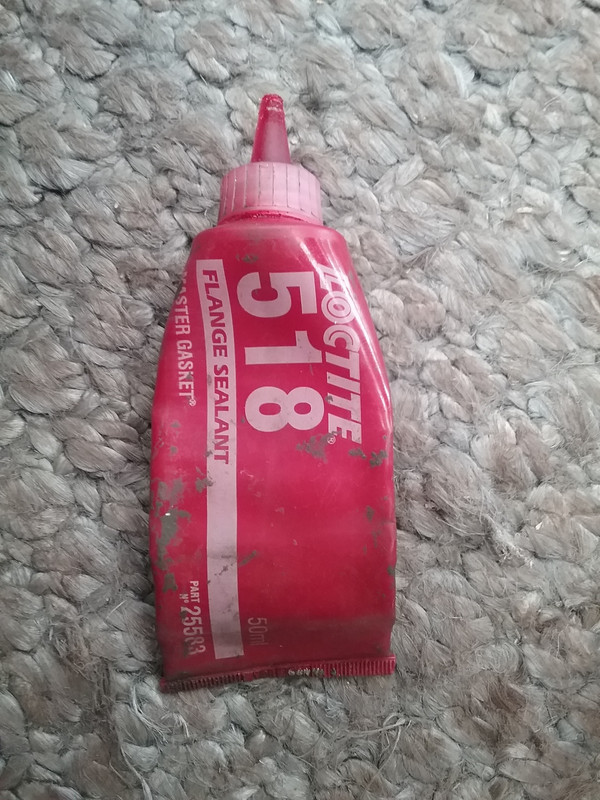 |
|
|
|
Post by enigmas on Sept 20, 2017 11:51:39 GMT
I'm finally nearing the end of the refurbishment process with the current engine in my coupe. Today's focus was to remove the torque convertor, the drive plate, replace the 2 rear welsh plugs and fit a new rear main seal. The existing seal wasn't leaking but as I had one in hand, it made sense to replace it. Interestingly the front timing cover seal was hardened but still functioning. It would have grooved the shaft eventually had I left it in place. The rear main seal was still quite supple. I'm fortunate that both the front and rear main seals on a P76 V8 are both of the modern lip type configuration...so they're easily fitted. Old rear main being removed. 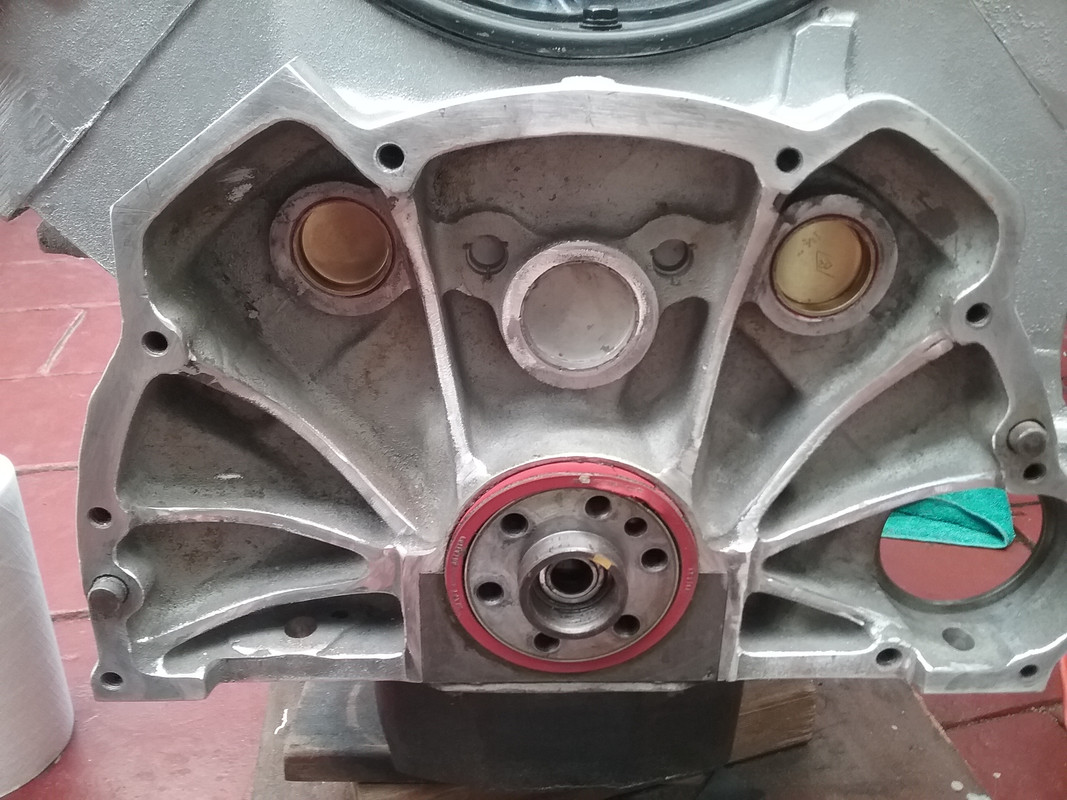 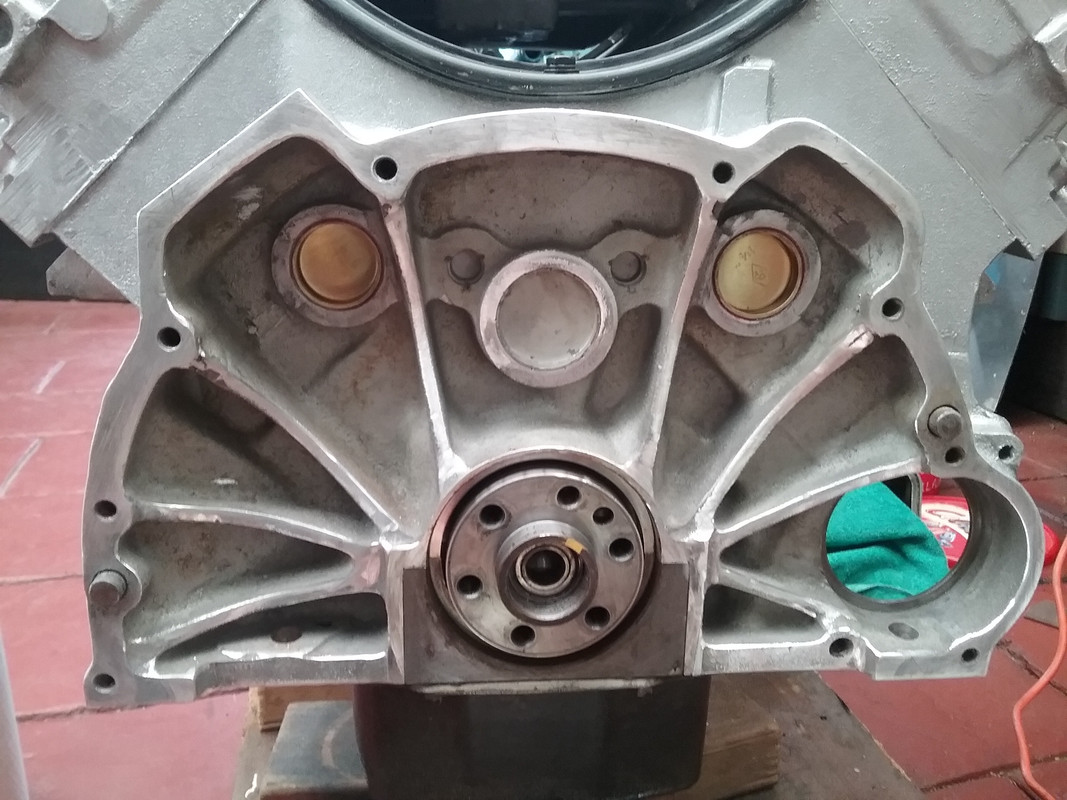 The new rear main seal fitted (below) 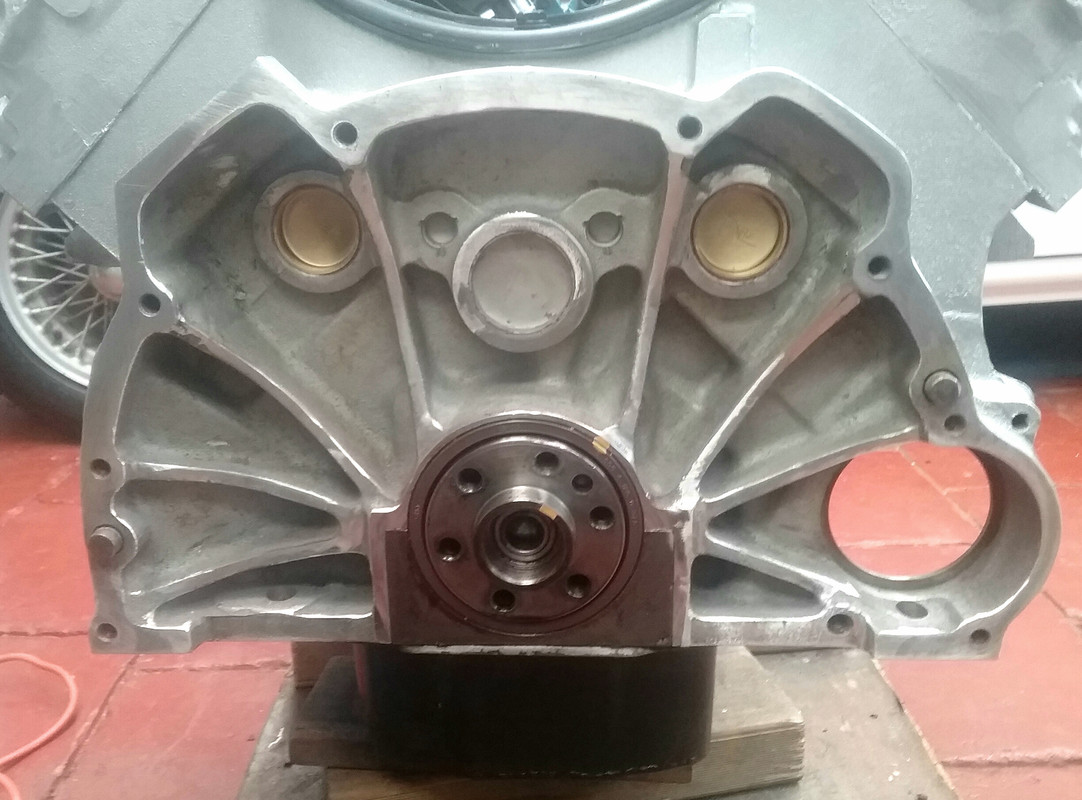 Note part of the casting (rear of block) that appears like a tube inside the opening where the welsh plug fits. There's one either side. The tube like casting is most likely the oil feed from the lower part of the block (oil galley) to the oil feed on one of the Rover V8 pedestals. These aren't drilled through on a P76 block as the oil feed to the rocker gear is provided through the push rods, unlike the Rover V8. Also welsh plug clearance to the rear cyls is close (when removing them) and there is a casting ledge that hampers the rearward movement of the plug when you're trying to remove it. The casting ledge can be dremelled out when the plugs have been removed. Take care especially when removing the rear welsh plugs due to the close proximity to the rear cyls. 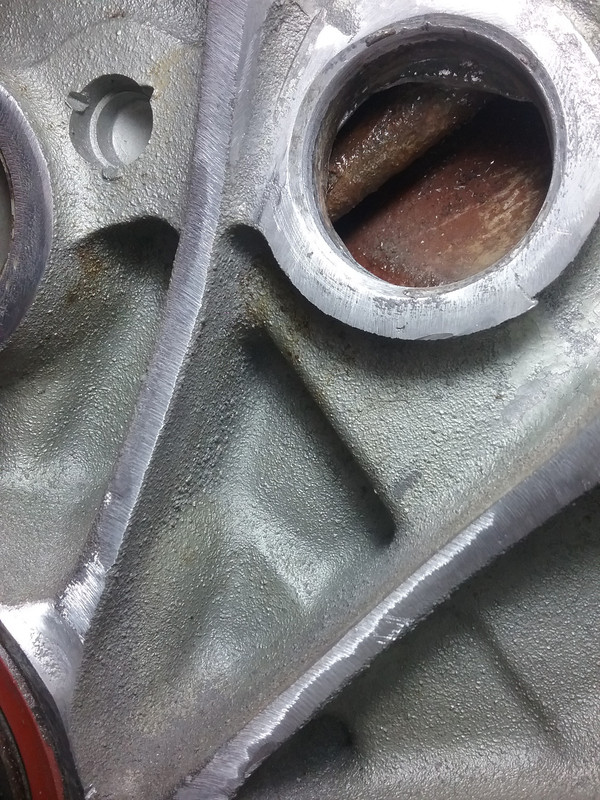 |
|
|
|
Post by ozriderp5 on Sept 21, 2017 9:57:26 GMT
Love your work....I've done lot's of bike motors but never a car.
What's attached to the wire wheels in the background?
|
|
|
|
Post by enigmas on Sept 21, 2017 14:03:19 GMT
Love your work....I've done lot's of bike motors but never a car. What's attached to the wire wheels in the background? This is...although the picture below is not current...quite a bit more has been done since  Here's a link to most of the build...'Couping the Magnette'. Copy and paste the following link into the address bar and it should work (clicking on it doesn't) www.mgexp.com/phorum/read.php?27,2202512 |
|
|
|
Post by ozriderp5 on Sept 21, 2017 20:18:05 GMT
Love your work....I've done lot's of bike motors but never a car. What's attached to the wire wheels in the background? This is...although the picture below is not current...quite a bit more has been done since  Here's a link to most of the build...'Couping the Magnette'. Copy and paste the following link into the address bar and it should work (clicking on it doesn't) www.mgexp.com/phorum/read.php?27,2202512 That is a hell of a read, is the car finished? |
|
|
|
Post by enigmas on Sept 21, 2017 22:07:32 GMT
Virtually Oz...with only interior cosmetic stuff left.
|
|
|
|
Post by enigmas on Sept 22, 2017 10:58:59 GMT
|
|
|
|
Post by wozzer on Sept 23, 2017 7:57:04 GMT
Coming along very nicely vince, didnt quite get why you have to modify the sump?
Keep up the good work
W.
|
|
|
|
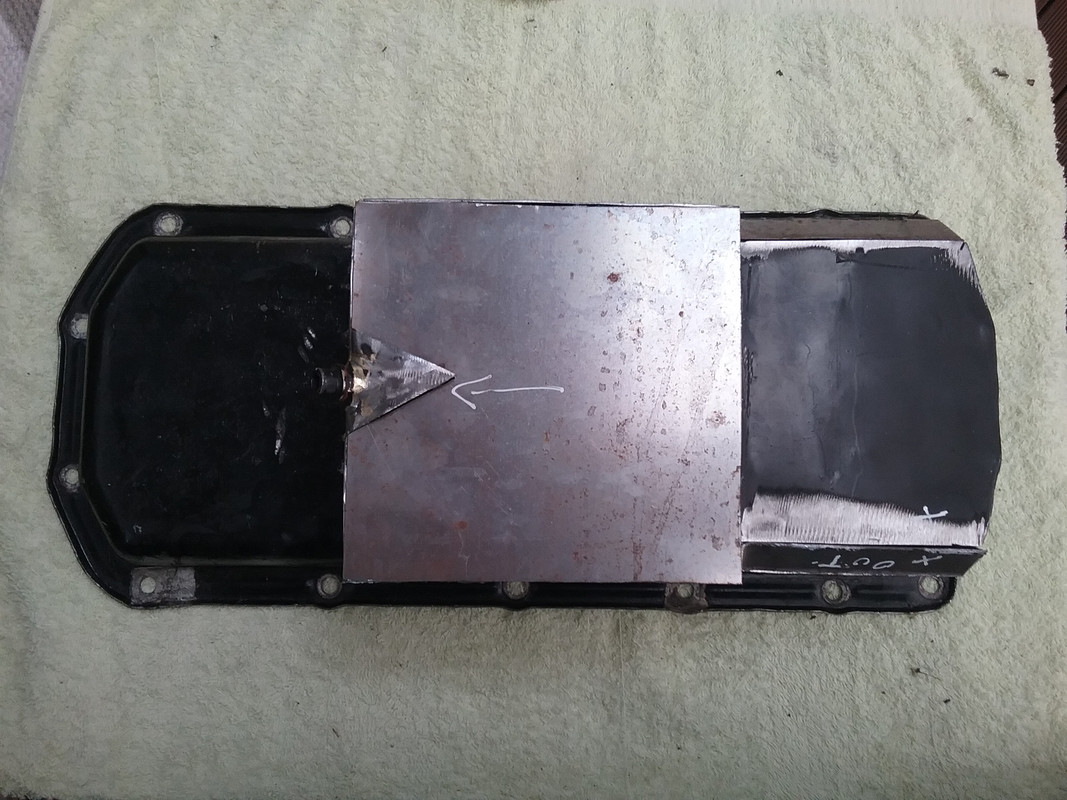
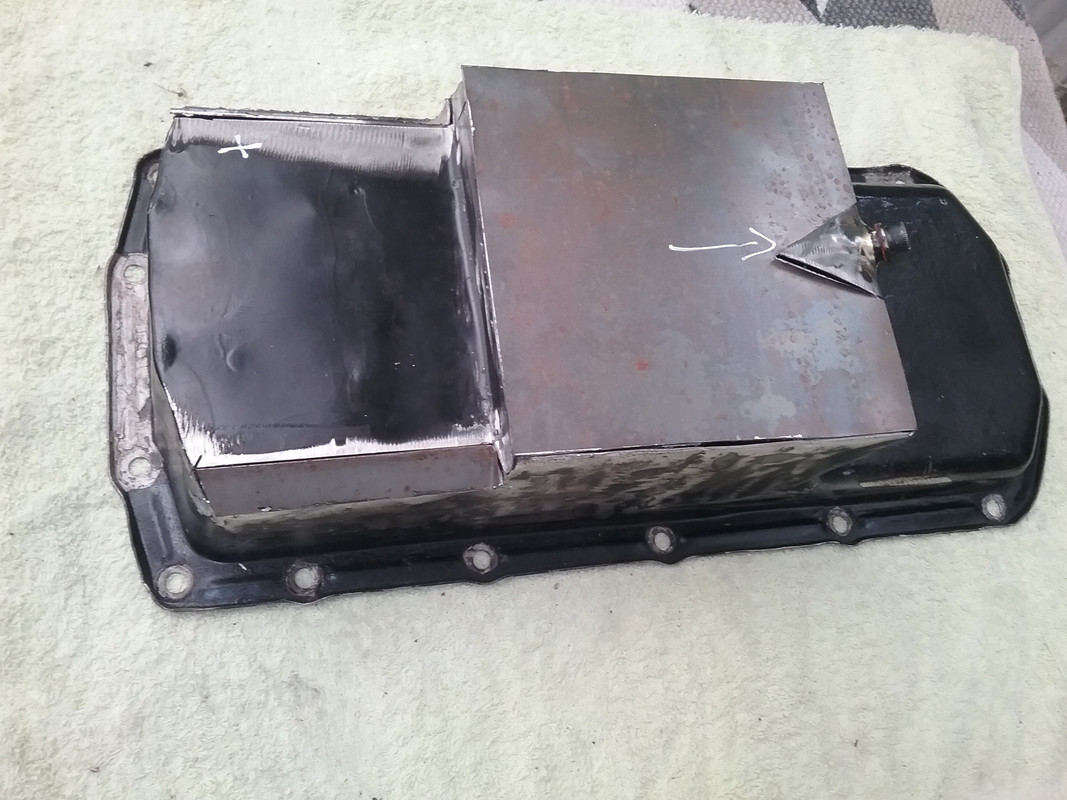
Post by enigmas on Sept 23, 2017 8:33:40 GMT
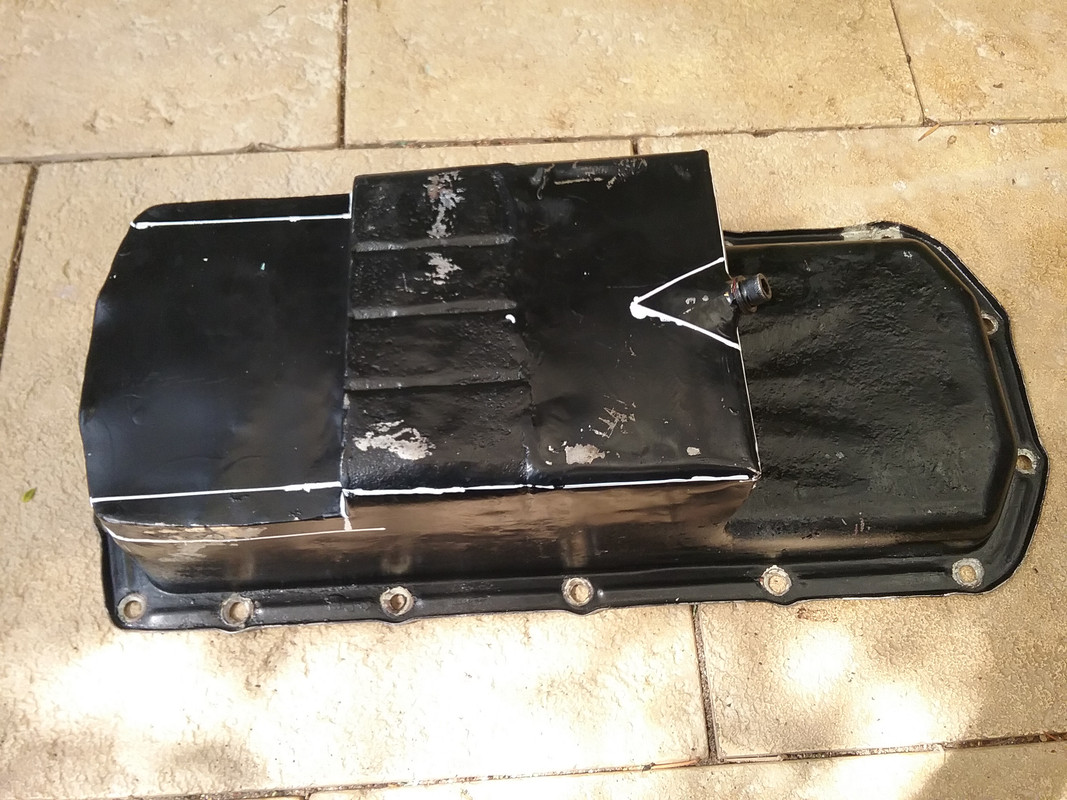
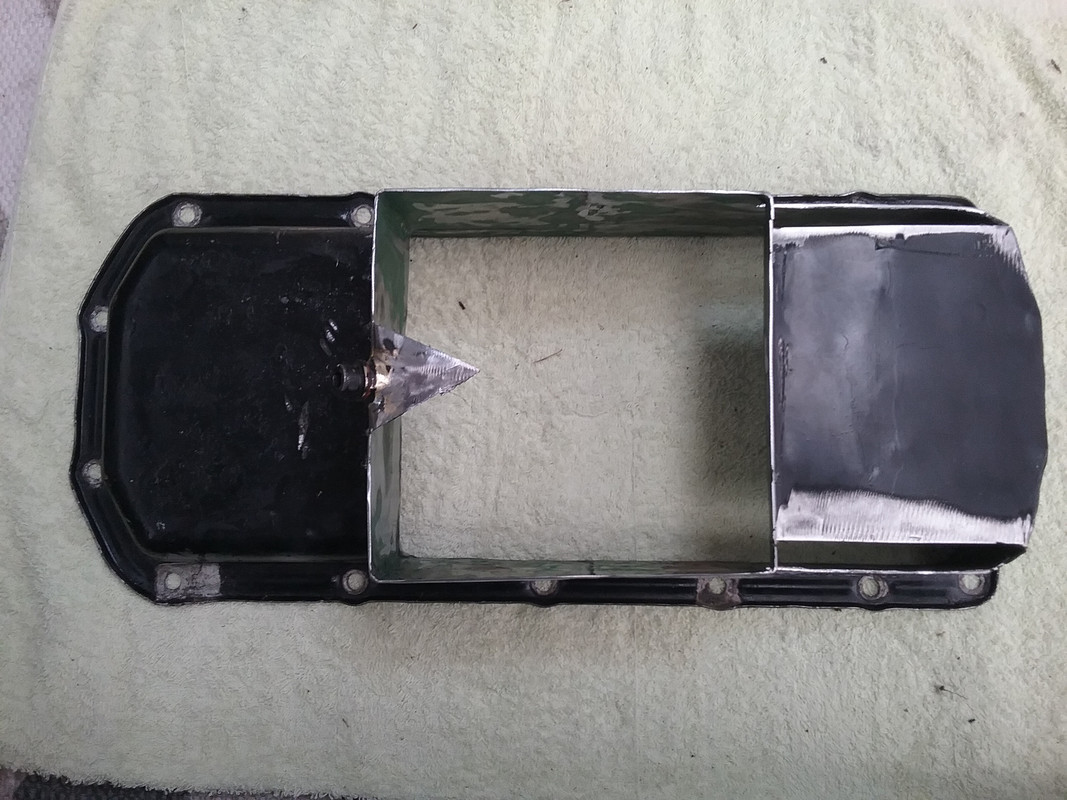
Coming along very nicely vince, didnt quite get why you have to modify the sump? Keep up the good work W. The primary modification to the sump was at the rear where it sits over the middle subframe cross member. The clearances were a bit tight so I angled the corners. As for the deep section where the pickup sits I originally just patched a piece in there and I didn't like the look of it...so out it came. I'll post some pix of today's work later this evening wozzer. |
|
|
|
Post by wozzer on Sept 23, 2017 17:16:02 GMT
Cool thanks vince
|
|
|
|
Post by enigmas on Sept 23, 2017 22:14:03 GMT
|
|
|
|
Post by enigmas on Sept 24, 2017 3:29:45 GMT
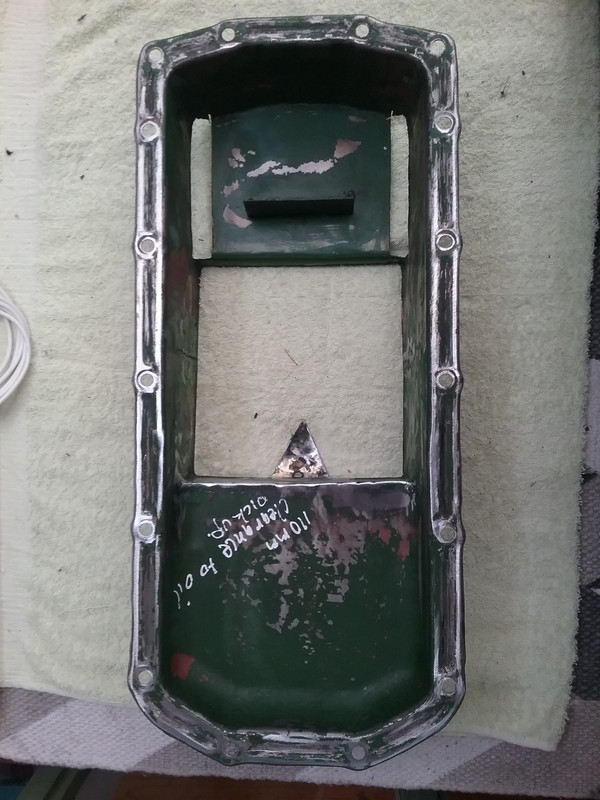
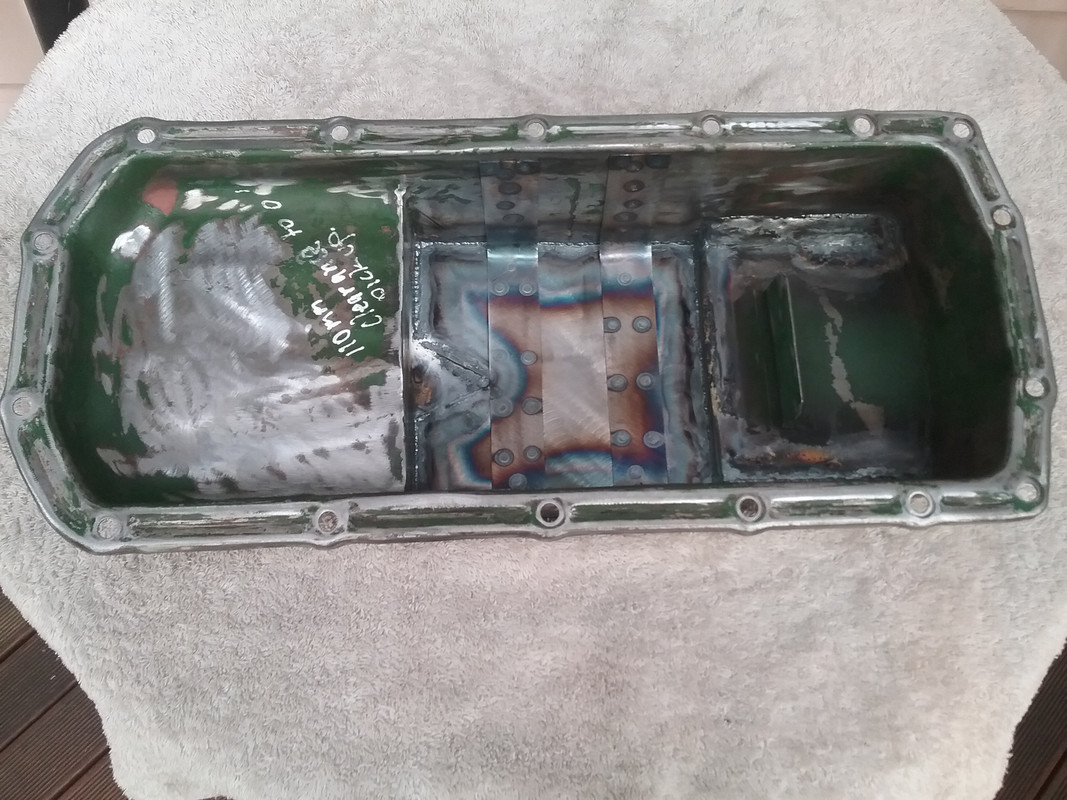
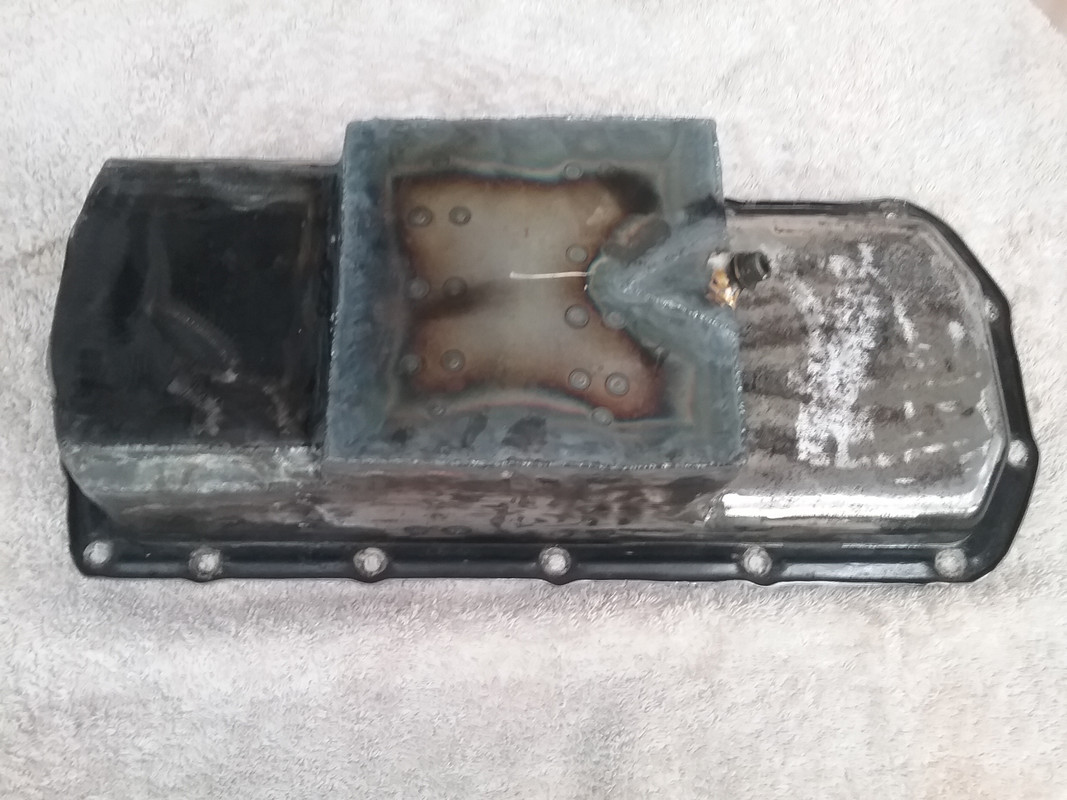
Sumpification cont: Stage 3 Finished 90% of the work on the sump. Its had a thorough cleaning, received abrasive blasting to the inside areas and was then internally coated with Glyptal 1201A. I used Glyptal to seal and smooth the welds internally and to also improve the draining ability of the engine oil from the sump during services. It's amazing how much stuff (carried and cleaned by engine oil doesn't drain from a sump * Glyptal (only available in red) dries to a very smooth finish, seals porosities and provides a slippery surface that oil doesn't adhere to. 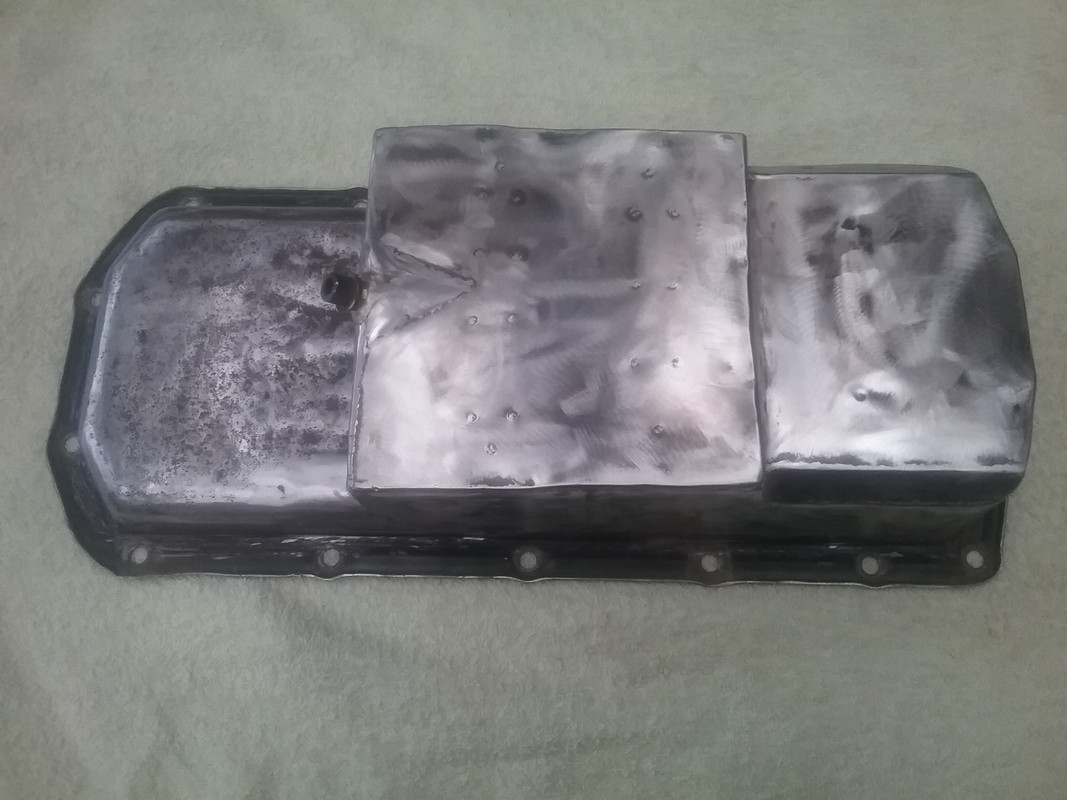 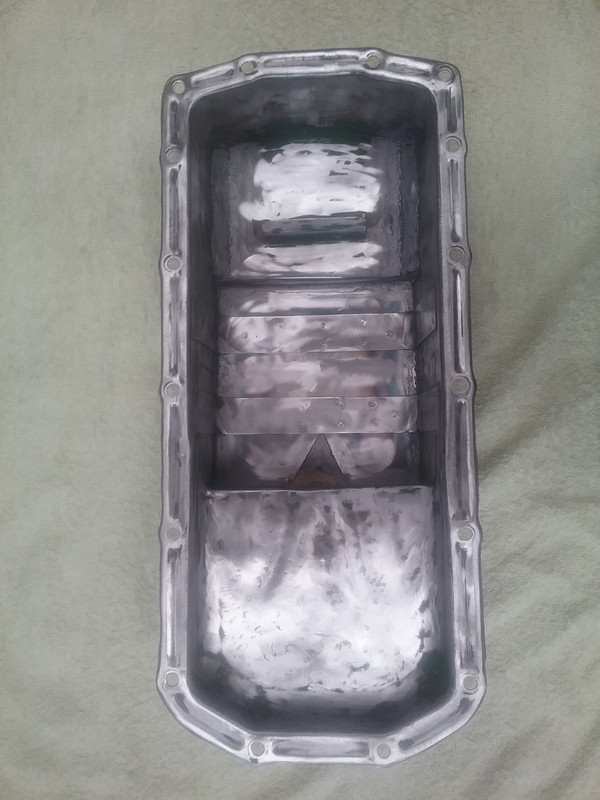 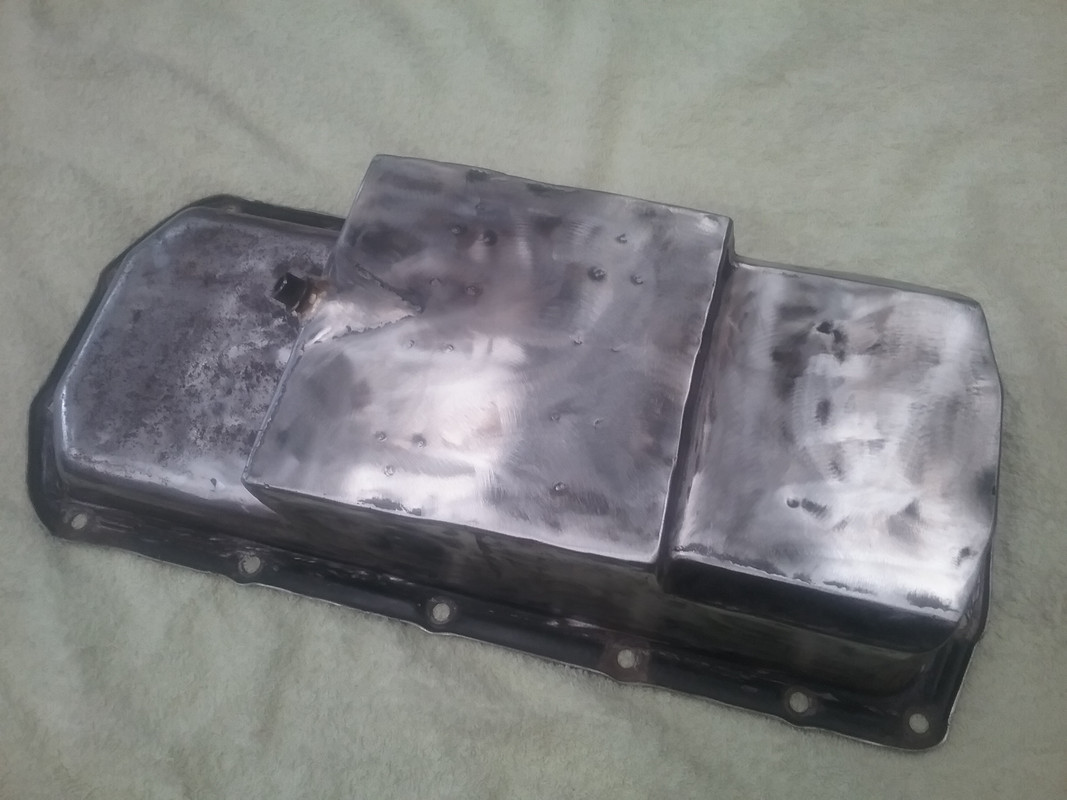 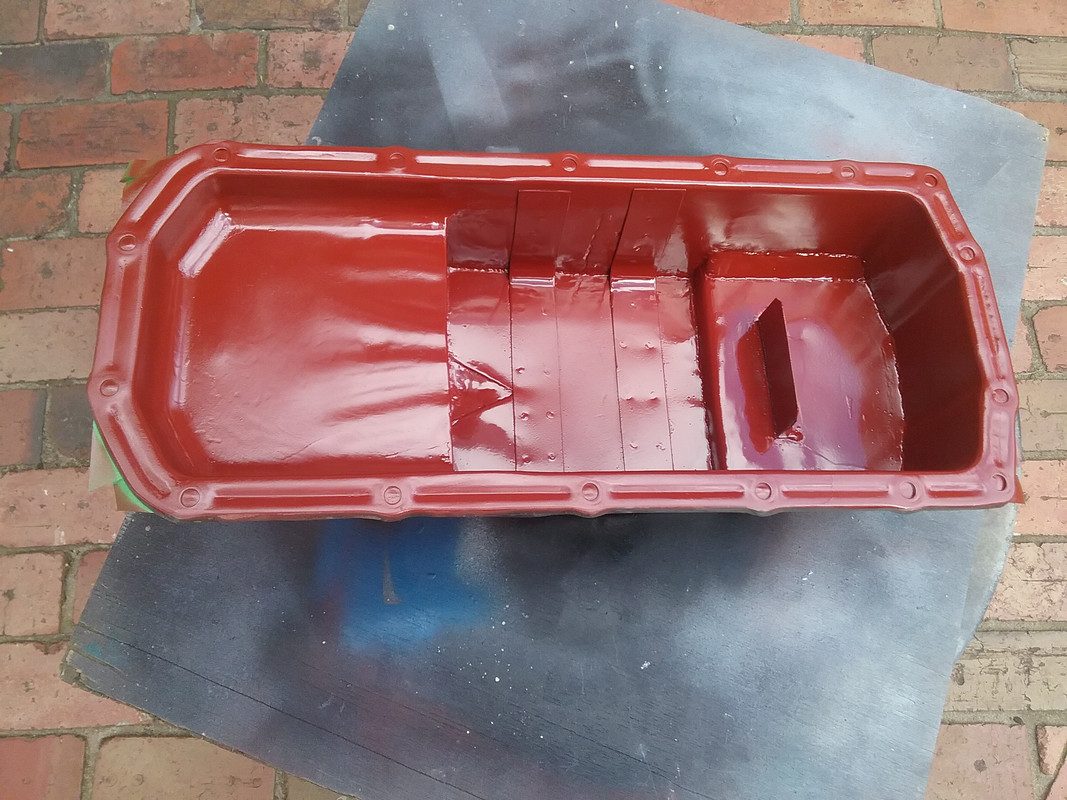 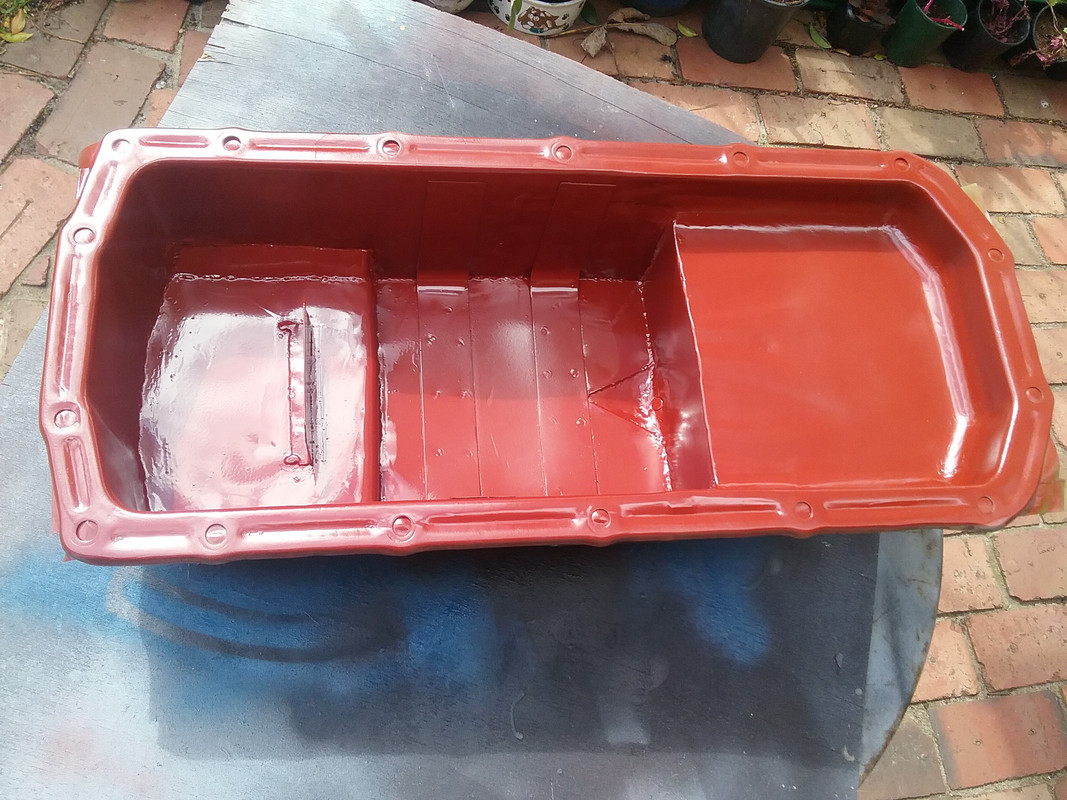 Stage 4. Both sides painted...just need to add some heat. 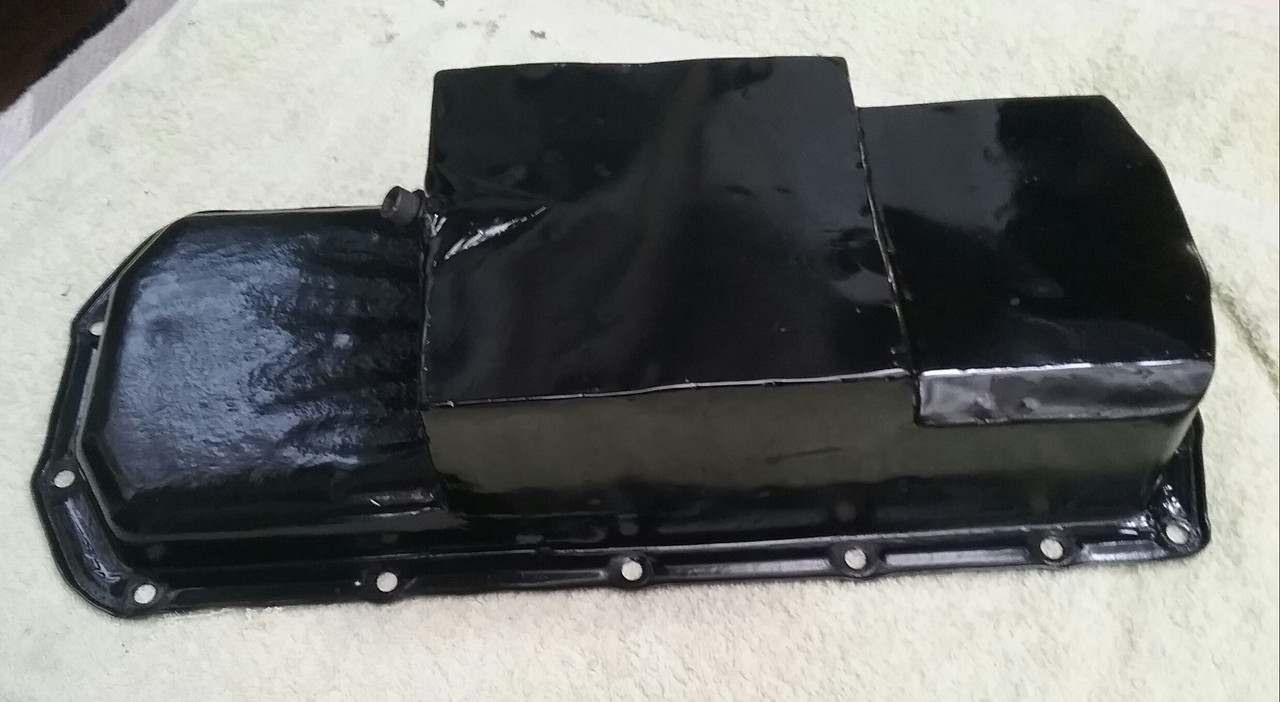 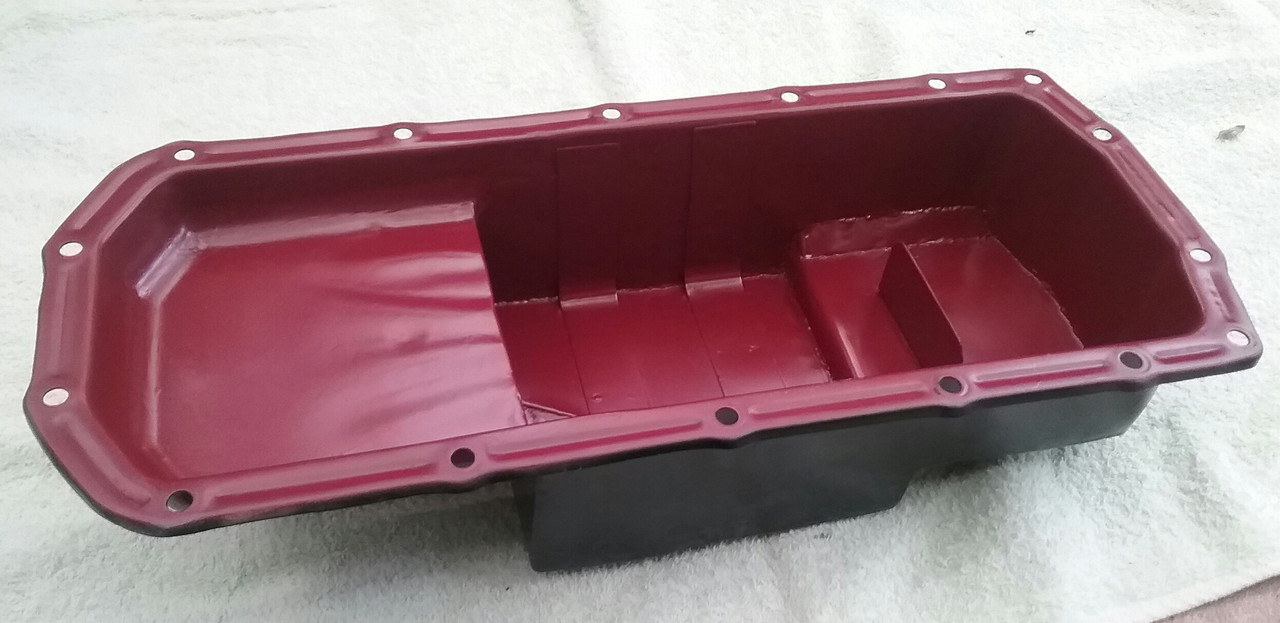 |
|
|
|
Post by enigmas on Sept 25, 2017 1:09:30 GMT
As an epilogue to 'sumpification' saga...I successfully cooked/baked the sump in front of one of the gas wall heaters in our house last night (actually the lounge/kitchen area rather than take up my daughter's offer of using her stove (as the odors given off may taint the family roasts, (who says I'm not considerate!) Fortunately our home is L shaped with a door and hallway dividing 2 sections, so any odours didn't transfer through to where my very tolerant wife was watching TV.
Postscript: The area went from being almost a dry heat sauna to a chill zone as I ventilated the front living areas with internal fans open windows and doors around 11pm.
|
|
|
|
Post by johnwp5bcoupe on Sept 25, 2017 14:23:41 GMT
As an epilogue to 'sumpification' saga...I successfully cooked/baked the sump in front of one of the gas wall heaters in our house last night (actually the lounge/kitchen area rather than take up my daughter's offer of using her stove (as the odors given off may taint the family roasts, (who says I'm not considerate!) Fortunately our home is L shaped with a door and hallway dividing 2 sections, so any odours didn't transfer through to where my very tolerant wife was watching TV. Postscript: The area went from being almost a dry heat sauna to a chill zone as I ventilated the front living areas with internal fans open windows and doors around 11pm. I would have thought the BBQ if it was a closed one? and a few tinnies would have helped plus a Hat with Corks of course  I used mine when I did my Valve Guides  |
|
|
|
Post by enigmas on Sept 25, 2017 15:24:21 GMT
Actually I didn't think of the BBQ John! It seems the obvious thing to use...but unfortunately ours doesn't have a hood.
|
|
|
|
Post by enigmas on Sept 27, 2017 13:36:45 GMT
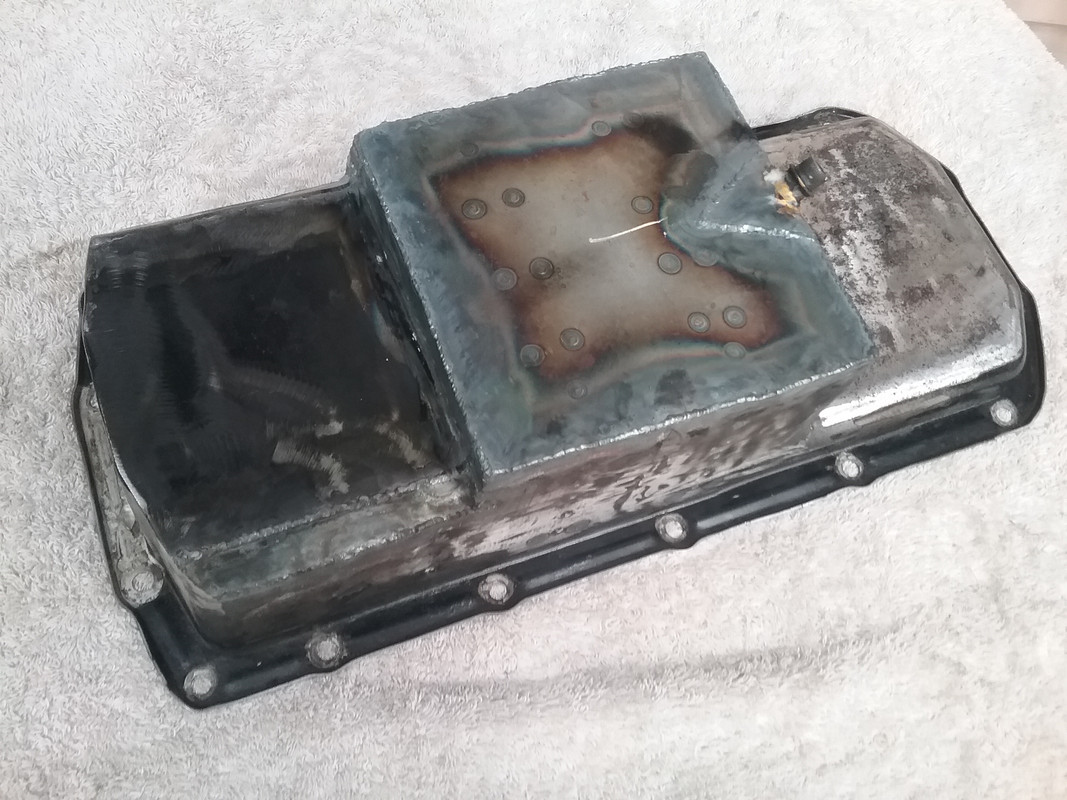
Here's the picture that was meant to go with the text (baking the sump) when the image host I use shut down uploads during maintenance.  Moving on. The engine refurbishment is now completed and I've moved on to cleaning, tidying, painting and some minor rewiring of the engine bay. With the engine out and the bonnet off it's definitely a lot easier, as I can stand in the engine bay to sort, reposition and solder connections, etc. (Pictures will follow) One final comment about fitting the sump. As they're pressed steel and have been around for considerable time, you may find the seating face either damaged bent or slightly bowed. I realize my sump is modified...but I did check the other standard sump I have. Sighting along the mating face revealed that the surface is neither true nor flat. When I fitted the sump initially I didn't think too much about it. Using a fresh gasket and Blue Hylomar I torqued it down. The rear of the sump has a small steel plate that spreads the load over and between 2 bolts. The sides and front don't have this. Viewing the finished job carefully,I noted that at 2 different positions between 2 bolts on opposing sides the gasket didn't seem to compress or crush down as much as at other positions. I found I could insert a .006" feeler gauge between the pan flange and the bottom surface of the block at these points. The fix. I cut 2 strips of 3/16" x 3/4" mild steel plate long enough to cover 4 bolt locations on the side of the block. Measured and drilled the holes and bolted the strips down into the recessed flange of the sump. Result. One very snug fitting sump. |
|
|
|
Post by enigmas on Sept 29, 2017 14:59:19 GMT
Now that the engine is done, I've spent the last couple of days sitting in the engine bay sorting out some of the messy and redundent wiring. Over a period of 24 years use electrical stuff often gets added, deleted and modified. The electronics in my Rover have evolved from a generator to an alternator, points ignition, to points assisted electronic, to full electronic (Pirhana), to a fully programmable module utilising a MAP sensor and the optical trigger of the Pirhana with a locked distributor advance. It has also been a dual fuel car, but primarily always run on LPG since the 90s. The wiring and related modules, relays, valves, lock-offs etc, were installed on a Monday, probably by a fitter who was still hung over from his weekend festivities. Fortunately it all functioned well enough and was for the most part reliable (apart from the occasional bad earth). Now with the engine and three quarters of the drive train out, I have the opportunity to unravel some of the spaghetti wound around various components and held in place with a multitude of cable ties and redirect it in a more appropriate and orderly manner. Although I think cable ties are a remarkable invention...you can take the use of a good thing too far! 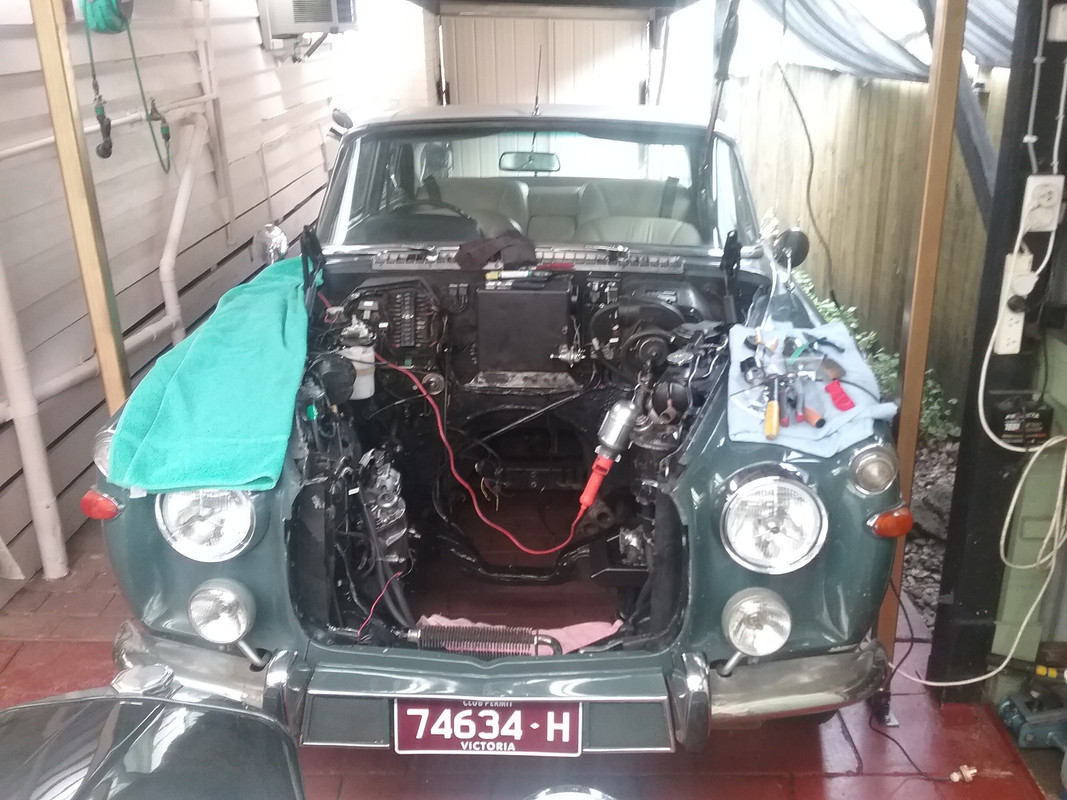 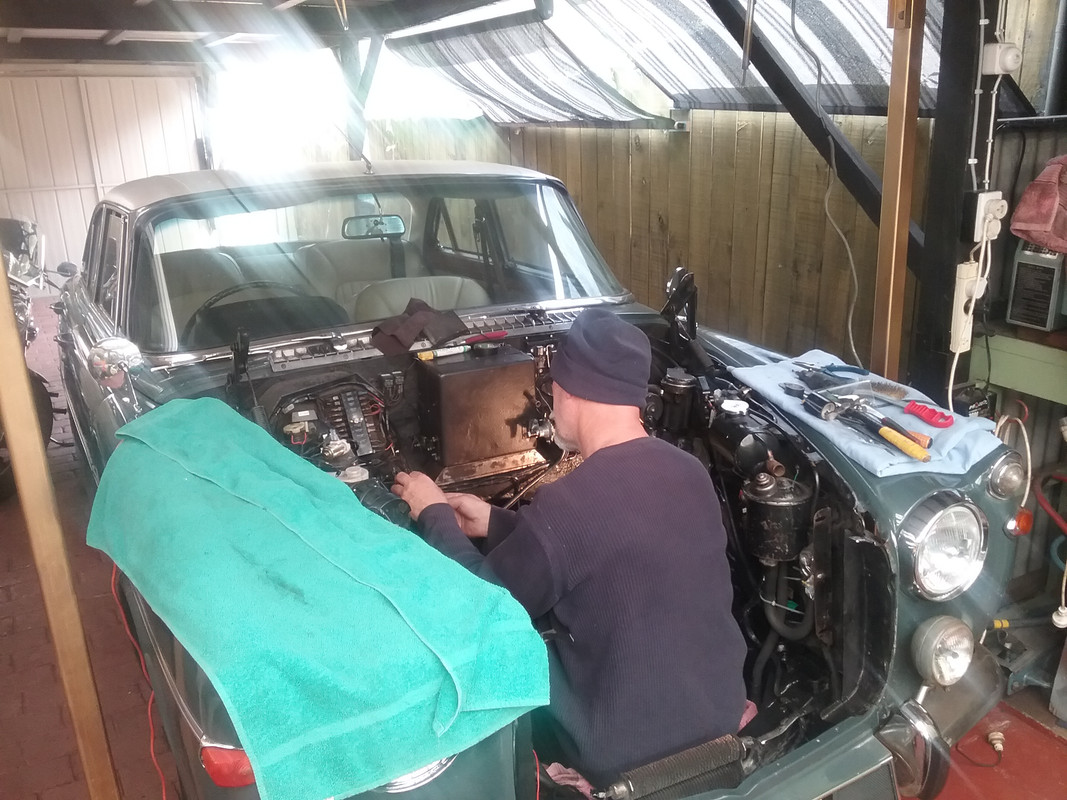 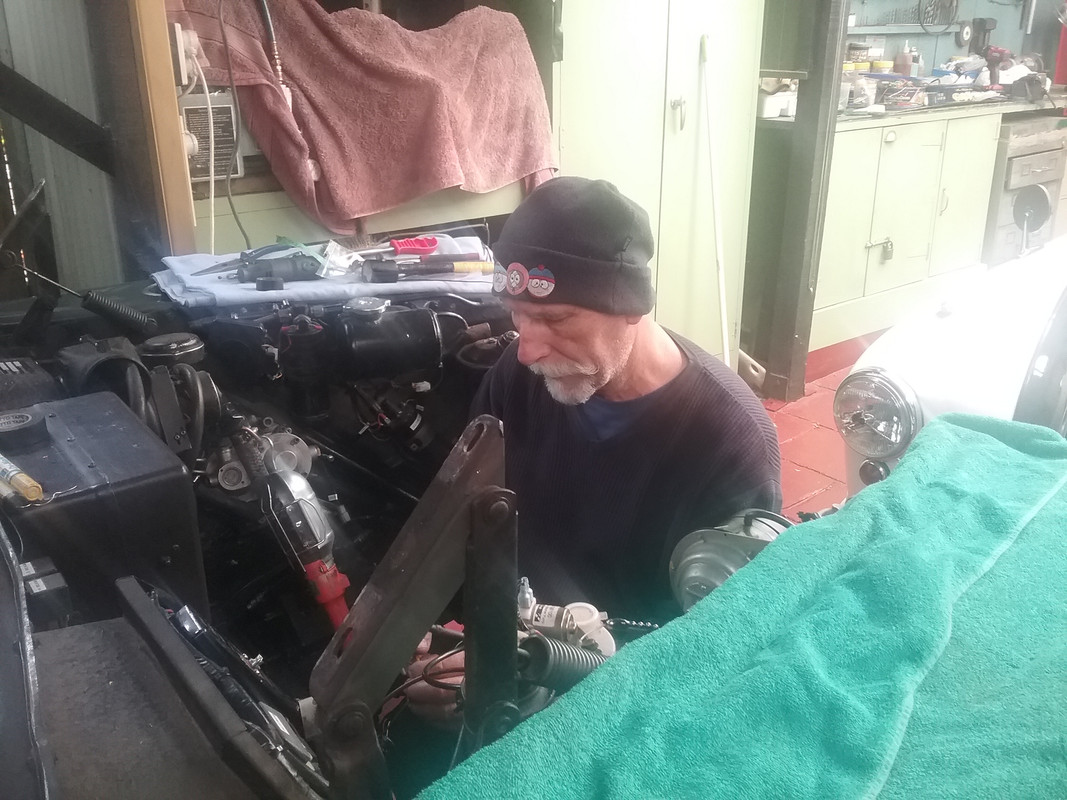 |
|
|
|
Post by enigmas on Sept 29, 2017 22:22:39 GMT
My wife does provide me with a cup of tea, biscuit or cake at times through the day Richard. I usually manage about 4-5 hrs a day generally after lunch and our morning walks to various coffee shops in our neighbourhood. And you're right...it can be a Zen thing once focused and in the zone.
|
|
|
|
Post by wozzer on Sept 30, 2017 9:48:55 GMT
Sumps turned out great vince your a great welder yourself, that looks like its been tig'd ?
|
|