|
|
Post by Steve P5b on May 14, 2014 6:16:47 GMT
Looking for advice as to the least amount of work required to replace the radius rod bushes, both sides. Is it possible to disconnect the bottom link and stub axle joint only? Thanks, Steve 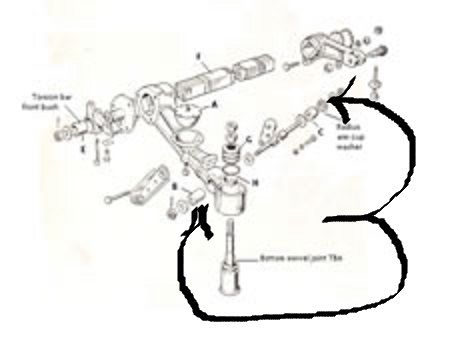 |
|
|
|
Post by enigmas on May 14, 2014 7:47:13 GMT
You're going to hate the work required if you're looking for an easy and quick fix. Whilst you're at it, it's good policy to replace the lower ball joint boot and also check the bottom ball joint if you haven't done this recently.
First off, remove the nut at the rear of the torque/reaction arm.
Then remove the bolts on the bottom ball joint and drop the arm out of it's housing. This is easier said than done. Initially, do not remove both nuts. Leave the lower nut in place but back off a half inch or so. Your aim is to shock the ball joint loose from its housing. Be very careful when you do this as you're dealing with all the stored energy of the front spring laminates. So check the WSM if unsure of the process.
Once the suspension arm has been dropped, remove the nut at the other end where the arm swivels and you should be able to withdraw the complete assembly.
|
|
|
|
Post by johnwp5bcoupe on May 14, 2014 8:51:16 GMT
As vince says steve there is no easy way having done a complete rebuild last year I would slacken the bottom ball joint nuts a few turns,break the taper the usual way, then take the load off the torsion bar by removing the adjuster, let the bottom ball joint clear the bottom link, remove the link mounting pin link housing, remove the nuts and washers on the front and rear of the radius arm, the bottom link should knock off easily (as I know you have been there recently and it will be well greased  ) with the radius arm. This is my safe way! it means a few more things to unbolt but will also make the job easier! what you don't want is the rear of the bottom link taking all the weight of the torsion bar which can lead to bending the bracket on the subframe and bending the rear of the radius arm. Again as vince says replace anything that looks knac**ered at this stage  The picture is after all this being done with the load off, you can see even with no load how little clearance there is between the bracket and the rod at the rear so with the load on  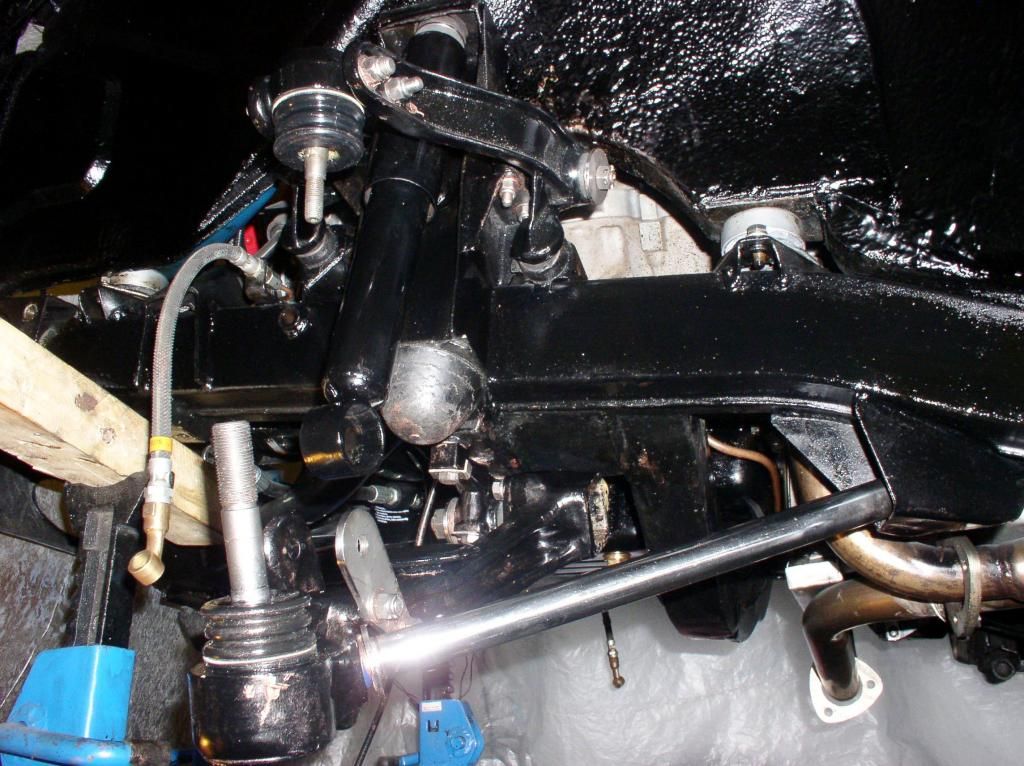 |
|
|
|
Post by Steve P5b on May 14, 2014 17:23:43 GMT
Thanks John, I must say that's a nice bit of "bling" going on under the car, very nice. Well things went as I thought and it turned into a nightmare job, ended up using a 3 foot pair of steelsons to rotate the radius rod as I couldn't get a spanner anywhere near the rear nut due to the spring being in the way. Having dismantled the assembly I found 3/32" play in the bottom joint, so thought I'd tighten it up and the inevitable happened 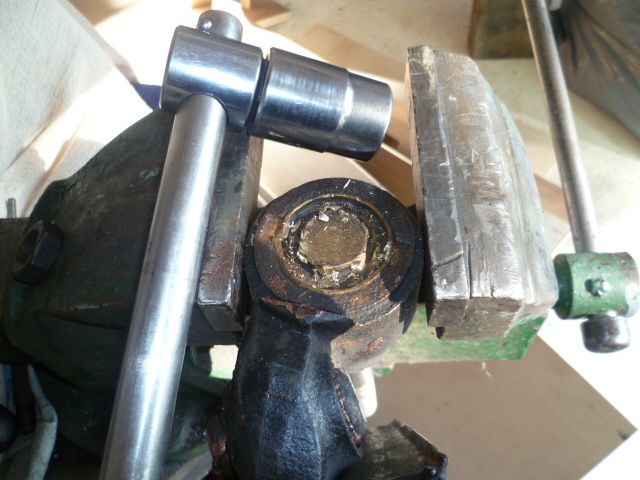 But not to worry as thankfully I have replacements available 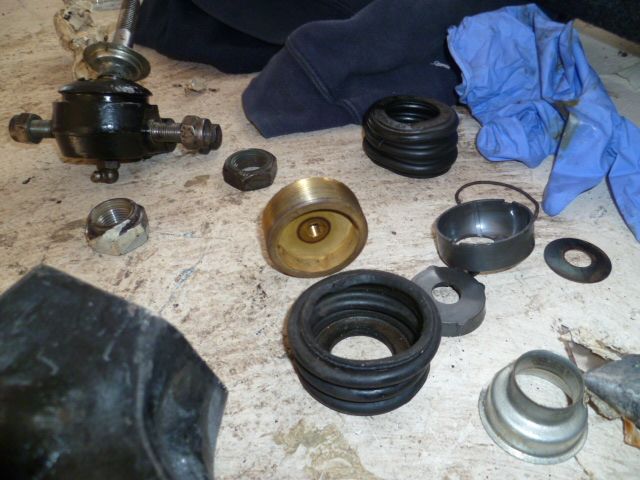 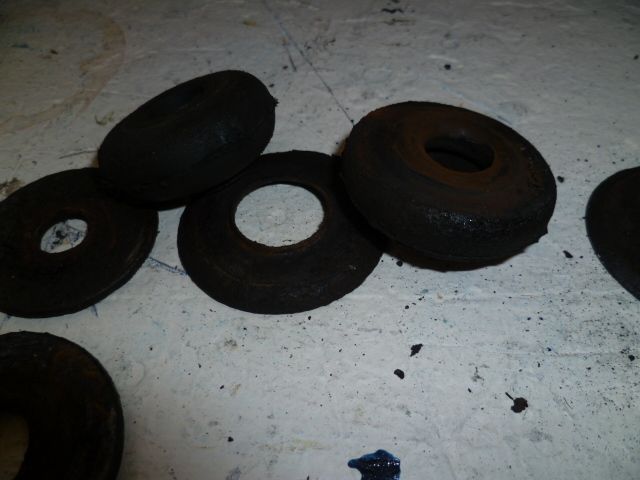 These are the old bushes, and I thought they would have been much worse, I have new ones  However your advice came in handy as I was very cautious of your advice regarding bending the rod, unfortunately someone else wasn't so careful years ago.Suprised to find it is a tube! 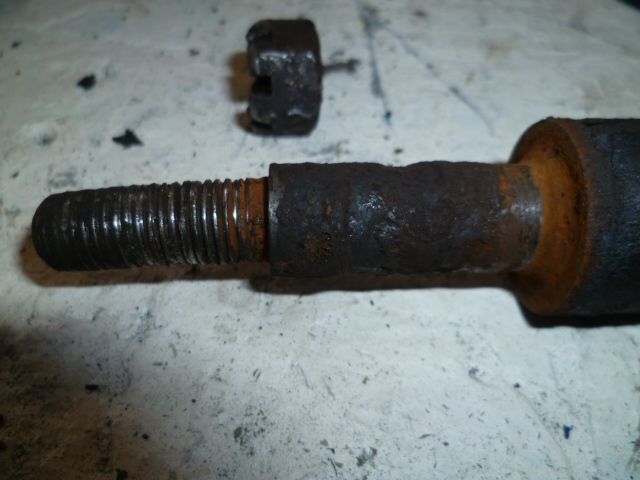 So here I am with the car in bits in the middle of Summer wishing to use the car for enjoyment and find myself unable to as I try and find a good radius rod. Where do I start? |
|
|
|
Post by cyf on May 14, 2014 17:31:24 GMT
Well, i'll look carefully at this post because I wanted to do it next winter.... hum
|
|
|
|
Post by johnwp5bcoupe on May 14, 2014 17:53:26 GMT
It can be a can of worms steve but I know you will sort it a shame the weather is now in our favor  I am snowed under at the moment steve otherwise I would make a pair of rods for you! |
|
Deleted
Deleted Member
Posts: 0
|
Post by Deleted on May 14, 2014 18:00:15 GMT
Thanks John, I must say that's a nice bit of "bling" going on under the car, very nice. Well things went as I thought and it turned into a nightmare job, ended up using a 3 foot pair of steelsons to rotate the radius rod as I couldn't get a spanner anywhere near the rear nut due to the spring being in the way. Having dismantled the assembly I found 3/32" play in the bottom joint, so thought I'd tighten it up and the inevitable happened But not to worry as thankfully I have replacements available These are the old bushes, and I thought they would have been much worse, I have new ones However your advice came in handy as I was very cautious of your advice regarding bending the rod, unfortunately someone else wasn't so careful years ago.Suprised to find it is a tube! So here I am with the car in bits in the middle of Summer wishing to use the car for enjoyment and find myself unable to as I try and find a good radius rod. Where do I start? Hindsight, I know, but for the benefit of other people intending to tackle adjusting the bottom ball joint, wouldn't it have been better to try and unscrew it before tightening? Maybe some plus gas to soak first. Sorry if I've misread your post. |
|
|
|
Post by Steve P5b on May 14, 2014 18:06:59 GMT
With hindsite I wish I'd given it to you to do for me  |
|
|
|
Post by Steve P5b on May 14, 2014 18:09:11 GMT
It can be a can of worms steve but I know you will sort it a shame the weather is now in our favor I am snowed under at the moment steve otherwise I would make a pair of rods for you! Thanks for the offer but I like to keep my car "original" Out of interest are yours tubes or solid? |
|
|
|
Post by johnwp5bcoupe on May 14, 2014 18:15:16 GMT
I just looked for my old rods steve then I remembered I gave them to Barry Kent for someone who was stuck! I forgot to say steve no Bling if it looks shiny it's Stainless Steel They are tube! when you find a new pair of original rods let me know The SS ones are an exact copy of the original ones in every detail even the pip 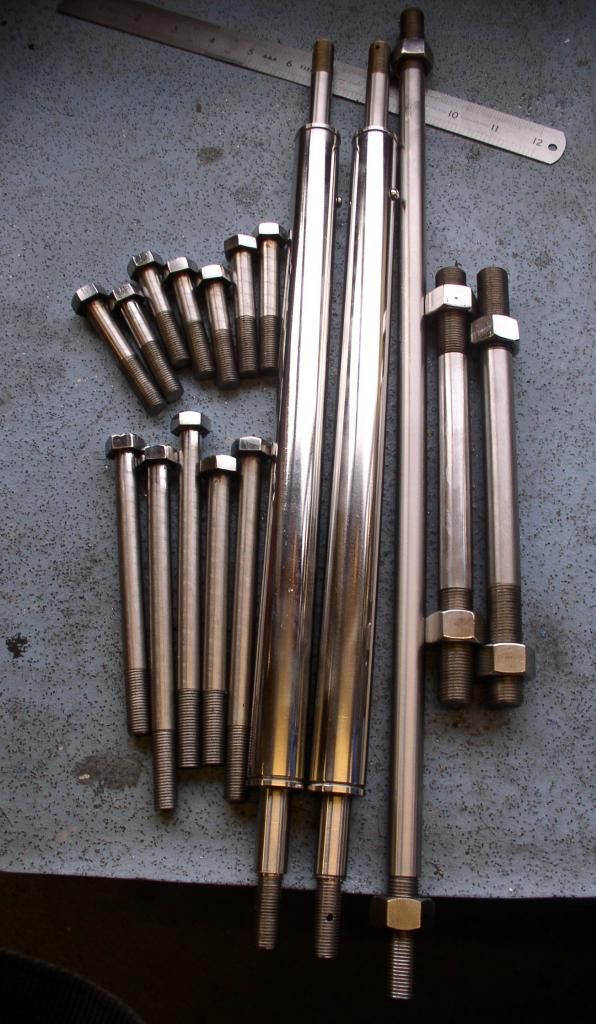 |
|
Deleted
Deleted Member
Posts: 0
|
Post by Deleted on May 14, 2014 18:24:54 GMT
I just looked for my old rods steve then I remembered I gave them to Barry Kent for someone who was stuck! I forgot to say steve no Bling if it looks shiny it's Stainless Steel They are tube! when you find a new pair of original rods let me know The SS ones are an exact copy of the original ones in every detail even the pip What was the purpose of the "pip"? |
|
|
|
Post by johnwp5bcoupe on May 14, 2014 18:26:42 GMT
Orientation Richard |
|
Deleted
Deleted Member
Posts: 0
|
Post by Deleted on May 14, 2014 18:29:21 GMT
Orientation Richard Thanks John, I would never have guessed that. Nice work on the replacements. |
|
|
|
Post by Steve P5b on May 14, 2014 18:30:44 GMT
Orientation Richard Not sure what you mean? When you made yours, are the ends shrunk into the tube as a way of location or welded somehow. If shrunk, I may be able to knock an end out in the lathe tomorrow. |
|
|
|
Post by johnwp5bcoupe on May 14, 2014 18:43:33 GMT
I thought you wanted original one steve Right seriously trying to help There is a shoulder about 1" long a tight fit inside the tube, I drilled two 3/16" holes one either side and spot welded the tube to the stub, as you have probably found out both stubs are different diameter and lengths the split pin hole distance is important steve it will save you grief later! use a good grade of steel EN8 not just standard mild steel. |
|
|
|
Post by enigmas on May 14, 2014 22:25:13 GMT
|
|
|
|
Post by djm16 on May 14, 2014 23:07:58 GMT
Your ball joint is different to mine in having some play adjustment. In mine, the play is taken up by a small spring. For the benefit of others considering doing the same, was there any need to remove 1/32 of play? I am having a hard time imagining any situation where the ball will not be firmly pressed upwards by the action of the torsion spring.
|
|
|
|
Post by Steve P5b on May 15, 2014 5:56:50 GMT
Your ball joint is different to mine in having some play adjustment. In mine, the play is taken up by a small spring. For the benefit of others considering doing the same, was there any need to remove 1/32 of play? I am having a hard time imagining any situation where the ball will not be firmly pressed upwards by the action of the torsion spring. Yes, you would think that is the case, this may help understand, as I see it any movement is detrimental too precise steering geometry but I have no idea of wear tolerances for this car www.youtube.com/watch?feature=player_detailpage&v=eCgoMyxZnac#t=664 |
|
|
|
Post by Steve P5b on May 15, 2014 6:00:55 GMT
Thank you , a very handy way to see a repair, not sure what to do with mine at this time, would prefer to replace with a decent unworn part but probably not many in existence |
|
|
|
Post by Steve P5b on May 15, 2014 6:07:49 GMT
Orientation Richard John, thank you for your help in this matter, it's a shame you are so busy to make new ones, I quite fancy nice shiny new ones. One thing puzzles me regarding the "pips" if the rod is not bent or shaped in any way what difference does the rotational position matter? splitpin holes? Thanks |
|
|
|
Post by johnwp5bcoupe on May 15, 2014 7:14:38 GMT
That would work for one end vince but the other shoulder is a much larger diameter than the external thread, a sleeve could be used? |
|
|
|
Post by johnwp5bcoupe on May 15, 2014 7:27:59 GMT
Orientation Richard John, thank you for your help in this matter, it's a shame you are so busy to make new ones, I quite fancy nice shiny new ones. One thing puzzles me regarding the "pips" if the rod is not bent or shaped in any way what difference does the rotational position matter? splitpin holes? Thanks The ends are different steve so they have to be fitted the correct way around the pips denote the which end is which, the holes for the split pin! when you fit the rear castle nut with the new bushes it's a good reference to how much to tighten the nut (as long as they are the same depth new ones can be different), otherwise you may destroy the work you have done, plus it will be a bit of a job to drill a hole for the split pin in situ I know you like shiny steve my reason for the SS is one of "I am getting too old to keep crawling under the car to keep it clean" not to mention rust free Are your Cup washers ok? Chamfered washers ok? |
|
|
|
Post by Steve P5b on May 15, 2014 8:10:53 GMT
I have the same feelings regarding "shiny" I too ache enough without getting under the car  . Got that regarding the pip, strange ways rovers had. Haven't looked at the washers as I'm assembling the bottom ball joint with no pictures, so one final question, does the Bellville washer fit between the brass nut and the nylon bearing cup? Thanks |
|
|
|
Post by enigmas on May 15, 2014 8:39:39 GMT
DJM, a 1/32" of play is too much free play in a ball joint. Having the weight of the car on a ball joint doesn't unfortunately fix the situation. If you can gauge 1/32" using your physical strength imagine the forces of a vehicle turning corners or going over rough terrain acting on that joint. Ideally you should disassemble the ball joint, clean the components and add fresh grease. When reassembling it, add some preload to the joint. When you swivel the taper, there should be some resistance otherwise it is too loose. Ball joints don't improve with wear and tear unless 'someone' intervenes. Don't be frightened off...they are quite easy to rebuild and very robust. As an aside you find the car is more stable and less inclined to veer under hard braking. Go for it. |
|
|
|
Post by Steve P5b on May 15, 2014 8:58:25 GMT
|
|


 ) with the radius arm. This is my safe way! it means a few more things to unbolt but will also make the job easier! what you don't want is the rear of the bottom link taking all the weight of the torsion bar which can lead to bending the bracket on the subframe and bending the rear of the radius arm.


 .
.


