|
|
Post by eisdielenbiker on Jun 10, 2009 9:53:38 GMT
Hello, I started to renew the rubber seals on the driver side now. I got them from Scots Old Auto Rubber. Rear door was easy. Front door seems a little more difficult as to the B-post section. That section glues between point 1 and 2 in the picture below. Have you got any hints or tricks to make the best of it ? 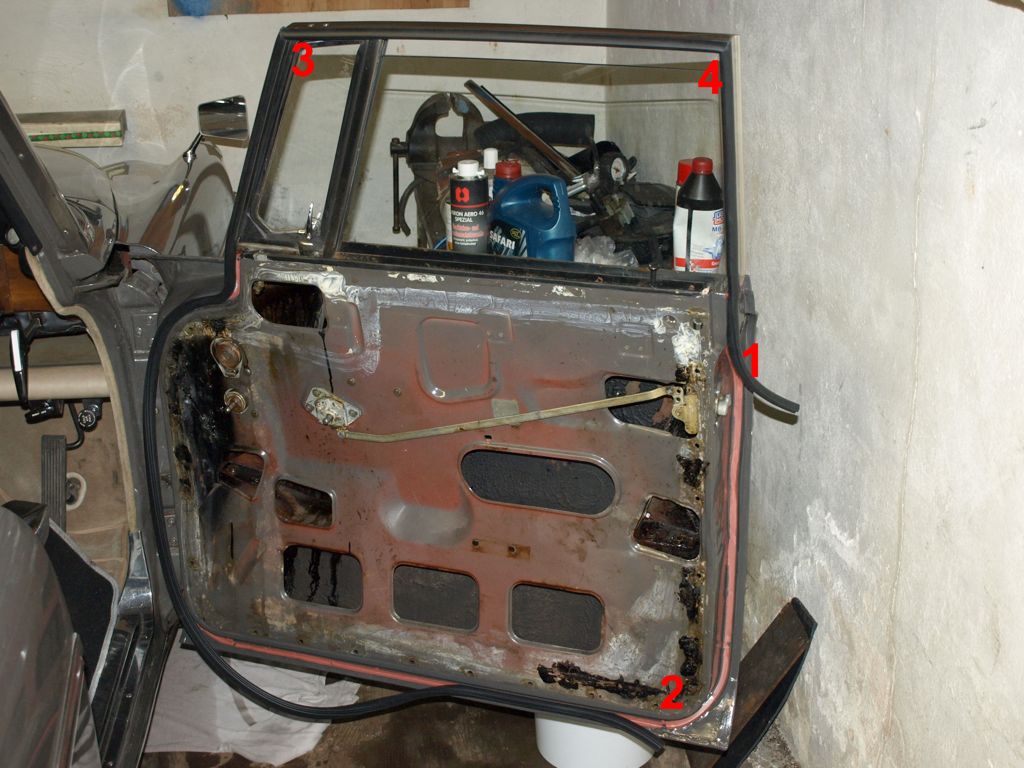 At 3 and 4 I used contact cement. Generally I only put the rubber into the stainless steel frame using a little white lube intended for fitting of plastic roof gutter. The lower channels where rust protected prior to glueing with special Pattex. On some critical corners I also used contact cement. At the rear door only 2 cuts were necessary, the 2nd of which I will possibly avoid at the nearside: 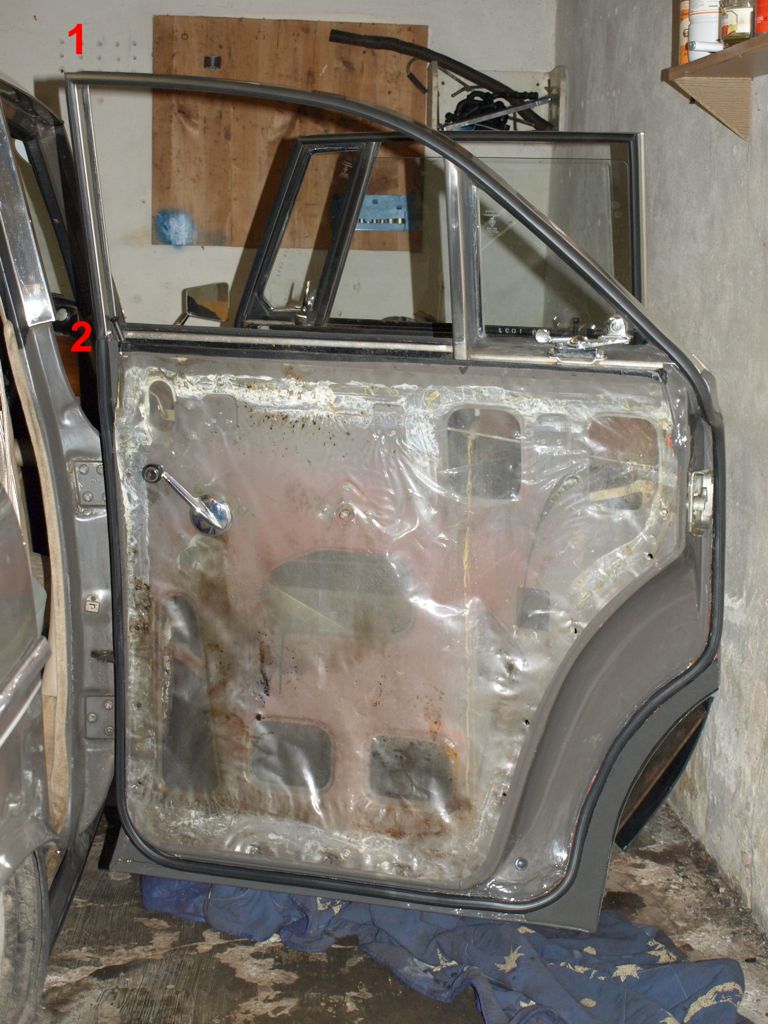 At the moment all the rubber seals you can see are of the same type. Just front door B-post section is different and a matter of question. At the rear I made up a new fillet piece from a 1.5 cm cellular rubber mat that is working very fine: 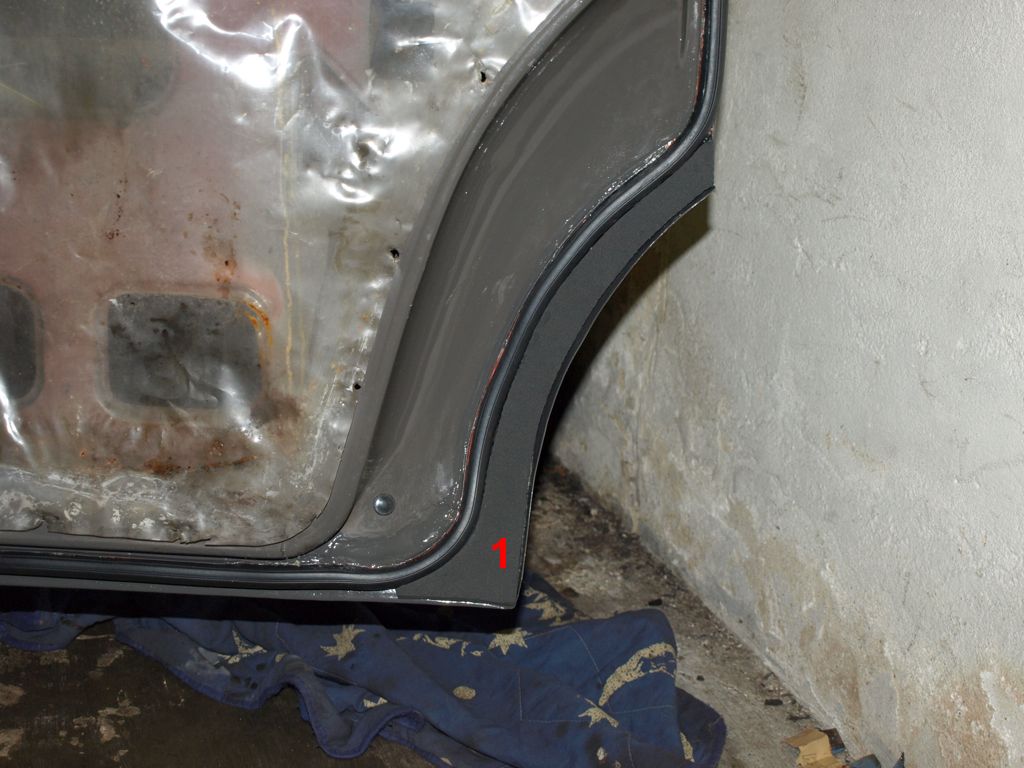 Mark |
|
|
|
Post by mcgill on Jun 10, 2009 11:59:55 GMT
nicely timed eisdielenbiker,im in process of doing mine in scotts,just gotta put the lower door channels on,on all four doors...can you tell me if those bottom door channels are double or single lipped?..(girl a wadhams couldnt tell me ...is it a secret)
.looks good with a bit of fresh rubber.
did you have to stretch the door rubber at all?
do the rear close ok .?
|
|
|
|
Post by eisdielenbiker on Jun 10, 2009 12:31:50 GMT
mcgill,
there is no way of stretching the seals at all. They are stiffer than the original partially very soft ones. But they had collapsed totally. I cannot imagine how the new ones should be prevented from shortening again before glue gets solid. The rear door closes fairly well after adjusting. I had to put the lock plate on D-post about 2 mm outwards. Therefore the trim is in line again. However my o/s D post has been welded recently. I guess the fit would be tighter on the near side. The rubber shape is all the same all the door round besides the front b-post section. The lower metal door channels are double lipped if I understand you right. There might be 5 mm to the doors bottom in space from the upper lip. Hence the seal gives a tight fit even without glueing inside the channel.
Thats why I just used a silicone like glueing stuff from Pattex. It also fills uneven patches contrary to contact cement.
Are yours rusted away ?
Mark
|
|
|
|
Post by Colin McA on Jun 10, 2009 12:46:33 GMT
Do your rear doors shut?
I had to use the small sections otherwise the door would not sit flush.
Otherwise I used contact glue but be sure to key the surface first.
Colin
|
|
|
|
Post by eisdielenbiker on Jun 10, 2009 14:02:45 GMT
Colin,
did you also use the small section for the lock area of front door ?
Rear shuts well without using the small alternative section for B-Post. Might be different on passenger side.
'key' i.e. 'clean' beore ct.cement use ?
Mark
|
|
|
|
Post by Colin McA on Jun 10, 2009 15:33:49 GMT
Hi,
to Key the channel I rubbed a bit of sand paper over it just to take the shine off the paint, seems dislike shiny surfaces.
I had to use the alternative piece because as you will have found there is not much stretch in the rubbers.
|
|
|
|
Post by mcgill on Jun 10, 2009 15:59:45 GMT
thanks eisdielenbiker,just what i needed to know.
|
|
|
|
Post by eisdielenbiker on Jun 10, 2009 18:29:11 GMT
Colin,
as visible there is just a reddish rust primer paint in the channels. That does not shine anyway.
Mark
|
|
|
|
Post by Welsh Warlock on Jun 11, 2009 23:01:35 GMT
Just a quick poiinter for anyone doing this job, when you are doing the corner marked 4 on the above pics (the top outer corner of the door seal), instead of cutting it all the way through and glueing back together it looks much neater if you cut a V section three quarters of the way through the rubber and fold it round the corner. It seals better too. And it stays in pace in the stainless channel better.
|
|
|
|
Post by Warwick on Jun 12, 2009 0:29:13 GMT
I've never tried this, but I heard about it years ago.
I was told that Super glue (i.e. cyanoacrylate) can be used to glue rubber and that it is possible to butt join the rubber sling on a speargun.
If that is true, it should give a sufficiently strong butt joint on door and screen rubbers. Unless the door seals are too porous internally.
|
|
|
|
Post by eisdielenbiker on Jun 12, 2009 8:46:31 GMT
Concerning the #4 corner(also #3 and #1):
You have to consider that the small inward channel is not going evenly around the corner. There is a small s/s rim inside.
I keep on posting pictures as I will be in the garage tonight again. I use super glue GEL reinforced with 'rubber' particles which gives a trace of elasticity and no drips compared to standard and rather drippy super glue.
Mark
|
|
|
|
Post by johnwp5bcoupe on Jun 12, 2009 11:33:32 GMT
Concerning the #4 corner(also #3 and #1): You have to consider that the small inward channel is not going evenly around the corner. There is a small s/s rim inside. I keep on posting pictures as I will be in the garage tonight again. I use super glue GEL reinforced with 'rubber' particles which gives a trace of elasticity and no drips compared to standard and rather drippy super glue. Mark You can fit the rubbers without cutting the 45 degree corners you cut the 45 degrees on the inside where it's not seen you end up with a slight radius instead but it looks fine and you don't have the horrible cut to deal with the only one you have to do with a 45 degree cut is the rear door at No1 position. |
|
|
|
Post by eisdielenbiker on Jun 12, 2009 12:27:15 GMT
John,
so you consider #2 cut on the rear door as obsolete ?
I also tend to think so.
Mark
|
|
|
|
Post by Warwick on Jun 13, 2009 9:14:18 GMT
This is all very helpful. This is a job that I really need to do. Mine were all replaced at some time but they weren't glued very well so have become detached and distorted in places.
Are you doing the boot rubber too Mark?
|
|
|
|
Post by eisdielenbiker on Jun 15, 2009 7:48:29 GMT
Warwick,
I bet that if I used that special dedicated rubber glue the door seals would come off again too.
I also did the boot seal. I used that rubber glue you thinly cover both pieces with wait a few minutes and press together. This stuff never works for me. I redid loose pieces with Super Glue on the boot seal. Disadavantage is the damage that follows any try to remove it again... However I had to reinforce the boot seal in places as the tension againgst the boot lid is rather weak. I checked success it with a piece of paper in several places around the lid.
I also let my wife lock me in the boot. That method is inferior to the paper method. Also in respect to get free again ;-)
Mark
|
|
|
|
Post by Warwick on Jun 16, 2009 0:17:17 GMT
Thanks Mark,
That reminds me of the old joke about finding out who your real friend is. You lock your wife and your dog in the boot for a couple of hours and see which one is really glad to see you when you open the lid.
Mine has been glued on with contact cement, and has detached. I've used this type of glue on car seals and other things for 40 years and I've found that the quality of the results depend largely on preparation and glue quality.
And the range in glue quality is large. The general purpose, home handyman contact adhesives aren't up to it. The best I ever used was an automotive trim adhesive called Goa that was readily available here in the '60s and '70s but I haven't seen it since. I've also found that the contact glue used for gluing Laminex (Formica) sheets to tables and benchtops is a close second.
Do you have a photo of the boot seal Mark? Mine is twisted so I'm not sure how it is supposed to look.
|
|
|
|
Post by johnwp5bcoupe on Jun 16, 2009 5:31:20 GMT
John, so you consider #2 cut on the rear door as obsolete ? I also tend to think so. Mark Sorry for the delay Mark I haven't been on th PC much busy building wall and Patios   I have done a few now and never cut at #2 I used a 2 part contact adhesive to stick the rubbers to the door I will send you the info  |
|
|
|
Post by glennr on Jun 16, 2009 6:42:37 GMT
I managed to get across to see John at the weekend and took some photo's. As usual, an excellent job.   |
|
|
|
Post by Warwick on Jun 16, 2009 7:08:15 GMT
I used a 2 part contact adhesive to stick the rubbers to the door I will send you the info What brand is it John? Is it a motor trimmer's product, or is it intended for some other application? |
|
|
|
Post by johnwp5bcoupe on Jun 16, 2009 12:26:32 GMT
I used a 2 part contact adhesive to stick the rubbers to the door I will send you the info What brand is it John? Is it a motor trimmer's product, or is it intended for some other application? Thanks Glenn taking pics and I am not finished yet! It is Bostik 2402 Warwick and Mark about £27 a liter but it will stick |
|
|
|
Post by eisdielenbiker on Jun 16, 2009 14:04:17 GMT
|
|
|
|
Post by johnwp5bcoupe on Jun 16, 2009 14:56:59 GMT
|
|
|
|
Post by Warwick on Jun 16, 2009 23:53:43 GMT
Thanks John.
|
|
|
|
Post by eisdielenbiker on Jun 17, 2009 18:43:25 GMT
Warwick, I put boot seal pictures into another thread: roverp5.proboards.com/index.cgi?board=Roversfromaroundtheworld&action=display&thread=3387Now I am up to the front door seal. However I realized a mistake in a too short wide seal section:   Originally Scotts suposses a medium wide section there. I believe It would not help too because you have to cut a little there anyway. SuperGlue is my best friend... Here I have to cut too, there is no intermediate piece supposed to be from Scotts:  Door closes easier than rear at the moment but seems not very tight at the A-Post slung up to the windscreen. More to follow. Mark |
|
|
|
Post by Warwick on Jun 18, 2009 0:32:45 GMT
Thanks Mark,
That flat section in the photos above is one of the areas that has come adrift on mine. I can't really reuse it because it has become twisted and crushed and so would never sit properly again - even with good glue.
I had intended to take it to show Scott and ask him to show me how it should be done, but the blown head gasket has delayed that somewhat.
I notice that you have removed the weather strip (stainless & rubber) from the top edge of the driver's door skin. I need to replace the rubber strip on mine (it's split) but I've been unsure of how to remove it without damage.
|
|