|
|
Post by enigmas on Aug 16, 2015 14:24:21 GMT
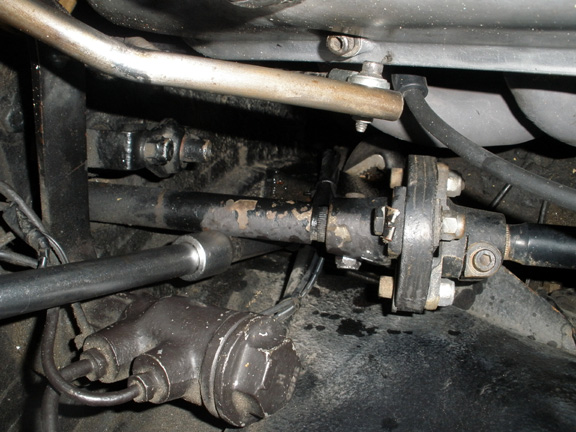
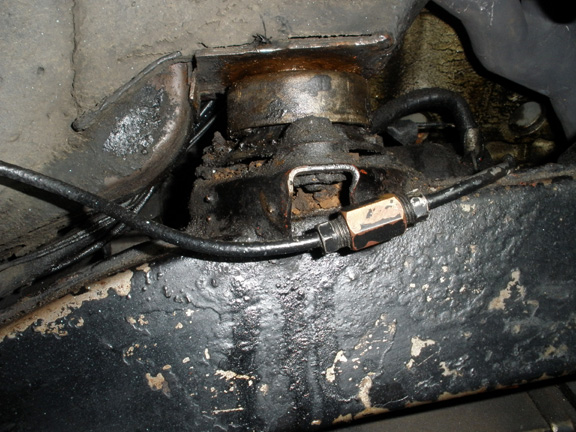
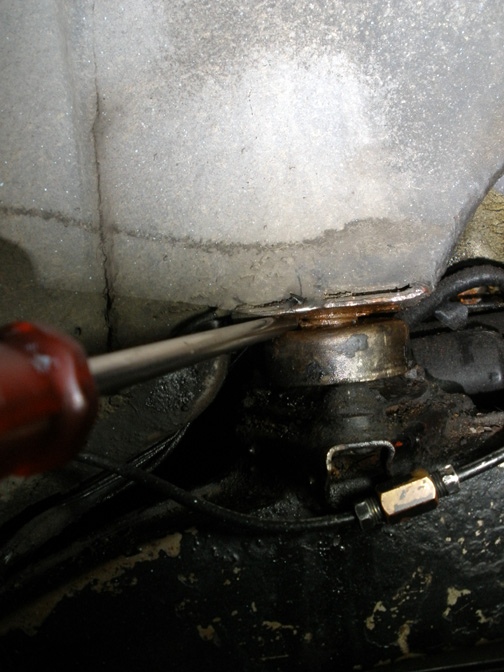
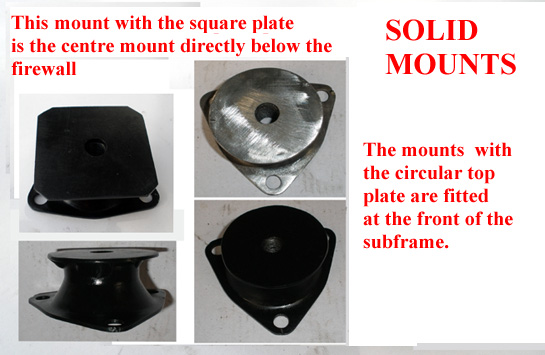
A while back I posted comments regarding the P5 subframe and the relative movement allowed by the OEM mount by virtue of the rubber cushion between the metal parts of this component. I am not exactly enamoured with the design that allows one section of the car to move relative to the other, even if this was a purposeful design consideration. When the mounts were new, perhaps there was negligible movement between the 2 assemblies (body & subframe), but certainly after 60 years or so, the original mounts (that are still on many P5s and still being motored about today) must be compromised with age related issues. My focus with my car is to ensure that the 'original' suspension does the work of absorbing road shocks, without any other relative movement transmitted via the subframe. Neither do I want any shimmy, shake or other road derived condition affecting the cars braking, steering and directional stability. To this end, I've decided to fit modified solid mounts to the front section of the subframe whilst still retain the rear 2 (replacing the originals with 2 new reproduction mounts) Find below several images and 3 short videos illustrating several aspects of the subframe mounts based on an old, new and a modified solid mount. * Please note this is what I'm doing with my car as I want more precise handling, steering and braking. What you do with your own car is your own business. This is purely a presentation for those who are interested in an alternative. Old Mounting 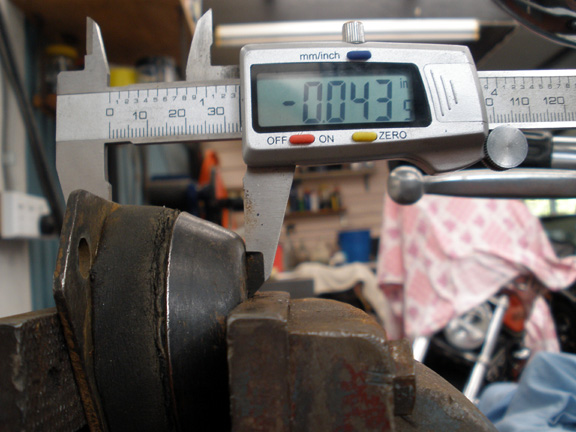 New Mounting New Mounting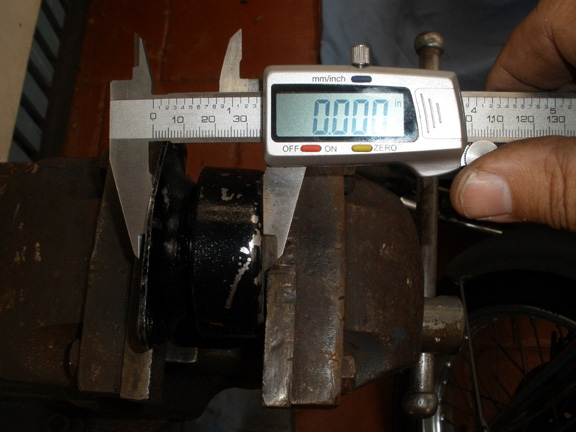 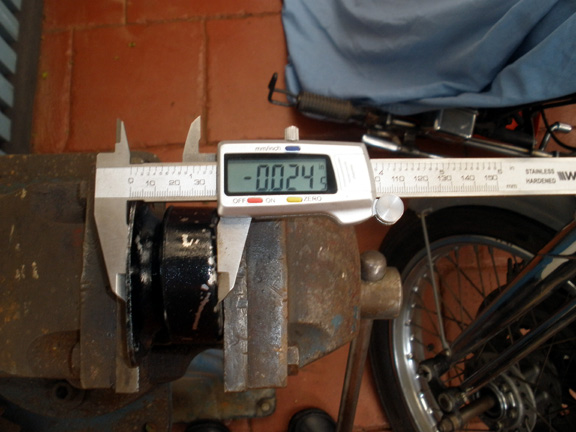 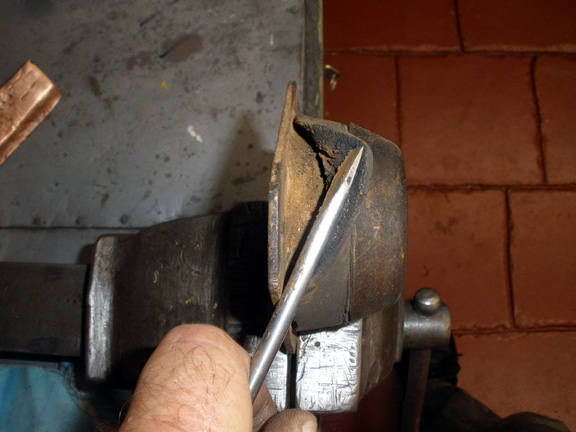 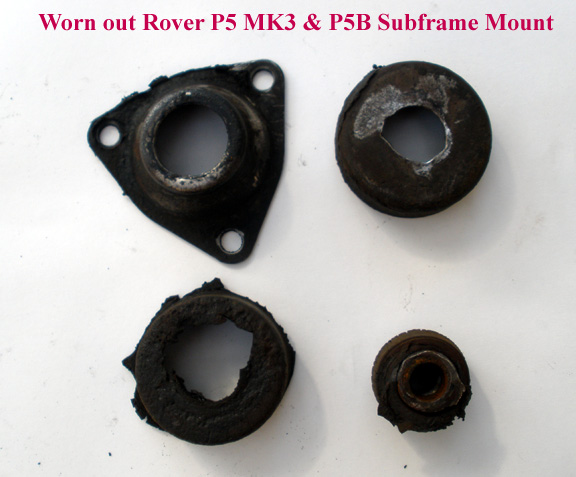 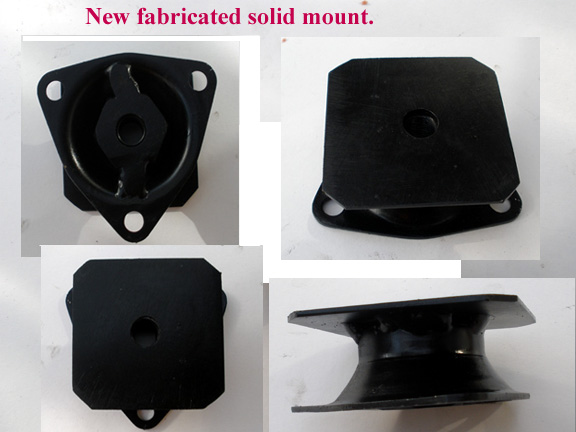 Videos: Videos: The first 2 vids illustrate twisting torque applied to an old and a new repro mount. I applied a twisting torque using a pair of multigrips...not the most precise or exacting method but it does illustrate the differences in the rubber compounds within the mounts. The final video is a 'talkie' outlining the various differences and suitability of the mounts shown. RoverP5 Subframe Mount Old 1 RoverP5 Subframe Mount New 2 RoverP5 Subframe Mounts New & Old 3 |
|
|
|
Post by Steve P5b on Aug 16, 2015 18:40:03 GMT
Nice video's Vince, the wildlife in the soundtrack sound really alien to me up here in the northern hemisphere. It is not surprising that these mountings perish and need replacement over the years, thank you for posting this.
Replacing these with a solid mount makes the car far more drivable and a great improvement.
One thing that puzzles me is the difference of diameter of the hole in the subframe compared to the locating bolt diameter . How and what will you do to improve things in this area. I did nothing but am not too happy, to be honest I'm thinking of a sleeve of some description to close the difference up and for what reason are all six not being replaced?
Thanks, Steve
|
|
Deleted
Deleted Member
Posts: 0
|
Post by Deleted on Aug 16, 2015 20:02:05 GMT
Enigmas, I know that I'm as welcome as a Redback spider in ones pants in this section but as reassurance to members in more temperate climates, is it not possible that many of the problems you've reported with your car have been caused by exposure to temperatures of 40c plus as mentioned by you?
Just an observation before half the Rover P5 drivers in the Northern hemisphere hang up their Rover keys in fright at what you report.
|
|
|
|
Post by enigmas on Aug 16, 2015 22:55:50 GMT
Steve I won't replace the rear 2 mounts with solids for the moment. My rear mounts are in seemingly good condition as they've been well protected from the elements and oil damage from the engine/trans/power steering system by virtue of where they sit. I will replace them with new repro mounts if I'm happy with the quality of the ride and handling' if not I'll fit 2 solids at the rear as well. The new OZ club mounts are a significant improvement on the OEM version with regard to the bonding of the rubber to the metal components, as the little test video illustrates. The rubber is also a harder spec. The original units only had peripheral partial bonding within. I 've found this as I use the core of the old removed mounts to make my solids. As for the locating hole for the large bolt Steve, I believe that was done to allow for component misalignment. I don't believe this is a concern if the large thru bolt is firmly torqued down. It may be an issue if I was racing/rallying the car but not for how I use it, essentially as a long distance cruiser.
I could always feel movement through the seat of my pants when the car traversed road ridges on smooth highways/freeways at speed, this generally being felt as a shudder/shake. This has annoyed me for the past 20 years. I believe the ride quality will be much improved as I'm not after a stiff/firm hot rod ride, believe it or not.
As for 40° degree heat affecting the mounts Resurgam, that's only for short periods during summer where I live (Google weather patterns Victoria, Australia) Damage to the mounts is through deterioration of the original rubber due to age and oil related ingress, primarily from the original engine trans combo. There was also metal fatigue as illustrated in the final video where I disassembled an old mount with my hands. The old mounts were also fully compressed beyond their original height of 37mm down to 30mm. The rubber cushioning when this occurs is negated and what you have is a solid mount under compression but under extension it drops, allowing relative movement of the subframe. Not good!
I rebuilt the front 4 mounts at slightly reduced height (30mm) as this is how everything was setup and has sat for the 2 decades since I rebuilt and repowered my MK3 with the P76 V8.
|
|
|
|
Post by enigmas on Aug 17, 2015 14:24:23 GMT
I didn't even realize there were birds in the background chirping Steve, until you commented on it.  There are a whole lot of magpies nesting around our home of late. Not a bird that you'd want to upset! |
|
|
|
Post by Steve P5b on Aug 17, 2015 14:37:18 GMT
I'm sure you are aware of this but please ensure the steer box and steer column are in line with each other at the flexible joint after fitting your new mountings.
I'm sure you will be in for a nice surprise when they are fitted.
Thanks for posting this.
|
|
|
|
Post by enigmas on Aug 17, 2015 21:39:46 GMT
Sure Steve. That was one of the primary reasons for fitting the solid mounts. I don't want 'any' relative movement between the subframe and the body at this point.
As an aside...the mounts certainly are a PITA to fit with all of the engine trans combo in place!
|
|
|
|
Post by Steve P5b on Aug 17, 2015 21:56:58 GMT
I agree very fiddly, I found a little more clearance available by loosening off the large bolts and allowing the subframe to drop away from the body by an inch, made it easier to get to the 5/16 UNF bolts . I cut them down before replacement as they were too long which made for less work.
|
|
|
|
Post by enigmas on Aug 18, 2015 11:26:07 GMT
Both the OEM MK3 and P5B mounts are the same although earlier mounts would fit any of the series of P5s. The final version of the mount as fitted to the P5Bs is certainly awkward to fit if the subframe is bolted to the car as the three locating 5/16" bolts have barely enough clearance between the head of the bolt and the cap of the mount. As you state Steve, reducing their length makes them easier to fit as the head of the bolt contacts the cap of the mount (if it's original) as it's being tightened down, turn by turn. So its all done in fractional turns of the spanner.
For those reading this thread who have concerns about the viability/condition of their original mountings and decide to check them and/or fit either OEM or modified, I'd advise doing this if ever the engine trans combo is removed...it's just so much easier.
|
|
|
|
Post by enigmas on Aug 19, 2015 11:11:35 GMT
|
|
Deleted
Deleted Member
Posts: 0
|
Post by Deleted on Aug 19, 2015 11:46:27 GMT
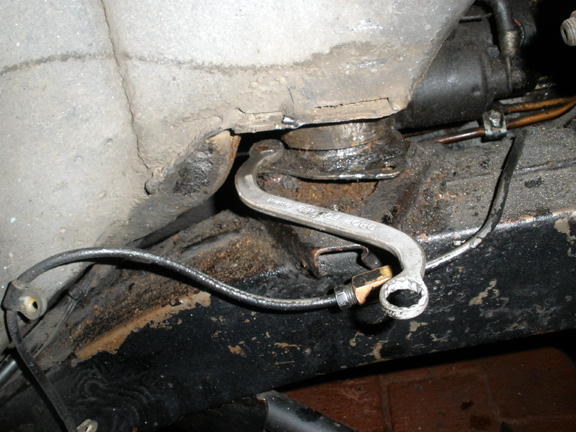
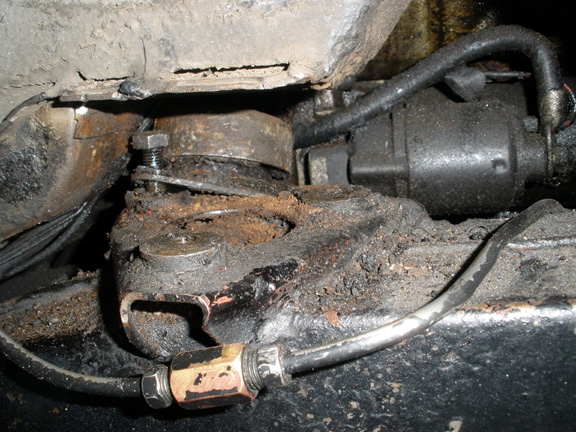
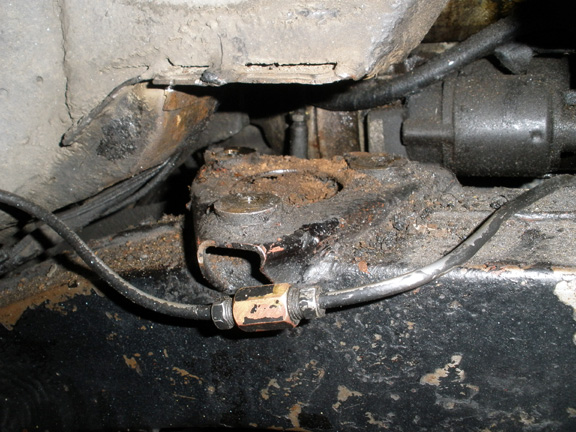
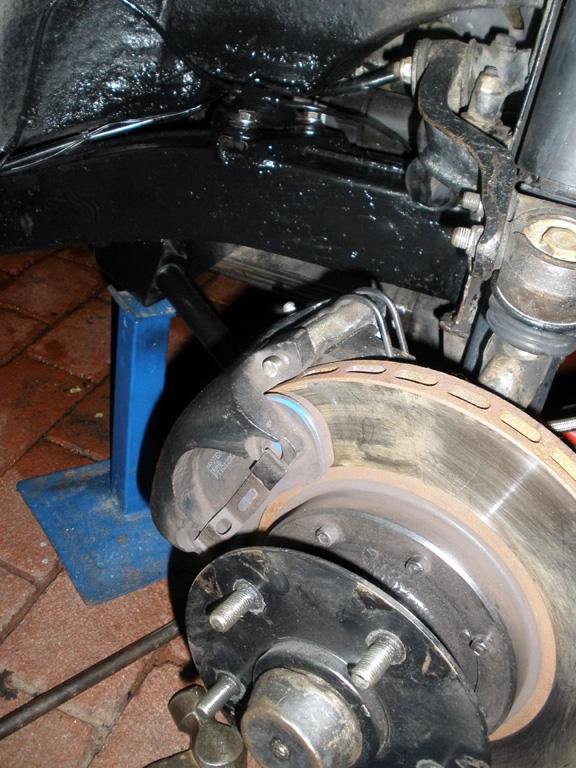
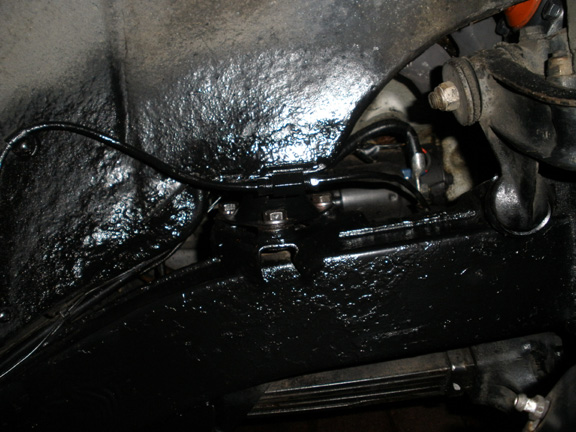
That's a very useful sequence for anyone thinking of replacing a mount and thanks for posting but could I ask some questions? 1) Are the stilsons there to stop the body of the mounting turning as the center bolt is removed? 2) Once the locating bolt is removed and the three locating bolts removed, can the mount be slid out?(in theory) 3) Can you use the same technique on all four of the front mounts? 4) Would placing a small scissor jack between the subframe and the body help with a few more cm's of lift? I think I can understand the necessity to replace these mounts or at least the two next to the bulkhead. Here are the same mounts on my car. The drivers side(1st image) looks the most tatty of the two but both seem to look intact and the connection to the steering box doesn't look as if it's been under stress.  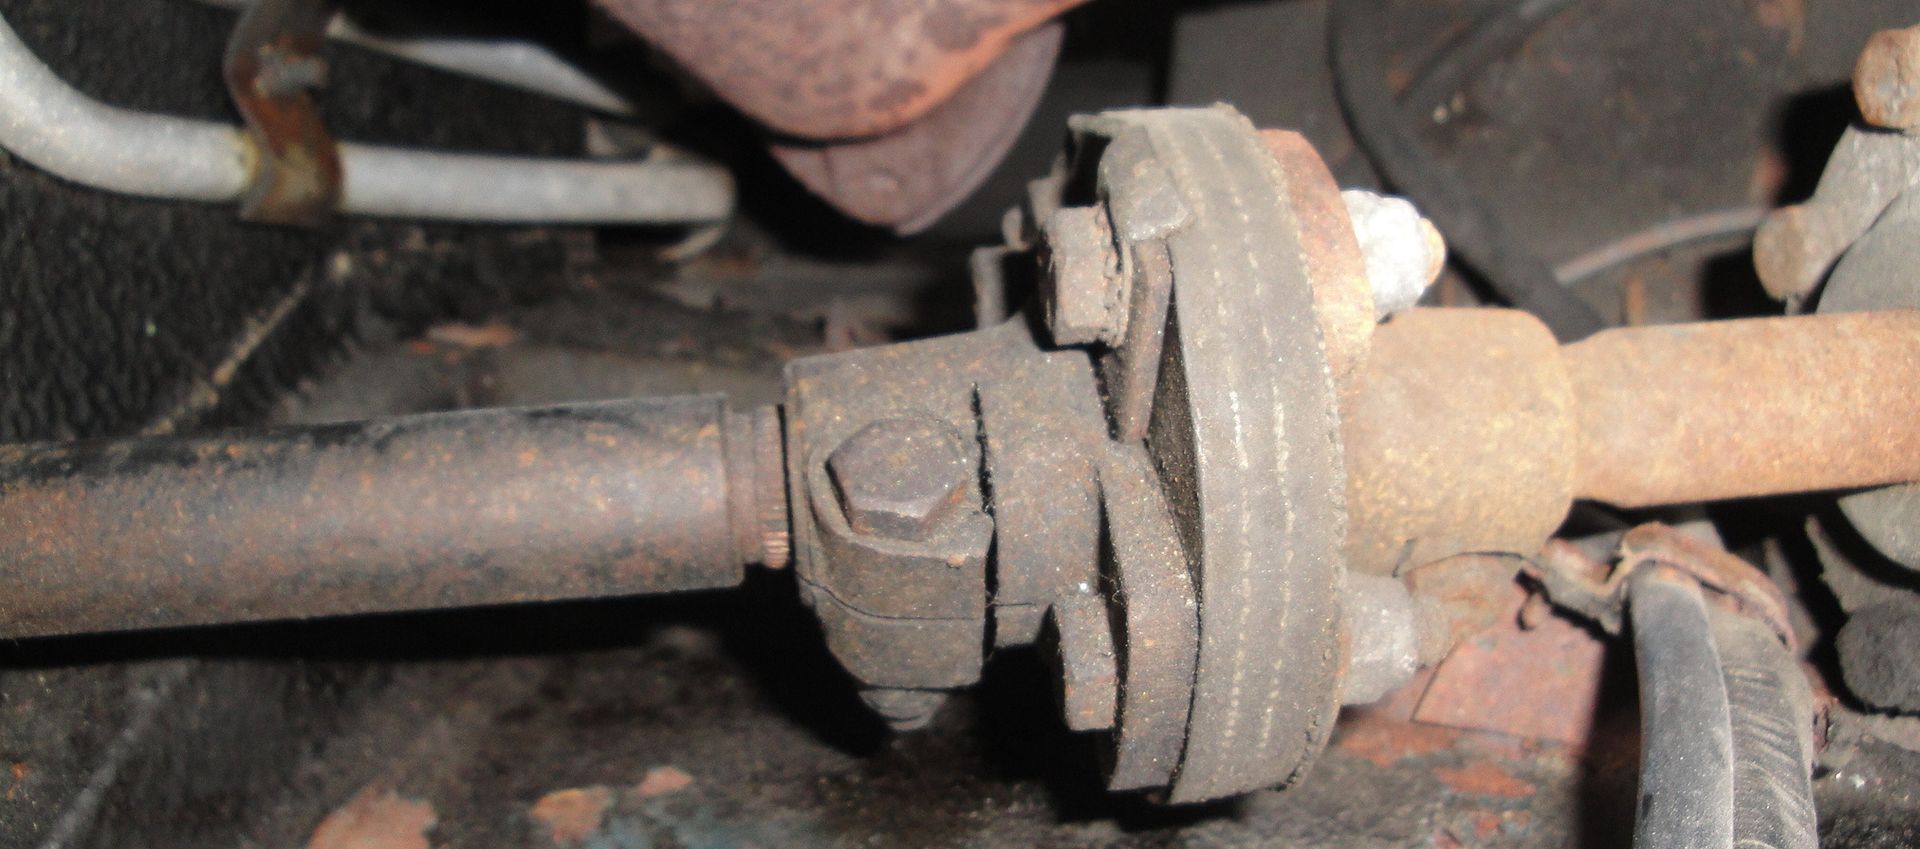 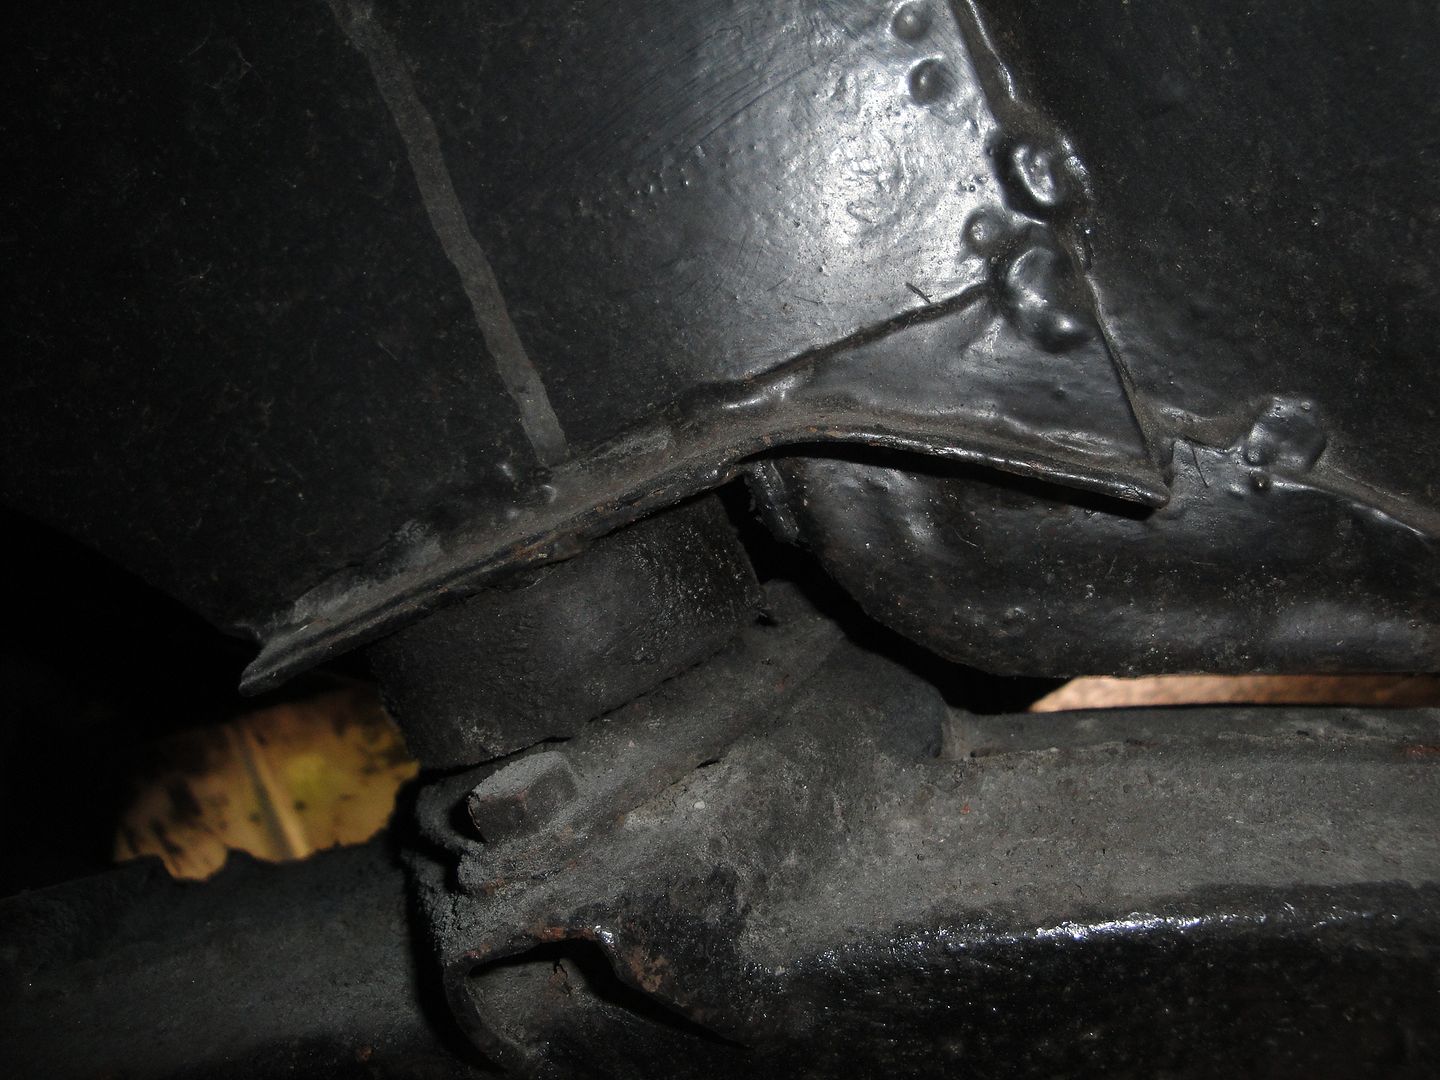 |
|
|
|
Post by enigmas on Aug 19, 2015 15:16:11 GMT
Richard, it's very late on this side of the planet and I need to retire. One brief reply. Your mounts look to be in a similar condition to mine. I'd say they're collapsed due to aged and deteriorated rubber within. If it's been like this for a long time (and I'd say your mounts are original) both your steering column and PS box would have long ago accommodated the current alignment. Given that, I'd now maintain the alignment.
I'll answer your remaining questions/concerns in the morning.
|
|
Deleted
Deleted Member
Posts: 0
|
Post by Deleted on Aug 19, 2015 15:36:00 GMT
Thanks.
Interestingly, the "Old" mount tested in your video is a completely different design to the mounts shown on both our cars but the "new" one is very similar.
My mounts are certainly original and seem to have compressed about 3mm.
Would replacing them affect the "settled" steering alignment?
I have to be honest and say it's a job I don't ever see myself doing but I'd be interested to know more about it so I look forward to your response.
|
|
|
|
Post by Steve P5b on Aug 19, 2015 17:12:25 GMT
Thanks. Interestingly, the "Old" mount tested in your video is a completely different design to the mounts shown on both our cars but the "new" one is very similar. My mounts are certainly original and seem to have compressed about 3mm. Would replacing them affect the "settled" steering alignment? I have to be honest and say it's a job I don't ever see myself doing but I'd be interested to know more about it so I look forward to your response. You could follow this thread from this point roverp5.proboards.com/thread/9050/front-subframe-rubber-mounts-all?page=4 and see the effect of 4mm movement has on the steering coupling. If your mountings have compressed with time then they will allow the subframe to move 4mm in the opposite direction under certain driving conditions that will effect the steering of the car. The stress imposed to the coupling under this condition may attribute to premature failure of the steer box, possibly creating leaking. Better to replace with new to be certain. Not forgetting the movement of the brake pipe also. |
|
Deleted
Deleted Member
Posts: 0
|
Post by Deleted on Aug 19, 2015 17:31:32 GMT
Thanks. Interestingly, the "Old" mount tested in your video is a completely different design to the mounts shown on both our cars but the "new" one is very similar. My mounts are certainly original and seem to have compressed about 3mm. Would replacing them affect the "settled" steering alignment? I have to be honest and say it's a job I don't ever see myself doing but I'd be interested to know more about it so I look forward to your response. You could follow this thread from this point roverp5.proboards.com/thread/9050/front-subframe-rubber-mounts-all?page=4 and see the effect of 4mm movement has on the steering coupling. If your mountings have compressed with time then they will allow the subframe to move 4mm in the opposite direction under certain driving conditions that will effect the steering of the car. The stress imposed to the coupling under this condition may attribute to premature failure of the steer box, possibly creating leaking. Better to replace with new to be certain. Not forgetting the movement of the brake pipe also. Thanks for the link. I included an image of the coupling which shows no distortion. My guess at the compression was very speculative and only based on a visual comparison with a new one and who's to say the new one is an accurate copy (+ or - mm's) of the original. The steering box is not leaking and the car handles well and will drive in a straight line when I take my hands off the wheel so I'm pretty confident that whatever compression has taken place has had a minimal effect on the ride and handling. Most of my motoring is pretty gentle so nothing is being subjected to undue stress. The brake pipe has a loop to compensate for any movement. Having said all that, I wouldn't be adverse to replacing the middle mounts and give the area a general tidy up at the same time! |
|
|
|
Post by enigmas on Aug 20, 2015 0:46:58 GMT
Here's the remainder of my reply Richard.
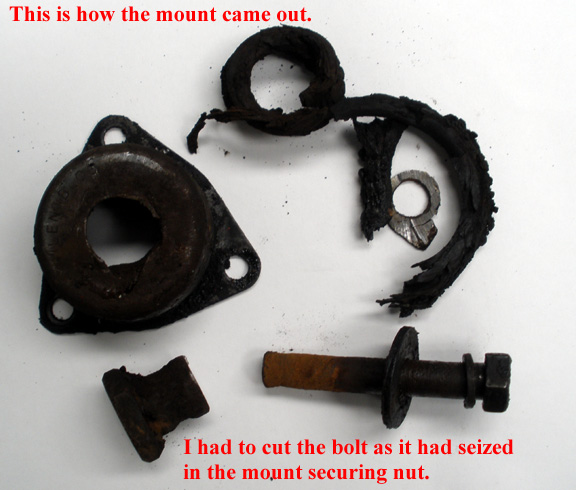
When removing the mounts it's best to loosen the large thru bolt first (3/4" head). If you're lucky the bolt will unscrew after an initial resistance. I was fortunate with three mounts. Do not remove the three 5/16" bolts first (if you can actually physically undo them as one or two are very awkward to reach) otherwise the complete mount will rotate. When I tried removing the thru bolt on the mount illustrated, I found that it was totally seized to its captive nut. I used an extension tube on my socket and ratchet assembly to turn it. This eventually seemed to loosen it. Unfortunately not so! The torque applied sheared the captive nut from the cap of the mount. (It's tack welded at the top). The stilsons were used initially to restrain the cap of the mount as it felt as though the thru bolt had released. It hadn't, as both the mount top and the rubber within had sheared. I needed to separate the mount top cap from the frame, so I initially wedged a large screw driver between the two. I also jacked the car up under the front jacking point so that the subframe would hang and hopefully drop a little. It did. I had a gap of about 3/16" that allowed me access with a thin cutting disc (1/16" thick) on an angle grinder to cut through the bolt shank. I couldn't have done this had not the bolt sheared from its mounting cap and the rubber within, as the mount needed to drop away from the subframe.
If ever you undertake this task clean and liberally grease all the threads (primarily the large thru bolt) so that it won't seize over time. Its taken me virtually one day per mount to remove (fabricate a replacement) and refit it.
A few notes:
The subframe does drop when the body is jacked up. Consider this when driving on rough or undulating surfaces when the suspension is actively working. If your driving is mainly pottering around the 'burbs' everything is in compression and not much of a concern. Drive at any speed where the engine/trans/suspension mass is worked against the rubber mounts securing the subframe to the body...then it becomes an issue for me! The quality of the rubber in any original mount is well past its best used by date. The bonding is also quite poor. The mount is designed not to separate, but there is still too much movement in the vertical plane given the mass of the subframe and its ancilliaries for decent handling.
The new mount manufactured by the RCCA is a superior design based on the final versions found in MK3s and P5Bs. The rubber/synthetic is very firm and fully bonded to its base. This is evident when compared to a good or OEM mount.
Personally I have no issue with whatever type of mount any P5 owner fits to their car (as it's their car). I'm doing this based on my personal experience/observations/experimentation as to how the original mounts perform on my car. Frankly, I want the suspension to move, not the subframe...not even a little bit.
I hope you and others find the information as presented useful in making informed decisions with regard to your car and the way you want it to perform.
|
|
|
|
Post by enigmas on Aug 20, 2015 6:33:41 GMT
Addendum.
It's around 4pm and I've just arrived back from test driving my coupe for about 40 mins. Most of the drive was in urban traffic at legal speeds up to 80 kph with some moderate to heavy braking in a few back streets. Truly, after the drive I can't really see why there was so much concern with modifying the mounts to solid. The ride is still comfortable and supple. The braking is even and straight. The steering feels to be unchanged and the car tracks well. There is also no increase in transfered road noise to the interior of the car from the subframe. I'd say it's a definite thumbs up modification.
|
|
Deleted
Deleted Member
Posts: 0
|
Post by Deleted on Aug 20, 2015 7:22:37 GMT
Thanks for that information and for the useful tips if changing these mounts with everything in situ.
|
|
|
|
Post by Ken Nelson on Feb 3, 2018 19:14:44 GMT
I just came across this thread today, but feel it might provide the answer to a concern I have had since owning my P5 Rover. I have noticed a definite "clunk" coming from the right front side of the car when driving over rough roads, especially on the highway. No noise on smooth roads at city speeds, and I have had the car aligned and the front suspension checked with no comments on anything being worn. I wonder if the wear mentioned on the subframe mounts might not be allowing some metal-to-metal contact on rough road surfaces at speed. I shall try to investigate further when our weather turns warm again in the spring! Other than removing the mount, is there any other way to tell how deteriorated they are internally?
|
|
|
|
Post by enigmas on Feb 3, 2018 22:49:23 GMT
Yes. Jack or raise the car at the front on both sides (obviously using 2 bottle jacks or similar at the body jacking points) so that both front wheels are off the ground. Make note of the position of the power steering coupling/box and steering shaft/related components for relative movement. With careful observation you may in all probability now note that the subframe is hanging lower than it did when the full weight of the car was resting on it. It's up to you whether you consider this good or bad. IMHO I don't like it for reasons given within the topic.
|
|
|
|
Post by pipetech on May 13, 2019 22:16:05 GMT
I have a 1969 p5b
Can you supply the mountings?
If so please let me know cost please.
If not can you describe how you made them and what components you used.
Thanks..
|
|
|
|
Post by enigmas on May 14, 2019 6:52:05 GMT
Len...unfortunately I don't have a source of subframe mounts that I want to sell but making/converting one to a solid mount is well within the capability of anyone with fabrication skills who can also use a welder. This thread has some clear photos of the modified solid mount. Print out the pix and provide your fabricator with an old mount and the images.
All that is required is to remove the decayed rubber insulator, then weld a suitable nut (for the long central bolt that holds the body to the subframe to a thick metal plate/large washer...then weld that to the top of the subframe tower with the 3 bolt holes. You will then have a solid mount.
|
|
|
|
Post by Ken Nelson on May 14, 2019 22:48:10 GMT
Does it matter that the new modified solid mount is not quite as tall as the original mount with the rubber bushing sandwiched in?
|
|
|
|
Post by enigmas on May 14, 2019 23:27:27 GMT
Ken I'd make it exactly the same height. Since the mounts generally have the full car's weight on them (unless of course the car is airborne  ) which is generally not how a P5 should be driven. Compress the best mount in a bench vice before dismantling and measure the total height. Then use the measurement to modify to a solid mount. If there's a slight variation fabricate sheetmetal shims to make up the difference. NB. Loosen the steering box mounting nuts slightly before reconnecting the steering column to the box to ensure the alignment is correct. If so connect the box at the coupling...then tighten the steering box mounts. If there is some slight misalignment add shims to the appropriate subframe mount to correct this. * You might even note that the car will handle and ride better after fitting the solid mounts (especially if the suspension rubbers and ball joints are in good condition. You'll also note that there will be less steering wheel shake on rough B roads. This is due to the removal of any subframe squirm created by the original flexible rubber mounts. It should also reduce any stress at the steering box coupling due to the original design. |
|


 There are a whole lot of magpies nesting around our home of late. Not a bird that you'd want to upset!
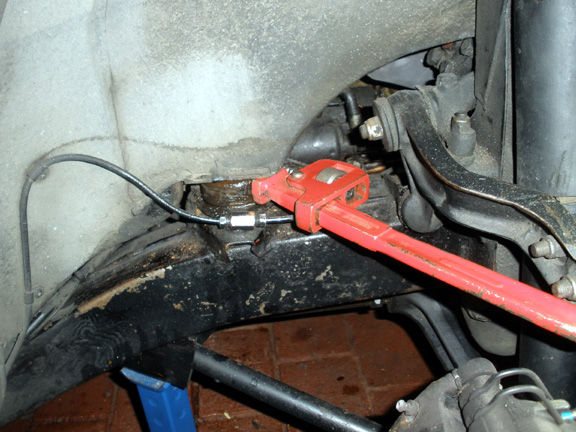


 ) which is generally not how a P5 should be driven.