|
|
Post by rover1066 on Jul 7, 2006 18:51:53 GMT
I have just been admiring the sill trims on 'Countess'. I have just had complete new sills fitted, and am at a stage where the old, but perfect sill trims need to be re-fitted. Although I am reasonably practical, it is with fear & trepidation that I contemplate fitting them. I have new clips.
Please can anyone give me some tips, as I'd hate this to go wrong having come so far! Many thanks.
|
|
|
|
Post by dorsetflyer on Jul 7, 2006 19:31:42 GMT
It should be very easy to do in fact. firstly you should already have two holes in the front wing which will give you your starter centres. Masking tape can be fitted right along the sill, then using the trim as ruler draw a line from the centre of the existing holes across the whole length.
I think the manual explains the distance between clips and once that is done, centre punch through the masking tape. Drill the holes through the masking tape to avoid any damage to the paint.
Before pop-rivetting the clips on coat the cut edges of the holes with paint and allow to dry.
Fit the clips, and then coat them with a dab of waxyoil
Finally fit your trims.
|
|
|
|
Post by rover1066 on Jul 11, 2006 7:37:46 GMT
Thanks very much for that. I feel a bit more confident now!
|
|
|
|
Post by johnwp5bcoupe on Aug 29, 2006 20:12:29 GMT
|
|
|
|
Post by Phil Nottingham on Aug 29, 2006 20:29:20 GMT
If you look at all the comments on this one topic over the past 9 months or so I think you will agree that the consensus, as much it can ever be with any thing Rover did, was that the strips go at the top of the sills allowing for the fact they are radiused.
|
|
|
|
Post by glennr on Aug 29, 2006 20:35:02 GMT
I actually rang James Taylor for some advice on this but he said they tend to vary. I have looked at many other P5B'S and most of them sit about 5mm from the top edge and they don't all finish in line with the rear of the sill either, but then again no two Rovers seem to have the same gaps everywhere else! I feel that where I have put mine is favourable with other owners cars. 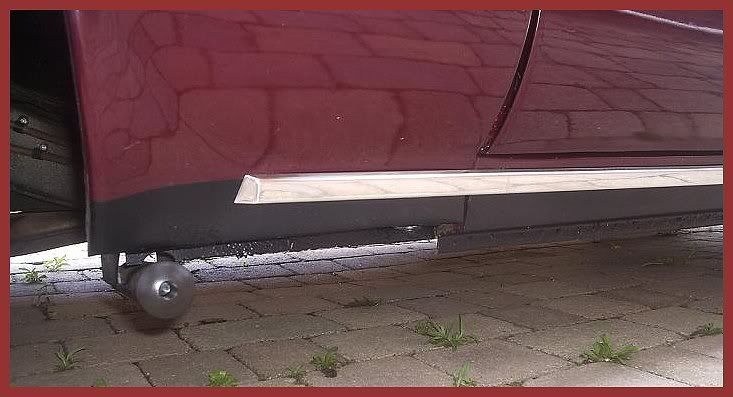 |
|
|
|
Post by Phil Nottingham on Aug 29, 2006 21:18:23 GMT
I have looked at my "before" photo's of one I did recently. the entire structure of the A post abottom and front sill end was still apparent. The vertical strip of rusty metal is the remains of the folder over wing flange. The A post has no bottom the pressed formed end of the out sill stops just over 2/3rds midway and has the captivated nut to which the wing bottom bracket bolts to. This part is very important to get right as if incorrect the sill strip will not lay flat and clip on correctly. There should be approx 1/8" gap between then of the sill face and the edge of the wing - said sill face then slopes slightly and goes under the wing. In my picture part of the sill bottom has rusted away. All this is nercessary to allow the spotwelder on the assembly line access so its not necessary to do this on a repair which can be made stronger  |
|
|
|
Post by lagain on Aug 29, 2006 21:25:28 GMT
Most cars have had new cills and or wings which very often are not the same as the originals.
On my car, which has had neither, if I lay a straight edge on the painted part of the cill that is visible when the door is opened the stainless trim will butt against it. At the rear of the car the trim should be level with the end of the cill.
But yours look fine - jacking point looks a bit odd though !
|
|
|
|
Post by Phil Nottingham on Aug 29, 2006 21:39:49 GMT
The sills are the original on my saloon too except a small patch had been laid over the end - you can just see it and the white filler. I have removed all this and made a new end so that it is as close to the original as I could get it. The clip holes must also be in the original place too.
I cannot get a decent picture of mine as it finshed up as being Admiralty Blue (with black sills) it all ends up the looking the same on a photo - some pictures are still on here somewhere though.
I will try some different lighting as the "before" picture makes the Blue look a lot lighter!
|
|
|
|
Post by lagain on Aug 30, 2006 20:46:05 GMT
I will try and take some pictures, but I am off for a week. So when I come back as others seem to be interested
|
|
Deleted
Deleted Member
Posts: 0
|
Post by Deleted on Aug 30, 2006 21:48:08 GMT
As the original cosmetic intention of the trim and black sill was to make the P5b look "slimmer" from the side compared to the P5, I would have thought that as much black sill as possible should be showing below the trim and on to the bottom of the wing. Any body coloured paint above the trim would negate this to some extent but you would have to look very closely if you were just an admirer and not an owner.
|
|
|
|
Post by Phil Nottingham on Aug 30, 2006 22:00:03 GMT
Believe you me some people do look closely!! GP's car is most probably the most original as he has also had this a very long time.
I have posted some more examples of mine above in the 3 Llitre "Where does it end" - Sorry about the sizing and fuzziness - they are perfect on the host board and if they are downloaded and displayed they are much better. Most the marks on the Blue and grey versions are mud not rust - who says photographs flatter!
|
|
|
|
Post by johnwp5bcoupe on Aug 31, 2006 5:51:58 GMT
Have you sprayed for "Rust Worm" Philip they tend to be active with winter around the corner I would hate to see them consume more of the car  Looking at your car Philip the trim looks about 6mm from the top of the sill? half a clip! |
|
|
|
Post by Phil Nottingham on Aug 31, 2006 16:32:26 GMT
No its less 3 mm - as I mentioned elsewhere most of the Rust Worm is currently mud - the rust has been removed temporarily for the nth time. That's the price for using them every day!
|
|
|
|
Post by Phil Nottingham on Aug 31, 2006 16:40:55 GMT
Interesting Sills on the black Mk2 3 Litre currently on Ebay?
|
|
|
|
Post by johnwp5bcoupe on Aug 31, 2006 17:19:42 GMT
A different profile you could say Philip  |
|
Deleted
Deleted Member
Posts: 0
|
Post by Deleted on Aug 31, 2006 20:49:01 GMT
Checking the cars in my two books "The Post-War Rover P4 and P5" and Brooklands Books " Rover 3 & 3.5 Litre" it is clear that the sill trim is running along the very top of the sill with no body colour showing.
This general principle would have been sensible so as to give a benchmark for assembly in the factory.
In addition, cosmetically, the higher the trim, the slimmer the car.
|
|
|
|
Post by Phil Nottingham on Aug 31, 2006 21:12:06 GMT
I think this thread has come 1/2 full circle!
The other half started months ago when Glen was trying to sort out the trim strips.
The general consensus then was that subject to the vagaries of the fitter on the production line they did end up more or less at the top allowing of course for the radiused top edge of the sill before it turns under the door.
|
|
|
|
Post by johnwp5bcoupe on Aug 31, 2006 21:13:16 GMT
Oh Boy! Oh Boy! "to drill or not to drill that is the question" I will try www.confused.com  |
|
|
|
Post by Phil Nottingham on Aug 31, 2006 21:27:57 GMT
Go for it as "crossplies" says above - just make sure the door bottoms are not touching the strip.  I hope the front wing is lined up properly and have you finished the back end of the sill correctly with the inner D post 5/16th2 inch below the sill bottom complete with fake underturn to simulate the spotweld factory fitted items!  |
|


