|
|
Post by ricky8664 on Dec 12, 2023 10:08:49 GMT
In the old days of 5 star leaded the timing requirement was 6 degrees BTDC.
Once 5 star went and when 4 star was available it was recommended to reduce the advance and I got the car to run smoothest with timing set at 1 degree BTDC.
When I last did the timing 4 star was still available!
When we got the engine running again back in May, we could not get it to idle.
THis Friday we're going to try and give it a tune. We only set the points manually in May as I could not find my dwell meter but that
s now turned up so we can properly set the dwell. We changed the plugs in May before starting up as well as Dizzy cap, points and condenser and rotor arm,
We'll clean the carbs as well as they've been idle for about 15 years.
However, what is the perceived wisdom about setting the timing now that 4 star isn't available?
And what about fuel? After we drained the tank I put E5 in it. Is that best or can we run on the more recent, higher ethanol E10?
|
|
|
|
Post by ricky8664 on Dec 12, 2023 10:14:39 GMT
I forgot. What about engine idle speed? I always found 650rpm gave smoother downshifts in the transmission when decelerating.
|
|
|
|
Post by lagain on Dec 12, 2023 14:07:54 GMT
I set my timing at 3 degrees BTDC or less and she still pinks at times. You should use super unleaded as much as possible, although the occasional tank of E10 should not hurt. It is better to have electronic ignition as the spark is more accurate and stronger. 650 tick over is about right.
|
|
|
|
Post by Phil Nottingham on Dec 13, 2023 6:04:13 GMT
I have ours set at 4 deg BTDC and 650 rpm idle. No pinking at all. This is still fine with E10 regular. It has been like this since 4 star disappeared. Each engine is different and pinking must be avoided
|
|
|
|
Post by Jens Munk on Dec 14, 2023 12:49:03 GMT
You may consider a new distributor. Mine was pinking a lot on load. After attempts to adjust I eventually got a new distributor and the pinking disappeared. The springs in it get soft with age and as a result it advances to quickly.
|
|
|
|
Post by ricky8664 on Dec 15, 2023 0:35:56 GMT
Thanks for the suggestions. I'll see what we can do tomorrow. There seems to be no real consensus on timing as it tends to vary from car to car so I'll stick with what worked previously until we've done the other stuff and see if a final tweaking of the timing does the trick.
The car has always in my ownership had a tendency for the dwell to go out very quickly, usually requiring a re-setting after as little as 30 miles but as I always carried the dwell meter it was no great problem with the adjuster on the side of the dizzy. My suspicion was that the cause was most likely a worn shaft in the dizzy and my intention has been to fit one of the modern electronic versions with variable timing profiles, but I'll leave that till the respray has been done and I know if I'm keeping it.
|
|
|
|
Post by Eric R on Dec 15, 2023 10:10:22 GMT
www.distributordoctor.com/ offers a distributor re-build replacing the wearing parts. I understand they can fit electronic system to it at the same time.
|
|
|
|
Post by ricky8664 on Dec 16, 2023 12:47:56 GMT
Engine ran for about 5 mins yesterday then got progressively rougher till it cut out and refused to start. Checked fuel supply which was fine. Checked dizzy and the points had closed up. Reset them to a 0.14" gap. Started again but ran rougher again until cutting out.
Checked the points again and they had closed up. However, upon closer inspection it appeared that it was the baseplate onto which the points are mounted that was moving. The points were set to the correct gap but as we manually rotated the engine, the action of the lobes on the dizzy shaft against the points pushed the base plate over and the points with it, so they didn't open. Miracle it started at all.
Looks like I'm going to have to go electronic before I wanted to.
Any recommendations for electronic dizzy with preference for ease of fitting and no need for massive re-wiring?
Also are magnacore leads that good as they seem quite pricey (c£140 +VAT)
|
|
|
|
Post by enigmas on Dec 16, 2023 21:45:16 GMT
This has been a real tooth pulling excercise. Even with a 10.5:1 high compression engine the pinging under load can be "adjusted out" if you know the rpm and load when it occurs. A tacho and a vacuum gauge will provide this info. Once these specifics are known (and noting that the distributor runs at half engine speed) the adjustments to the spring(s), the centrifugal weights, and limiters can be made. If a mechanical distributor is worn excessively though, any amount of fiddling with timing adjustment is both wishful thinking and optimistic. A worn V8 distributor will have at times 6° of dwell variation. So the ignition timing will never be precise cyl to cyl. Also trying to adjust timing statically with a worn distributor (by retarding the ignition) simply kills engine performance and creates a hot runner, as late timing simply heats the engine block. A worn distributor that is functionally otherwise OK should have new shaft bushes fitted. The shaft endplay (at the driven gear) should also be shimmed to the correct tolerance. Take it to an auto electrical shop and have it restored properly as they will have the required bush reamer to do the job correctly. POWERSPARK Ignition ModulesFitting a "PowerSpark" electronic ignition module. I have no affiliation with this company apart from using their products. Ignition Points wear because they rely on physical contact to function. Both friction and pressure loading of "points components" causes rapid wear to occur. Points were a regular maintenance and service item in the day prior to full electronic ignition systems being developed. Simple electronic modules (mentioned above) function without any physical contact. They are also very precise with regard to ignition timing cyl to cyl. Here is the link to "Powerspark Ignitions" simonbbc.com for everything you need. These kits are cheap, reliable and fit directly to the distributor. Note: Choose the correct kit for your V8s distributor, do read the literature supplied with the kit, do use the appropriate coil (generally the original points coil...don't use a high output "sports" designated coil and ensure the module receives 12 volts (not 14 or 15 plus volts from a dodgy alternator/regulator) and the module will outlast you. * If the voltage to the module is too high. It will cook the module over a short period and it will fail. To ensure this doesn't happen fit an appropriate ballast resistor in the power feed to the module to regulate the voltage to 12v - 13.5v. Check the voltage output with a multimeter at idle and at 2000 - 3000rpm (or at engine cruise rpm) to see that it is within the range, Here's the link to their extensive range of ignition modules. simonbbc.com/electronic-ignition-kits/Here's the link to 8 cyl lucas distributors. simonbbc.com/electronic-ignition-kits/sort-by-distributor-make/lucas-distributors/8-cylinder-v8/Here's the link to an early Rover V8 distributor module. simonbbc.com/Powerspark-Electronic-Ignition-Kit-for-Lucas-35D-Distributor-K3x--R5 Here's a brief outline of Simon's Tech blurb for this module. "This kit is designed to replace the points and condenser inside a Lucas 35D Distributor. The Lucas 35D was fitted to a wide range of vehicles including Land Rover, Range Rover, Rover, TVR, Morgan and more." "This is suitable for early Rover V8s. Early Rover V8s are engines classed as pre 1976. As many engines have been swapped or have been converted to the later front cover, it is not always easy to identify whether a Rover V8 is early or late. This can be done from the engine number, so if you aren't sure, or need help identifying which distributor your Rover V8 engined car has, then please call us." |
|
|
|
Post by ricky8664 on Dec 17, 2023 10:40:56 GMT
Interestingly and perhaps coincidentally, my mechanic has just recommended the Powerspark system which he has fitted to his Beetle and is great. That looks like the way I'll be going.
Also ordered a couple of new float needle valves for the carbs as one of them was sticking a little bit, so hopefully she'll be running fine early in the NY.
Bit disappointing about the needle valves in the SUs as I had replaced them a couple of years before the car was taken off the road..... though that was 32 years ago!
|
|
|
|
Post by Phil Nottingham on Dec 17, 2023 16:21:27 GMT
The dwell on ours rarely needs adjusting if quality points are used or the fixing screw is not stripped. The bushes do wear but the usual problem is that the early dizzies baseplate developed slack and changed the dwell. The early dizzy points had a pin in them and are more expensive
After having 2 Lumenitions fail and had to be roadside recovered I reverted back to points with the later dizzy and never had any bother
|
|
|
|
Post by Sam Bee on Dec 17, 2023 16:35:37 GMT
The problems associated with use of E10 are emerging as Ethanol is shown to have a detremental effect on the metal parts of car engines. The extent of long term effects are as yet uncertain but I for one are not chancing my fuel system and engine. E5 only for me and an additive to 'kill' the Ethanol. Besides, our V8s are much happier with a 98 or 99 octane petrol, my P5B and P6b , set at 6 BTDC simply fly.
|
|
|
|
Post by enigmas on Dec 17, 2023 23:45:17 GMT
The dwell on ours rarely needs adjusting if quality points are used or the fixing screw is not stripped. The bushes do wear but the usual problem is that the early dizzies baseplate developed slack and changed the dwell. The early dizzy points had a pin in them and are more expensive After having 2 Lumenitions fail and had to be roadside recovered I reverted back to points with the later dizzy and never had any bother Phil checking the voltage output to the module is critical. It's vital to check the voltage at both idle and at cruise speeds. Why? Because that's generally the rpm level that will be maintained for long distance driving and the voltage at that RPM/Speed is what the electronic module will see for extended periods of time. Voltage regulators within alternators aren't always consistent. So check the voltage output at these 2 extremes and wire in an appropriate ballast resistor to ensure it stays within a specified range. I've used several electronic kits in my cars for over 30 years without issue once I became aware of voltage power feed inconsistences. Points are OK to a point (no pun intended), but won't ever produce precise timing. If they burn and pit early it's usually due to the condensor being too low rated or the voltage power feed too high. If you want precise engine timing and the benefits derived from it, then electronics is the way to go. Most electronics kits fail due to instalation issues or not fully understanding the tech literature that came with the module. |
|
|
|
Post by Phil Nottingham on Dec 18, 2023 9:23:04 GMT
Thanks - useful info. Stable alternator charging voltage is around 14.5v normally otherwise it would not charge a 12v battery. As such some form of regulator would be safer. A ballast resistor would still cause variable voltage so an electronic regulator would be better to power the coil and ignition pack surely.
The standard high output coil is Lucas HA12 - the Gold Lucas Sports coil is a higher output but I do not not know what the difference is
I will stick with the standard points for the time being
|
|
|
|
Post by enigmas on Dec 18, 2023 13:02:09 GMT
High output ignition coils have a lower resistance on the primary winding (for example 1.2 ohms.) A standard OEM points ignition coil is generally in the range of 3.4 ohms for its primary winding. If using a high output coil (generally termed as a "sports" coil) the primary voltage resistance needs to be increased to around 3.4 ohms if you want the electronic ignition module to last more than a few days. Adding a ballast resistor of 2.2 ohms in series with the power feed to a 1.2 ohm coil bumps the primary resistance up to a safe 3.4 ohms of primary resistance.
The reason the modules fail progressively till they eventually die is heat related.
|
|
|
|
Post by Phil Nottingham on Dec 18, 2023 15:48:30 GMT
High output ignition coils have a lower resistance on the primary winding (for example 1.2 ohms.) A standard OEM points ignition coil is generally in the range of 3.4 ohms for its primary winding. If using a high output coil (generally termed as a "sports" coil) the primary voltage resistance needs to be increased to around 3.4 ohms if you want the electronic ignition module to last more than a few days. Adding a ballast resistor of 2.2 ohms in series with the power feed to a 1.2 ohm coil bumps the primary resistance up to a safe 3.4 ohms of primary resistance. The reason the modules fail progressively till they eventually die is heat related. I had the Lumenition special coil with my set ups. The Lucas HA12 does have that resistance from memory. Then it did not specify a ballast resister was needed or to check the charging output. I can see these factors can upset delicate electronics - what the higher and more vraiable dynamo outputs would have done to them is anyone's guess. Just checked the HA12 is 3.40 - their Sports Coil is 2.8-3.0 Ohms so both should be OK. Therefore the on spec alternator output may be the real problem |
|
|
|
Post by lagain on Dec 18, 2023 17:22:27 GMT
Irrelevent to this thread, but I had Luminition fitted back in 1977 by a local garage as it was before I started fiddling with my lovely coupe. It still works fine, although I keep the points in the boot just in case. The coil is an original with the armoured casing. I think that I had to have something done to the rev counter to make it work correctly.
|
|
percy
Rover Rookie

Posts: 72
|
Post by percy on Dec 18, 2023 18:06:12 GMT
The Lumenition Optronic module is quite tough and can take a maximum of 7 amps. If the ballasted voltage is 9 volts and the resistance is IRO 3 ohms then 3 amps could get through to the module. Even if 12 volts gets through,then current will be 4 amps.If the resistance is only 2.5 ohms, only 4.8 amps will get through.How on earth can you burn out the module? Wrongly mounted maybe?
|
|
|
|
Post by enigmas on Dec 18, 2023 22:13:48 GMT
The Lumenition Optronic module is quite tough and can take a maximum of 7 amps. If the ballasted voltage is 9 volts and the resistance is IRO 3 ohms then 3 amps could get through to the module. Even if 12 volts gets through,then current will be 4 amps.If the resistance is only 2.5 ohms, only 4.8 amps will get through. How on earth can you burn out the module? Wrongly mounted maybe?This is what I have found through personal experience with a range of modules Percy. For example, with the PowerSpark, Pertronix and Piranha optical. As an aside, I also have several points assisted modules that I've built from kits. These put about a quarter of an amp through the points....just enough to keep them clean and functioning. The points are then only used as a switch to turn a power transistor off and on. The power transistor then controls the firing of the coil and also has control over the dwell period when the coil is charged between firing intervals. I still have one of these (older) units wired up to my Rover V8 powered ZB MG Magnette. The benefit of this type of module is that points contact wear is virtually nil. The rubbing block that runs on the points lobe though is still subject to frictional wear. Depending upon regular use, the points can last several years or more if the rubbing contact is kept lubricated. The module (black in colour with some paint peeling off) can be seen in the picture below to the left of the brake fluid reservoir...if you zoom in on the image. If the module fails in service it can simply be unplugged and the ignition with the addition of one wire restored to full control by the distributor points. I built this particular module 35 years ago.  Modules Failing_The Cause Modules Failing_The CauseOutlined below is what I've found/experienced through personal use with the modules listed above fitted to both cars and motorcycles. Currently my MK3 P5 coupe (P76 V8) runs a fully Programmable Ignition Module. It's a dual fuel car, so runs 2 distinct ignition timing maps (LPG & Petrol). How Electronic Ignition Modules Fail. * Check the literature that is supplied with the module and ensure the voltage powering it is within specifications. * Use a 3.4 ohm coil or adjust the primary resistance of the coil at hand using a ballast resistor as oulined above to enable 3.4 ohms (or close) coil primary resistance. * Don't use solid core "wire" high tension spark plug leads with electronic ignition modules. LPG carbon core, spiral leads are some of the best high quality leads available and are fully compatible with electronic ignition systems. This is the scenario that will occur if the particulars above aren't given due attention. The module will work initially. The car may run for a half hour or so, then the engine will start to run roughly and eventually cutout. Trying to start the engine just after it has cutout will fail. Wait approximately a half hour and the engine will restart and run normally for a similar time length. This process will repeat a number of times until the module fails totally. If you are aware of what is occuring and rectify the issue prior to the module's complete failure, the ignition system can be made to work reliably. Keep repeating the cycle and the module will be trashed. Here's a few more images of the ignition system. Electronic Points Assisted Ignition Module. The black electrical tape visible on the module is holding a protective plastic cap over the power transistor (A temporary fix that I haven't got around to attending)  The Coil for the Module. The Coil for the Module. Note that it is a red "sports" high voltage output coil. Not required, but what I had on a shelf at the time. Note also the ballast resistor on the side. I added the ceramic resistor to increase the coil's primary resistance to around 3.4 ohms. 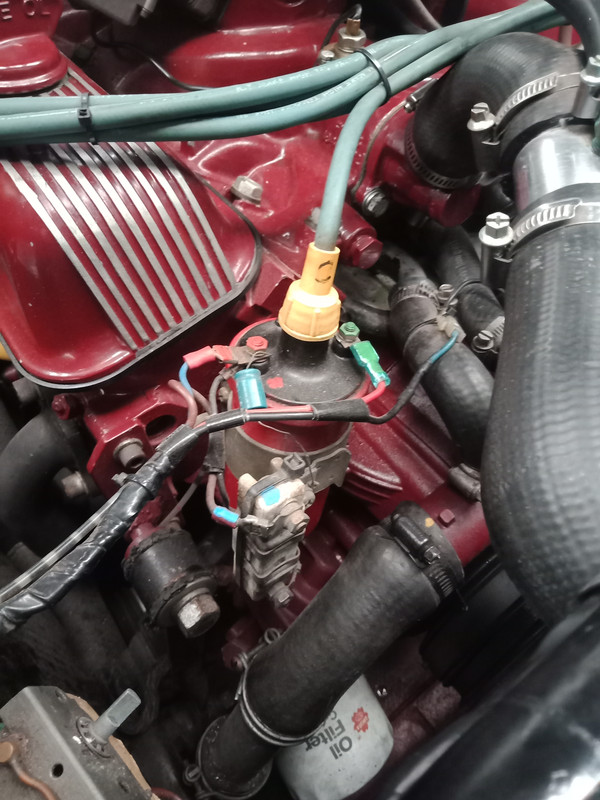 The distributor (actually a modified GM Holden V8 distributor) and a close up of the points. The points have been in place for years now and illustrate no visible wear on the contacts. 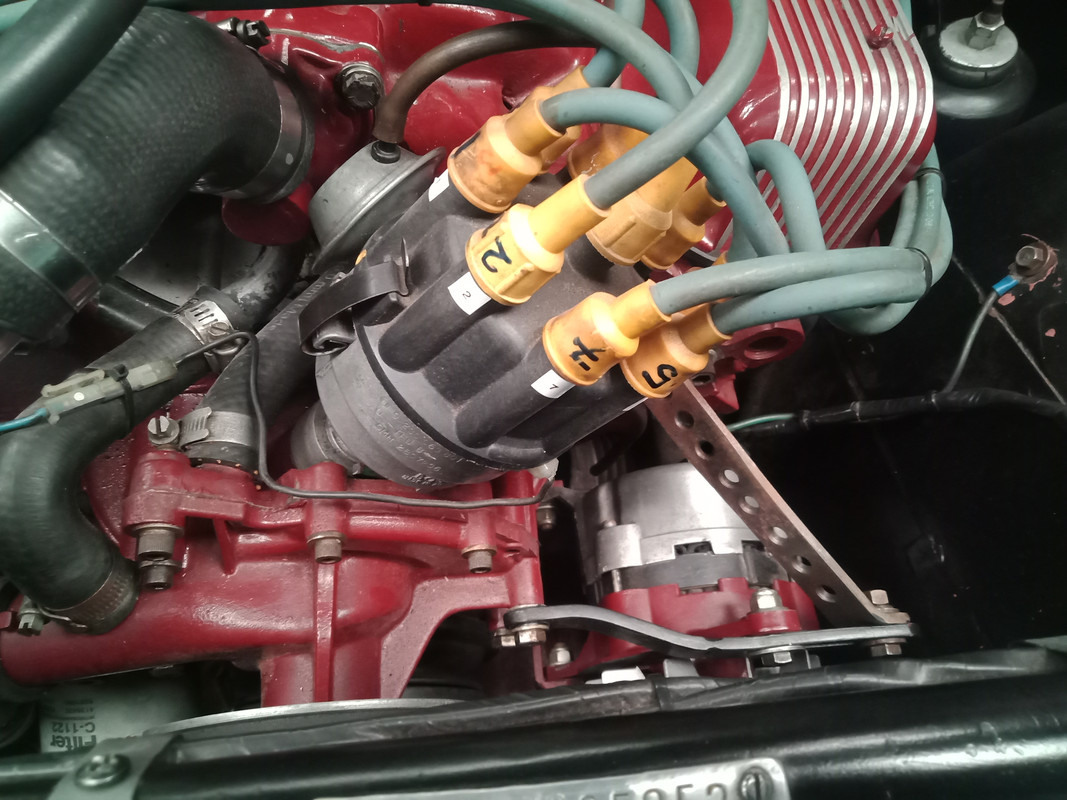 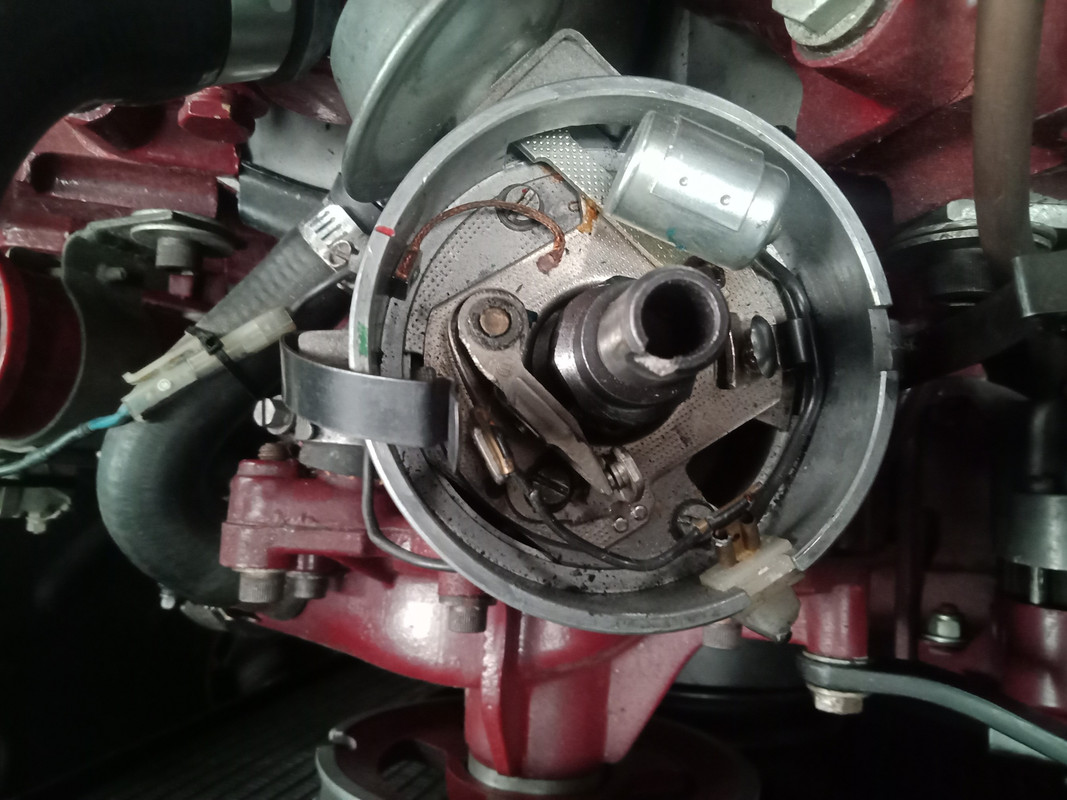 |
|
|
|
Post by frank1965 on Jan 8, 2024 13:18:42 GMT
The Lumenition Optronic module is quite tough and can take a maximum of 7 amps. If the ballasted voltage is 9 volts and the resistance is IRO 3 ohms then 3 amps could get through to the module. Even if 12 volts gets through,then current will be 4 amps.If the resistance is only 2.5 ohms, only 4.8 amps will get through. How on earth can you burn out the module? Wrongly mounted maybe?This is what I have found through personal experience with a range of modules Percy. For example, with the PowerSpark, Pertronix and Piranha optical. As an aside, I also have several points assisted modules that I've built from kits. These put about a quarter of an amp through the points....just enough to keep them clean and functioning. The points are then only used as a switch to turn a power transistor off and on. The power transistor then controls the firing of the coil and also has control over the dwell period when the coil is charged between firing intervals. I still have one of these (older) units wired up to my Rover V8 powered ZB MG Magnette. The benefit of this type of module is that points contact wear is virtually nil. The rubbing block that runs on the points lobe though is still subject to frictional wear. Depending upon regular use, the points can last several years or more if the rubbing contact is kept lubricated. The module (black in colour with some paint peeling off) can be seen in the picture below to the left of the brake fluid reservoir...if you zoom in on the image. If the module fails in service it can simply be unplugged and the ignition with the addition of one wire restored to full control by the distributor points. I built this particular module 35 years ago. Modules Failing_The CauseOutlined below is what I've found/experienced through personal use with the modules listed above fitted to both cars and motorcycles. Currently my MK3 P5 coupe (P76 V8) runs a fully Programmable Ignition Module. It's a dual fuel car, so runs 2 distinct ignition timing maps (LPG & Petrol). How Electronic Ignition Modules Fail. * Check the literature that is supplied with the module and ensure the voltage powering it is within specifications. * Use a 3.4 ohm coil or adjust the primary resistance of the coil at hand using a ballast resistor as oulined above to enable 3.4 ohms (or close) coil primary resistance. * Don't use solid core "wire" high tension spark plug leads with electronic ignition modules. LPG carbon core, spiral leads are some of the best high quality leads available and are fully compatible with electronic ignition systems. This is the scenario that will occur if the particulars above aren't given due attention. The module will work initially. The car may run for a half hour or so, then the engine will start to run roughly and eventually cutout. Trying to start the engine just after it has cutout will fail. Wait approximately a half hour and the engine will restart and run normally for a similar time length. This process will repeat a number of times until the module fails totally. If you are aware of what is occuring and rectify the issue prior to the module's complete failure, the ignition system can be made to work reliably. Keep repeating the cycle and the module will be trashed. Here's a few more images of the ignition system. Electronic Points Assisted Ignition Module. The black electrical tape visible on the module is holding a protective plastic cap over the power transistor (A temporary fix that I haven't got around to attending) The Coil for the Module. Note that it is a red "sports" high voltage output coil. Not required, but what I had on a shelf at the time. Note also the ballast resistor on the side. I added the ceramic resistor to increase the coil's primary resistance to around 3.4 ohms. The distributor (actually a modified GM Holden V8 distributor) and a close up of the points. The points have been in place for years now and illustrate no visible wear on the contacts. |
|
|
|
Post by frank1965 on Jan 8, 2024 13:26:27 GMT
Hi all i just converted too powerspark unit at my 1969 P5B - good to have a look inside the distributor because the vaccum unit was totally worn - i mention this piece had done nothing for years  approx 50 horses died and hopefully i can get them alive again. I have ordered the vacuum unit from Simon BBC and look forward BR Frank |
|
|
|
Post by frank1965 on Jan 28, 2024 17:52:42 GMT
Hi all i just converted too powerspark unit at my 1969 P5B - good to have a look inside the distributor because the vaccum unit was totally worn - i mention this piece had done nothing for years approx 50 horses died and hopefully i can get them alive again. I have ordered the vacuum unit from Simon BBC and look forward BR Frank |
|
|
|
Post by frank1965 on Jan 28, 2024 18:01:22 GMT
Hi all,
yesterday i started the engine with Powerspark conversion. After checking everything like centrifugal adjuster and replacing also the vaccum adjuster, replacing vacuum hose the engine starts emediately and after setting the ignition timing it runs really fine and stabil at very cold temperatures - so everithing seems to be perfect at the first view.
I dont want to doo a testride because of pretty salted streets, so a have to wait.
Br Frank
|
|
|
|
Post by enigmas on Jan 28, 2024 22:00:53 GMT
Congratulations on successfully fitting the PowerSpark module and getting the engine to run. As for the Vacuum Advance module...there's no way on God's green Earth that you'd lose 50 ponies if it wasn't functioning. The capsule is simply in place to add advance during cruise situations on a steady throttle whilst motoring down a highway. It's only there to slightly improve fuel economy as the engine's flame front isn't as turbulent on a light throttle opening.
|
|


 approx 50 horses died and hopefully i can get them alive again.