|
|
Post by daveh on Feb 7, 2016 18:46:07 GMT
this is my next job to get the seats out and get them to a local auto trimmer,before i start to remove the seats,
i think after my points replacement problems and to make the job go to plan, i need ask for advice and info on the
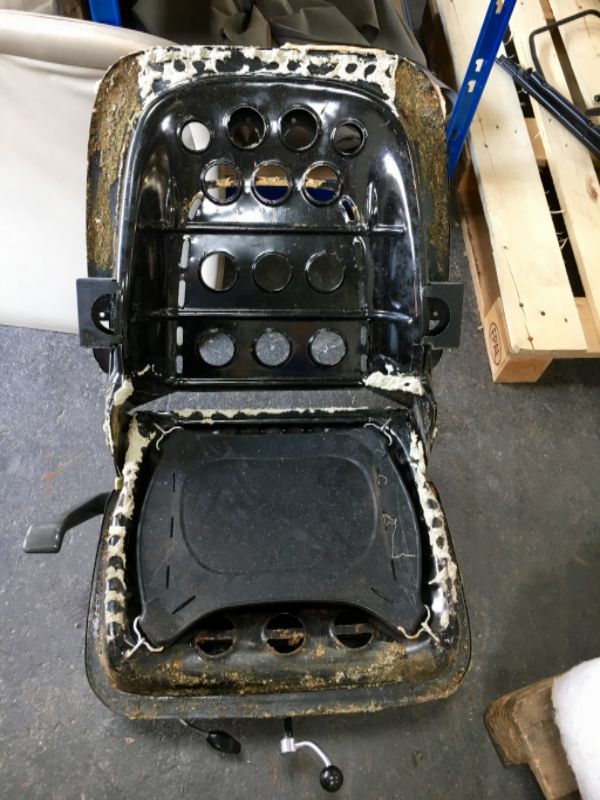
removal of the seats.i know the front and rear seat bases just lift out. it's how do i get the rear back rest out?.
i'm sure somewhere on the forum i read it's held in with bolts or bolts in the boot and something about
don't remove the middle nut or bolt as that holds the tank in. can you tell me where these fitting are,
i guess they are under the cover in the back of the boot at the top also is there any holding the bottom
of the seat rear panel, it is very solid and i don't see anything inside the car.that's holding it in position.
now for the front bench seat, can the back rest part be removed or dose all the base frame have to be
removed along with the runners on the floor pan? i have noticed there two metal plates either side of
bench seat base frame with various hole positions with nuts and bolts at both sides of the base that look
like they are to adjust the seat height and angle etc:, these look like they can be removed and leave the
seat runners fixed to the floor pan so i don't need to disturb the runners from the floor pan,there is only stitching
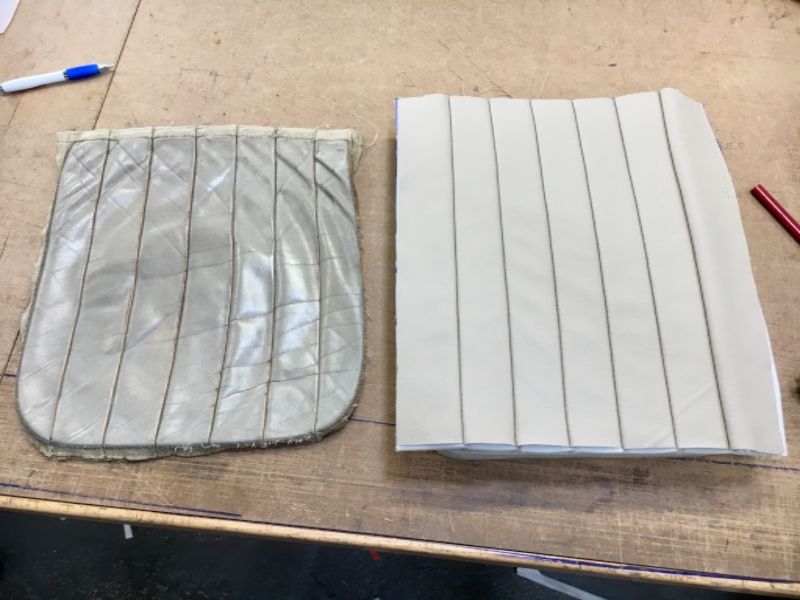
needed on the front bench seat that has seams on the back and base that need re stitching. three small area's in
54 years is'nt that bad when you think about the quality of the seats, plus the base is a bit soft on the driver side,
the years and sun has bleached the colour so thats also being re done hence the rear seat have to go as well even
the carpets have gone virtually white so i have had a new set set made from the original set,in the original green colour.
any advice on this would also be helpful.has anyone tried using spray fabric
dye on their upholstery does it work? when the trimmer came to see the seats he said he
would give me a aerosol spray to use on the faded carpet on the bottom of the door cards
apart from being faded they and the rest of the door cards are very good condition and it's only
the carpeting that's lost it's colour, so after masking up the rest of the door card, he said the fabric dye
will work and bring the colour back i hope. he says it dries in about 30 mins and is colour fast and permanent in a day
|
|
|
|
Post by Phil Nottingham on Feb 7, 2016 19:53:59 GMT
The front seats can be removed from the runners - it is for height adjustment
The rear seat has 4 1/4 UNF set screws (7/16" AF) along the top accessed from inside the boot behind the tank board which is just fixed with self tappers along the top
No need to remove the tank and often the setscrews are missing. Early P5's may have slotted screws. The seat back may be stuck to the sound proofing. Pull from inside along top and lift up from bottom brackets
|
|
|
|
Post by daveh on Feb 7, 2016 20:09:08 GMT
The front seats can be removed from the runners - it is for height adjustment The rear seat has 4 1/4 UNF set screws (7/16" AF) along the top accessed from inside the boot behind the tank board which is just fixed with self tappers along the top No need to remove the tank and often the setscrews are missing. Early P5's may have slotted screws. The seat back may be stuck to the sound proofing. Pull from inside along top and lift up from bottom brackets ***************************************************** once again thank you for your help, advice and info , it should go smooth now i know where and what to look for, |
|
|
|
Post by Welsh Warlock on Feb 7, 2016 23:00:46 GMT
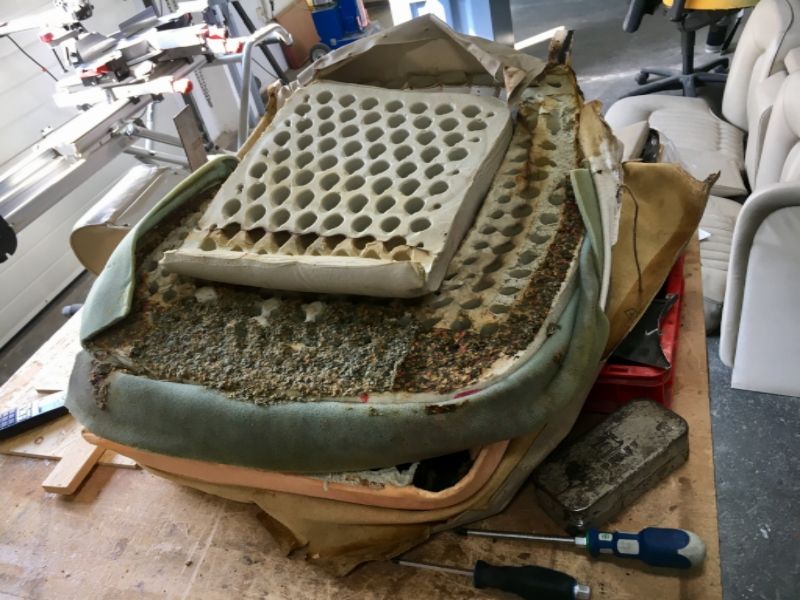
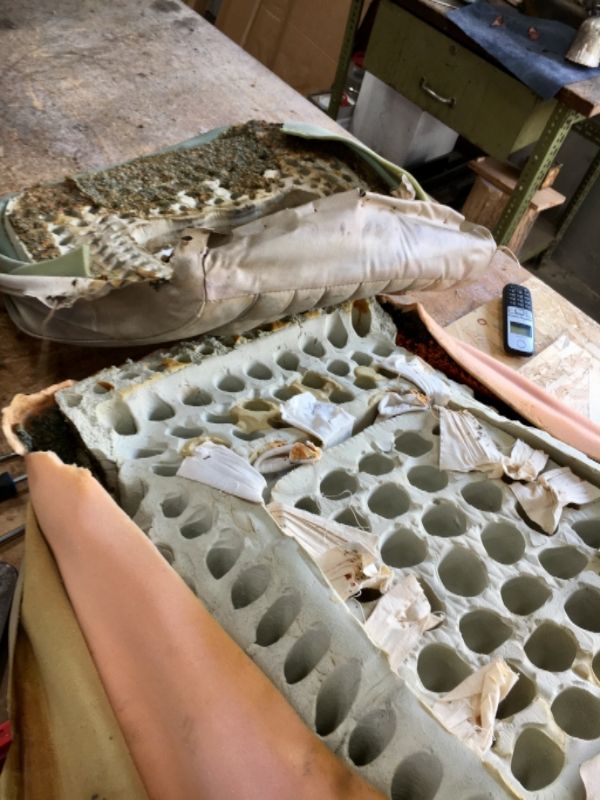
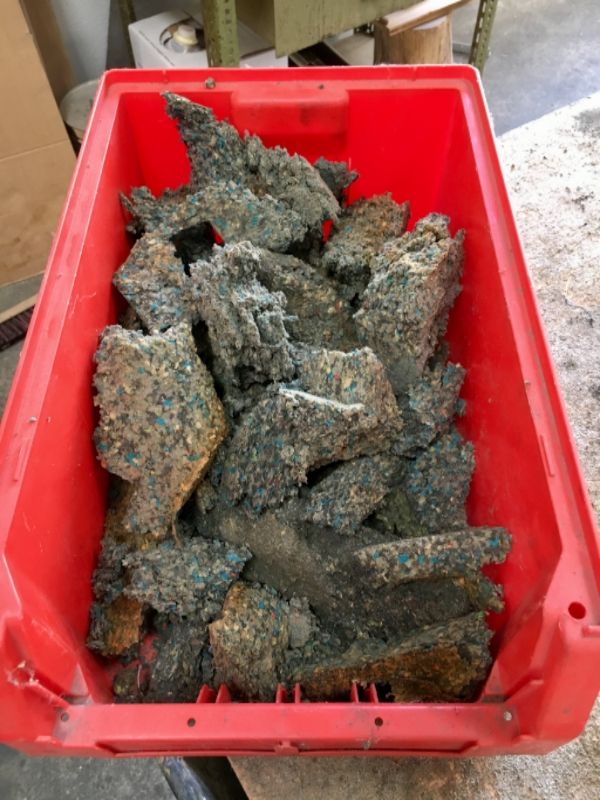
You might want to budget for most of the crumble foam to be replaced as well as any visible trimming issues as the crumble foam will likely be either crumbled or gooey!
|
|
|
|
Post by johnwp5bcoupe on Feb 8, 2016 8:44:13 GMT
You might want to budget for most of the crumble foam to be replaced as well as any visible trimming issues as the crumble foam will likely be either crumbled or gooey! Looks a bit like this doesn't it Allan  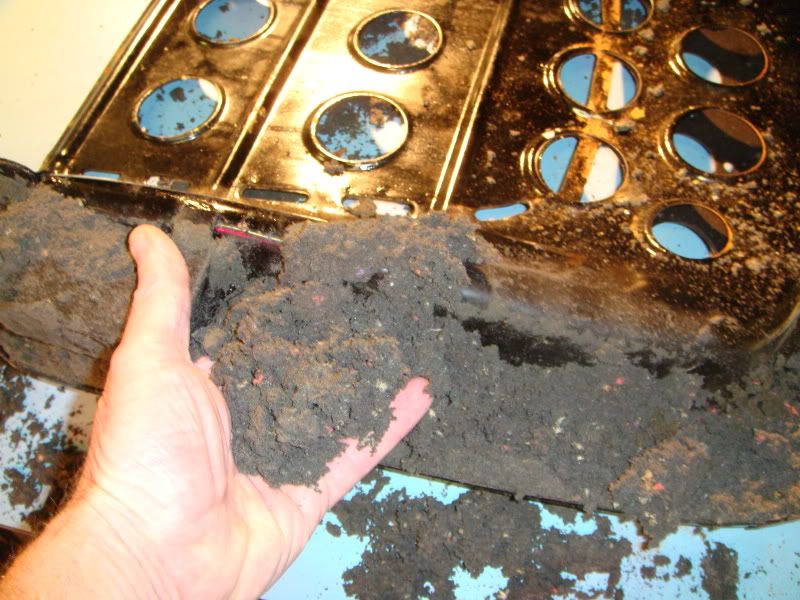 |
|
|
|
Post by Welsh Warlock on Feb 8, 2016 10:41:23 GMT
Yours had obviously gone a little further than mine John but mine was well on the way and had lost all of its support. 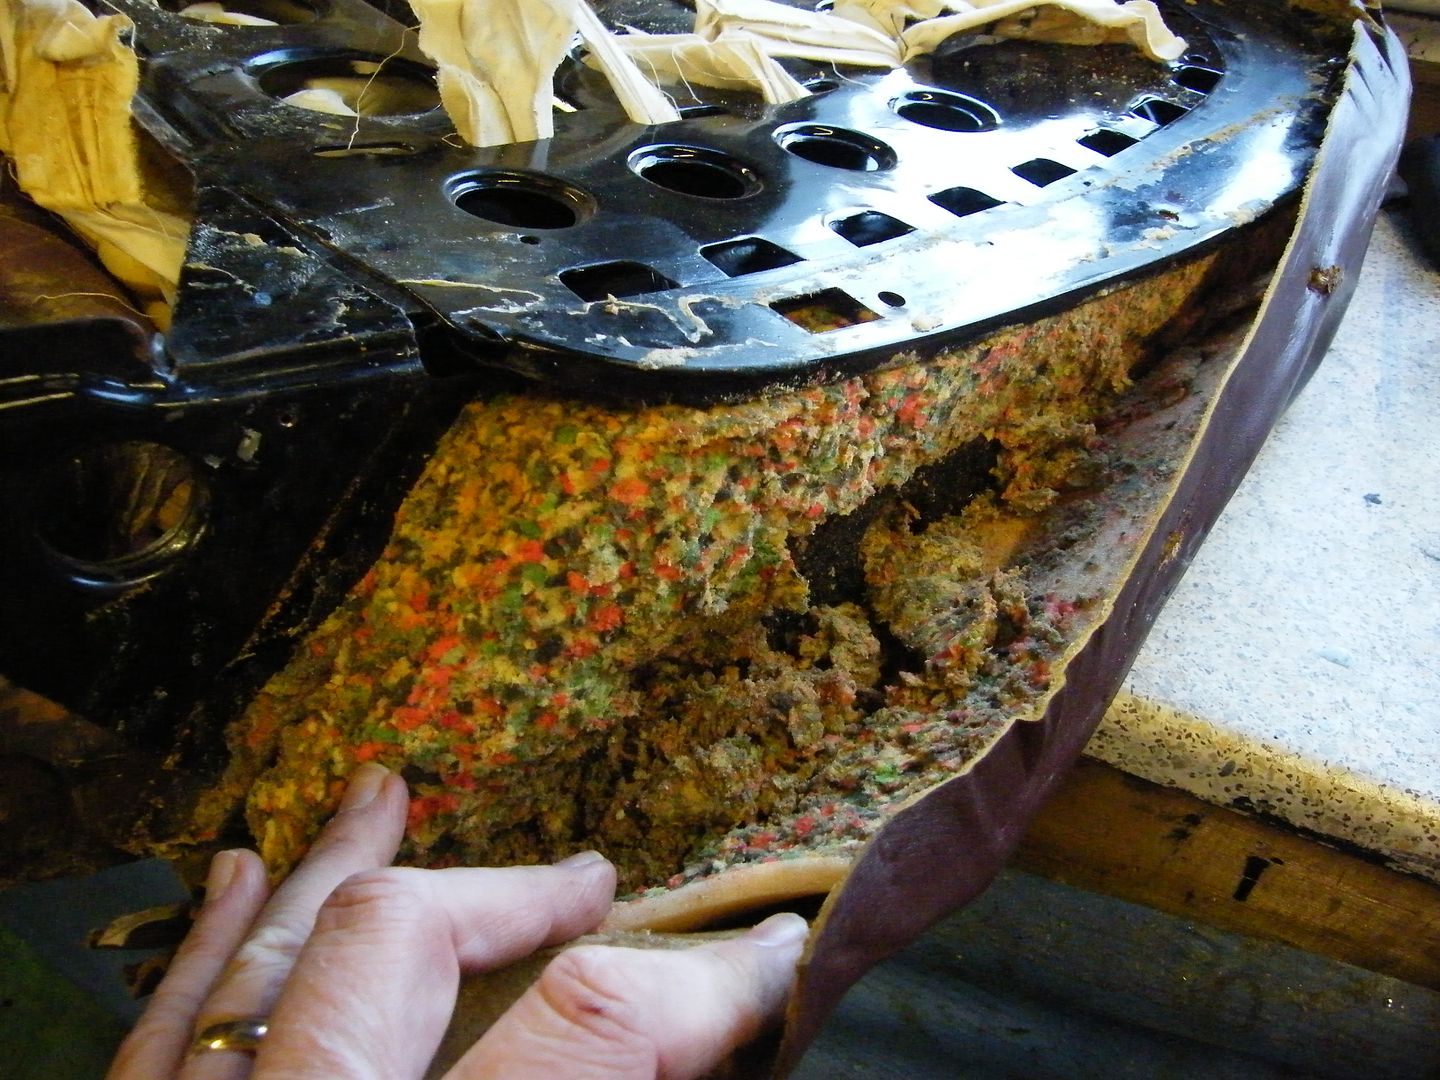 |
|
|
|
Post by Phil Nottingham on Feb 8, 2016 17:00:53 GMT
Progress for you! Mk3 P5 and P5B seats only lasting 40 odd years - our 1938's rubberised/raw horse hair and Dunlopillow on coil springing is still going strong  |
|
|
|
Post by johnwp5bcoupe on Feb 8, 2016 17:20:50 GMT
Didn't the MK3 use proper yellow foam Phil? My rear cushion when striped the cheek on the right turned out to be a legacy from MK3 so is that degrading now Phil? It would be interesting to know how many MK3 guys have collapsing foam? 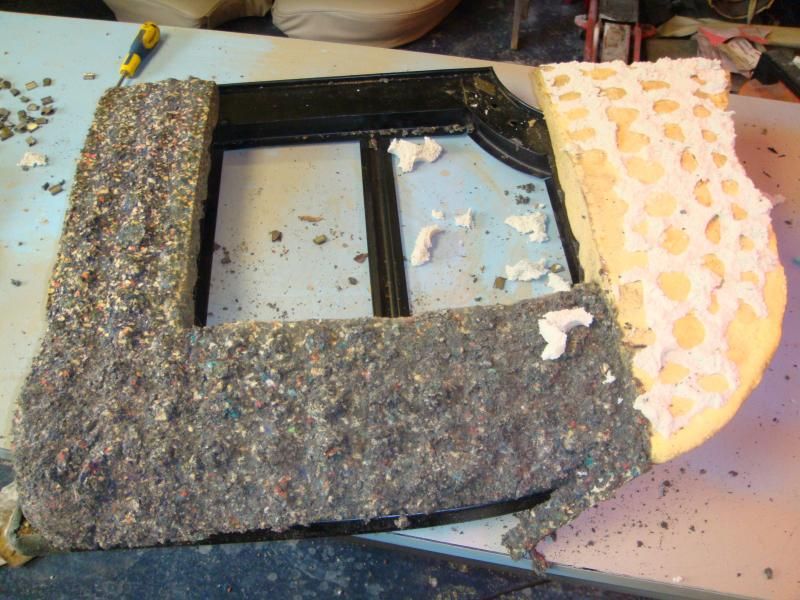 |
|
|
|
Post by Phil Nottingham on Feb 8, 2016 18:09:57 GMT
Some are not looking good so perhaps that is degrading now?
|
|
|
|
Post by daveh on Feb 8, 2016 18:25:10 GMT
You might want to budget for most of the crumble foam to be replaced as well as any visible trimming issues as the crumble foam will likely be either crumbled or gooey! i did say to the trimmer the drivers side base was a bit soggy so i'm expecting him finding a bit more than the three seam that need re-stitching. i just hope mine are not as far gone as the one's posted lol, i will ask him if poss to get a few pic's of whats under the leather. they do feel reasonably solid though, the back looks in real good condition it's maybe not seen much action plus once they are refurbished it will only be the drivers seat that gets sat on, my three year old daily runner Citroen has never had a passenger in it. |
|
|
|
Post by stantondavies on Feb 8, 2016 19:39:40 GMT
Looking at the photographs, I would have said the seats were from a P5B. What date is your 3 litre? Is it a very late model?
|
|
|
|
Post by daveh on Feb 8, 2016 20:41:14 GMT
Looking at the photographs, I would have said the seats were from a P5B. What date is your 3 litre? Is it a very late model? it's a 1962 mk1A saloon, the previous owner kept on top of most of the problems, |
|
|
|
Post by johnwp5bcoupe on Feb 8, 2016 21:32:25 GMT
Allan started the rot it's not a 3.5  You wont have Crumble Foam to worry about Dave that's the trouble with just reading Recent Posts  |
|
|
|
Post by Phil Nottingham on Feb 8, 2016 22:14:13 GMT
The springs can fracture if persons of a certain weight have sat on them too long and/or have suffered corrosion during long periods of storage
|
|
|
|
Post by Welsh Warlock on Feb 8, 2016 22:42:09 GMT
Allan started the rot it's not a 3.5 You wont have Crumble Foam to worry about Dave that's the trouble with just reading Recent Posts Oops- Sorry! |
|
|
|
Post by Warwick on Feb 9, 2016 1:19:33 GMT
- our 1938's rubberised/raw horse hair and Dunlopillow on coil springing is still going strong Phil, I think the 1930s were the pinnacle of rubberized horse quality. |
|
|
|
Post by daveh on Feb 10, 2016 18:24:36 GMT
after a couple of days of heavy rain and very cold, i got the rear seat out to-day
and found it all in good condition, i gave it a good cleaning and it looks excellent so
this wont need to have any renovation work done, tomorrow i will get the front bench seat out
and if that cleans up as good as the rear seat, i will only need the seams re-stitching and
the foam on the front base panel sorting out, i was also going to get both seats re-coloured
after looking at the back seat that's just not needed and would be a waste of money. if the front cleans up as the rear
then i wont need it either, and i will save a few shillings, i did find the panel in front of the tank had no self tappers
it was just push in place but the hard board panel is in poor condition so i will remove the cover and use it as
a template and make a new board from 1/8" ply wood and staple the cover back on it and then fit it with new screws.
|
|
|
|
Post by Phil Nottingham on Feb 10, 2016 18:39:47 GMT
Rover never pushed anything into place - there will be screw holes there |
|
|
|
Post by daveh on Feb 10, 2016 20:53:26 GMT
Rover never pushed anything into place - there will be screw holes there i probably stated it wrong the panel and the car body have the holes for the self tapping screws they were just not replaced i don't know if someone had replaced the petrol tank or fuel lines etc: and just couldn't be bothered to re fit the screws, a point that got my attention was the petrol tank looked just like it was new it's very clean, but who ever had the panel out certainly made a mess of re-fitting it ,the hardboard panel it's cracked across it in two places and it's just the boot liner that's stapled to it is holding it together. |
|
|
|
Post by barryr on Feb 11, 2016 22:13:31 GMT
They are often like that I think. Quite a weak piece of trim - mine has weaknesses across the 2 sides that go over the wheel tubs but it hasn't actually broken.
|
|
|
|
Post by djm16 on Feb 12, 2016 0:32:32 GMT
This is quite easy to repair with several coats of 50% diluted PVA Glue painted onto the hardboard, followed by a thick line of neat PVA down the splits.
|
|
revoxy
Rover Rookie

Posts: 30  Location: Linz, Austria
|
Post by revoxy on Mar 29, 2017 15:01:09 GMT
|
|
|
|
Post by tarnowl on Mar 30, 2017 8:36:15 GMT
Great photos. I have all this to come! (Can't wait!!). Great that you have a trimmer where you are. Less chance of finding one here in South West France!
regards,
Tarnowl.
|
|
|
|
Post by Steed on Sept 9, 2017 11:33:21 GMT
Is it easy to DIY re-foam fill front seat squab??
|
|
|
|
Post by richardlamsdale on Sept 10, 2017 14:27:35 GMT
Agreed - I saw that listing and thought similar. I realise it's easy to be an armchair critic, but I do hope the bidders have viewed the car - it's difficult to tell much at all about the condition due to the fuzzy photos.
|
|