|
|
Post by djm16 on Mar 22, 2016 2:58:33 GMT
I have been straightening the bonnet on my 3 litre. There is (was) a kink just in front of the hinges where someone had tried to shut it over an obstruction, and a handful of minor dings elsewhere.
Regarding prepping for painting. The bonnet is stripped completely of its hardware, and I want to paint the underside too. I will unfortunately have to use some bog on it (fine glass filler).
Would we
1) have it sandblasted and
2) have top and bottom powder coated with etch primer
3) or have top only primed
4) or not have it primed at all?
5) or none of the above (please explain)
|
|
|
|
Post by enigmas on Mar 22, 2016 7:05:17 GMT
You don't need to make a meal out of the task to restore the bonnet unless you want to go that way. Could you post a picture of the bonnet to illustrate the areas that need repair.
I know you've seen my posts on 'Couping the Magnette' so this is how I would go about it. Generally I like to minimize the work required but it's difficult without referencing the damage.
If you've got an angle grinder that takes 100 or 120mm discs purchase some 80 - 120 grit abrasive flap discs and clean the paint, filler from the area to be repaired. Metal has a memory and if you are relatively proficient and patient with a hammer and dolly you can work most of the shape back to the correct contour. Don't work a panel before it is cleaned to bare metal and don't attempt to beat the metal into submission, just gently work...sometimes against the dolly and sometimes beside it.
The purpose of the flap discs is to give the metal surface tooth so that a thin veneer of (good quality filler) will adhere firmly. Be careful not to thin the metal too much by over linishing the surface.
Before using filler, clean the area with 'panel wipe'(it's not as volatile as acrylic thinners) then give the panel a light coat of etch primer.
You can have the panel sand or bead blasted, but it's not really necessary. Sand blasting can be very aggressive. If the paint is structurally ok you can work your repair up to it without stripping the entire panel. After the major dolly work and filler where required, use panel wipe, etch primer, primer and primer filler up to the old paint surface to level it. You'll need to do this several times to blend the repair to the old paint edge to create a smooth invisible transition.
At this point of the repair body colour is irrelevant. Once the repair is done, it's best to coat the entire panel with primer to provide a uniform surface to key the top coat, unless you know how your top coat will react with the old painted surface.
If you're overcoating old paint, vigorously rub the surface with a scotch brite pad to key the surface for the new coat. Then panel wipe it, wipe it with another clean dry cloth and then you can paint it.
Yes, it's all very tedious and laborious, but it's just physical work that requires a patient and methodical approach.
PS. Using an oxy/acetylene set to heat/shrink and reshape a metal surface is a bit more complex to explain and you'll need some proficiency with the unit.
Materials:
Aerosol cans of etch primer, primer surfacer and primer work fine if you don't want to go to the trouble of mixing all these products individually for you spray guns.
|
|
|
|
Post by djm16 on Mar 23, 2016 7:09:54 GMT
I thought I had the bonnet kink straightened out, but when I test fitted it to the car, the bonnet would not close properly. I nearly kinked it again trying to get it to close. Then it dawned on me what had happened. The P.O. must have driven off with the bonnet open and it flew up, stretching the frame. When he then closed the bonnet the skin bent around the stretched frame. Off with the bonnet again. This time I took out as much of the stretch as I could by cutting 3/4 the way through the frame and re-welding the cut shut with some compression around the bonnet. Yeah, it just about fits now. The rusty and bent frame, before I made cuts in the leading edge and re-welded: 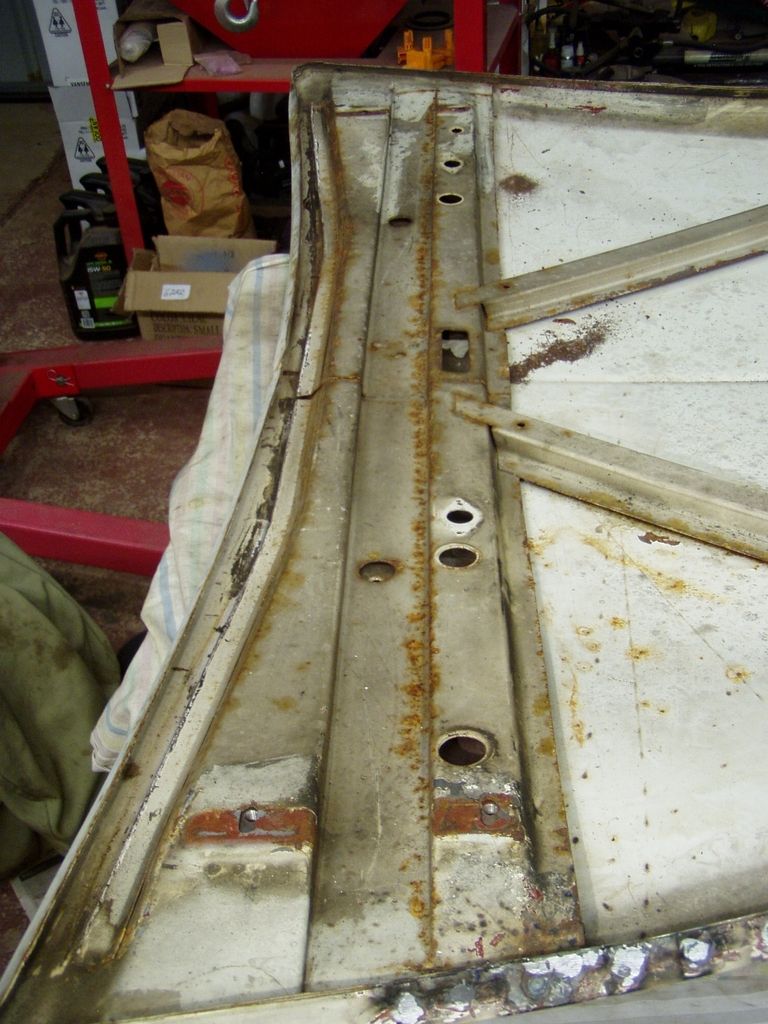 The line of the bonnet almost back to spec now: 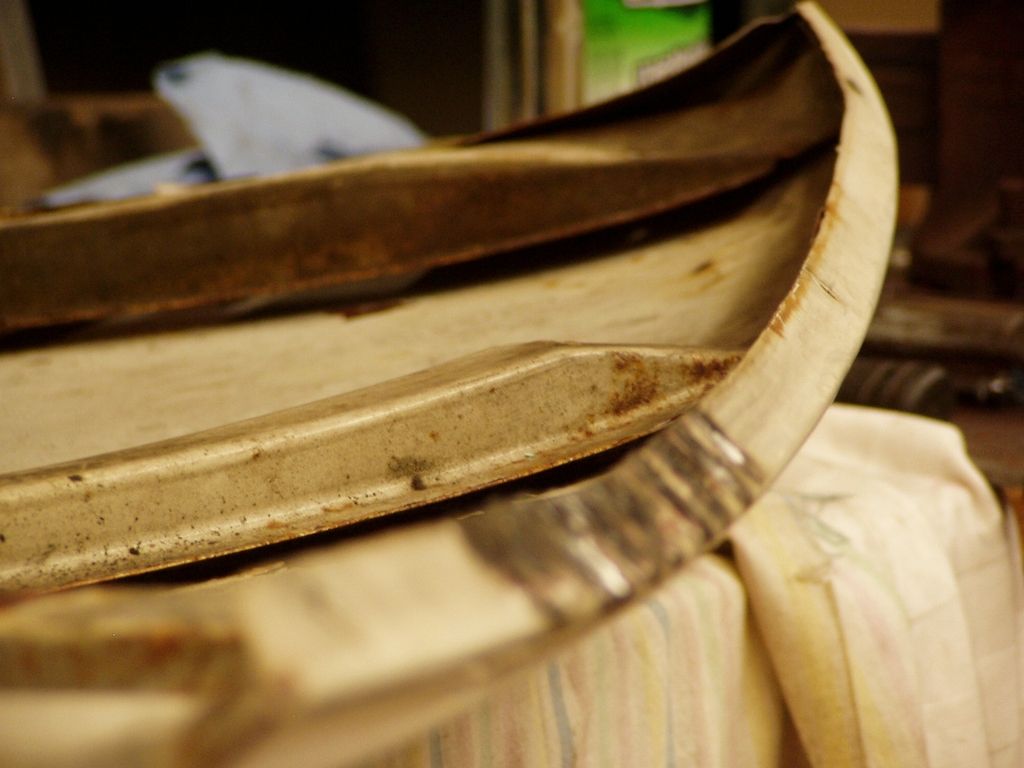 The reinforcing strips - spot welded through drilled holes: 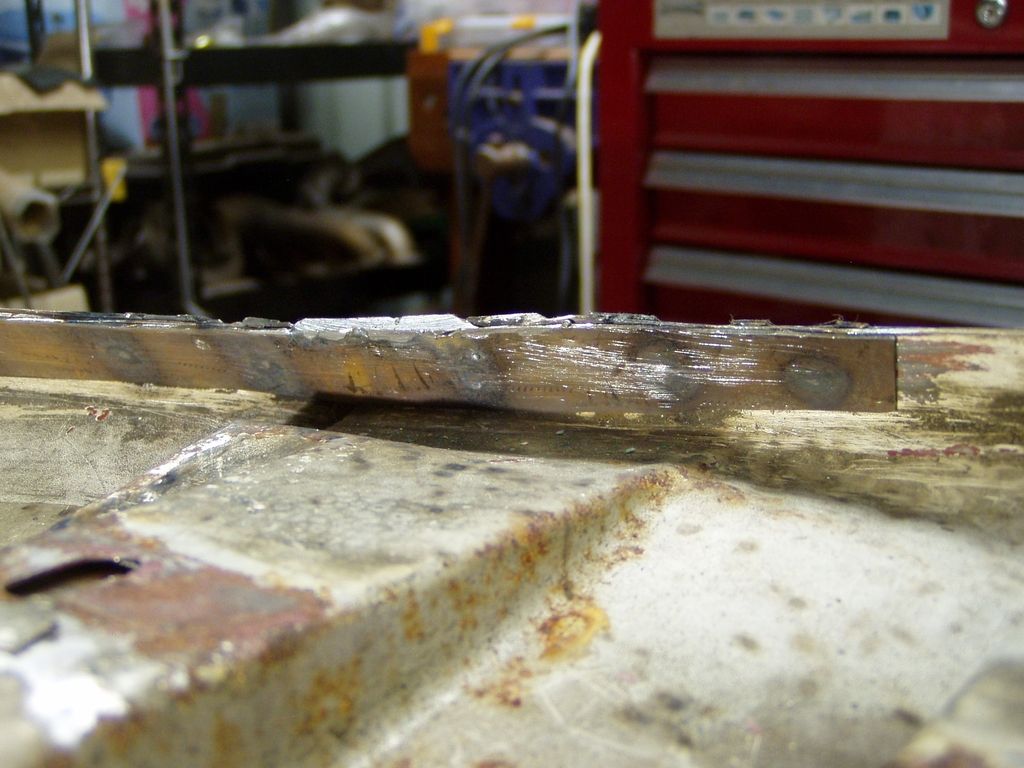 Lastly the minor dents: 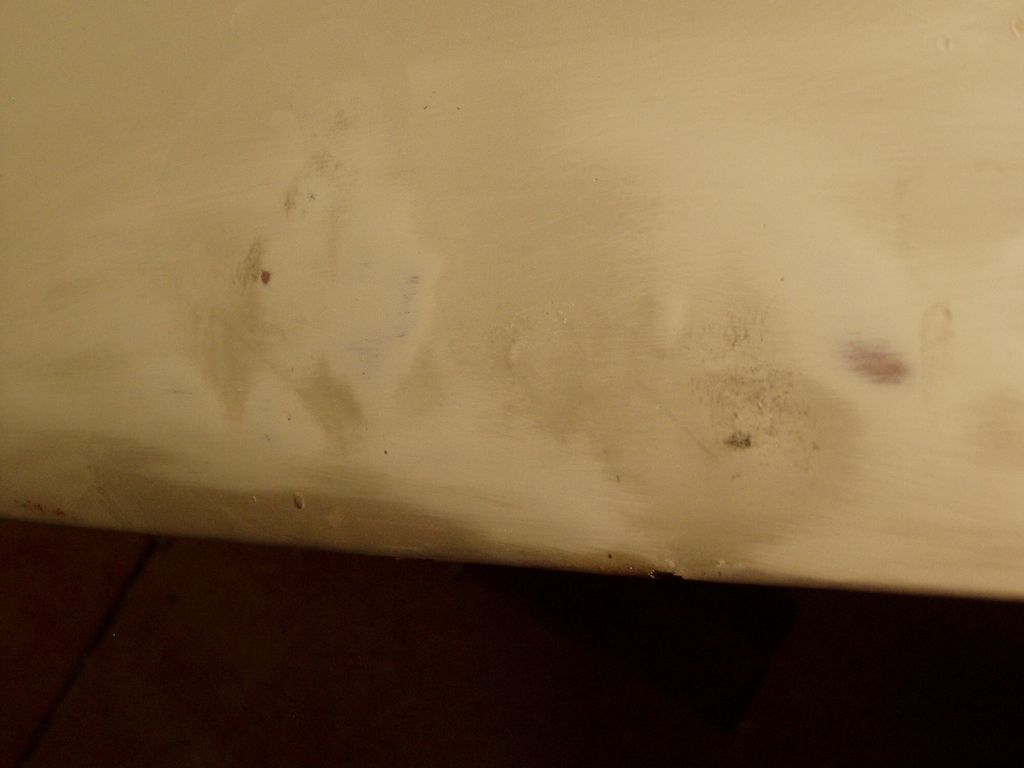 |
|
|
|
Post by p5rover on Mar 23, 2016 21:42:31 GMT
I would use a small portable shot blaster and lightly blast clean the inner frame to remove the rust and then on the outside of the bonnet, if there is no sign of corrosion and the paint is in good condition, I would just hammer/dolly the dents out as best you can followed by a light skim of 2k polyester filler and then sand/key the paint, clean it down inside and out with panel wipe and then give it two coats of 2k epoxy primer followed by 2 coats of high build primer. I would stay away from etch primer and aerosol cans.
|
|
|
|
Post by petervdvelde on Mar 23, 2016 22:23:38 GMT
Be carefull with shot blasting the bonnet as if the pressure is to high and you shot blast the inside, you will find the marks on the outside of the skin where the frame parts are. I would first remove all the paint with paint stripper and then very carefully shotblast it with low pressure. With shotblasting you easily stretch the metal.
I removed the bonnet skin from the frame because in the upper corner the frame and bonnet had severe rust but i would not recommend this method as welding the skin back to the frame caused disortion due to the welding heat and it took me a lot of time to correct this.
For removing the paint on a door, i found a shot blasting company who had a large oven in which they burned down the paint prior to shot blasting. I had second thought with this method but the owner convinced me and used this method for a door
Peter
|
|
|
|
Post by djm16 on Mar 24, 2016 3:56:41 GMT
Thanks, all sounds like good advice.
The paint on the topside really is not viable. It has been repainted at least once, and is now bubbling. So I think it has to come off back to bare metal.
I like the oven baking to burn off the paint idea. It is not heating so much as localised heating that is the problem. So I might try removing every scrap of paint with paint stripper under alu foil, then treat the awkward bits inside with my mini blaster.
In any case, my preferred shot blaster / powder coater is closed for 2 weeks over Easter.
P5Rover, what do you have against etch primer?
|
|
|
|
Post by p5rover on Mar 24, 2016 13:01:57 GMT
what do you have against etch primer? Its only really used now by DIYers or people looking to do a quick job and also by people who think that because that's what they used from the factory it must be good. Paint technology has moved on a lot, any decent restorer who cares about longevity will use 2k epoxy primer as its water proof, unlike other primers which are porous. Most restorers aren't bothered about how long the job will last as they will probably never see the car again and etch is cheaper and easier. |
|
|
|
Post by johnwp5bcoupe on Mar 24, 2016 15:38:50 GMT
what do you have against etch primer? Its only really used now by DIYers or people looking to do a quick job and also by people who think that because that's what they used from the factory it must be good. Paint technology has moved on a lot, any decent restorer who cares about longevity will use 2k epoxy primer as its water proof, unlike other primers which are porous. Most restorers aren't bothered about how long the job will last as they will probably never see the car again and etch is cheaper and easier. I like it and I don't do quick jobs it's well proven you can follow with your 2k primer! |
|
|
|
Post by p5rover on Mar 24, 2016 16:42:48 GMT
I like it and I don't do quick jobs it's well proven you can follow with your 2k primer! Not having a go at you john or anyone else who uses it, i'm just stating the facts. Your response is the same as most who have always used etch. Yes its well proven and works ok, but there are far better paints available. If you spray a bare metal panel with etch primer and one with epoxy primer and put them both in the garage for 12 months, when you come back to them, the one sprayed with etch primer will be starting to rust, the one sprayed with epoxy will be rust free, that is the difference. Weather you believe it or not is up to you. In my opinion the primer coat is the most important part, as its the foundation. |
|
|
|
Post by p5rover on Mar 24, 2016 17:25:16 GMT
|
|
|
|
Post by johnwp5bcoupe on Mar 24, 2016 18:42:46 GMT
I like it and I don't do quick jobs it's well proven you can follow with your 2k primer! Not having a go at you john or anyone else who uses it, i'm just stating the facts. Your response is the same as most who have always used etch. Yes its well proven and works ok, but there are far better paints available. If you spray a bare metal panel with etch primer and one with epoxy primer and put them both in the garage for 12 months, when you come back to them, the one sprayed with etch primer will be starting to rust, the one sprayed with epoxy will be rust free, that is the difference. Weather you believe it or not is up to you. In my opinion the primer coat is the most important part, as its the foundation. Not a problem no offence taken  I have always felt Acid Etch does a good job! there are good and bad brands? I have used Epoxy primer but not on my P5b, there are modern materials which are as good but if Acid Etch works for you  You will always get a difference of opinion on materials people use. I am going back a few years a friend had a Ford Granada he took down to bare metal so I gave it a good coat of Acid etch, it was left in a barn for several years while he decided he didn't want to finish it!! it was sold for scrap the body was still rust free There must be 1000's of Classics done in the past using Acid Etch which have stood the test of time mine is about 20 years.I agree the primer is important but the prep is even more important. |
|
|
|
Post by p5rover on Mar 24, 2016 19:44:49 GMT
Not a problem no offence taken I have always felt Acid Etch does a good job! there are good and bad brands? I have used Epoxy primer but not on my P5b, there are modern materials which are as good but if Acid Etch works for you You will always get a difference of opinion on materials people use. I am going back a few years a friend had a Ford Granada he took down to bare metal so I gave it a good coat of Acid etch, it was left in a barn for several years while he decided he didn't want to finish it!! it was sold for scrap the body was still rust free There must be 1000's of Classics done in the past using Acid Etch which have stood the test of time mine is about 20 years.I agree the primer is important but the prep is even more important. Yes there are good and bad etch primers, most of them now don't even contain any acid! much like red lead which doesn't contain any lead! which makes them useless. If you do use etch primer always go for a 2k , which will come with the paint(usually in a metal tin) and the acid (in a plastic bottle) the reason for this is because the acid would eat through the metal container. so any acid etch primers in 1 metal tin or aerosol are a waste of time. I agree that a acid etch job can last a long time if the vehicle is kept dry and well cared for. Preparation is equally as important, but cars from the factory(with as near to perfect prep you can get) still rusted pretty quickly. |
|
|
|
Post by p5rover on Mar 24, 2016 20:12:17 GMT
I am going back a few years a friend had a Ford Granada he took down to bare metal so I gave it a good coat of Acid etch, it was left in a barn for several years while he decided he didn't want to finish it!! it was sold for scrap the body was still rust free That is surprising! could be a few factors why it stayed good, the main one being that barns stay nice and dry with good air flow? Did your friend strip the paint off with nitromors or sand paper? |
|
|
|
Post by enigmas on Mar 24, 2016 22:38:34 GMT
I work in a well organised space with a good range of equipment including a gas MIG, oxy/acetylene set, lath, etc. The thing is, it's well ventilated but semi enclosed at the rear of my home. The area is one of family/high density living and my work space borders the fence line to my neighbour's home.
The primary reason I don't use 2 pak in my work area. It's got cyanide within it's formulation. It's very toxic and poisonous. Frankly all of the products used in body work are toxic and poisonous. I don't own a respirator, have a sophisticated extraction system for controlled air flow nor is my work area temperature controlled. I use acrylic lacquer because it is relatively forgiving (when you know the product) and can be sprayed in my particular working environment.
As for using etch primer. I prepare a panel and then paint it within a day or 2. I don't store it for a year...I'm not running a professional panel shop just restoring or building one off projects as I feel inclined to do. The etch primer is only designed as a substrate for the next coat not a long term storage solution. If I did want to store it I could shoot it with a sealer.
I don't like clear coats either (including 2 pak) although I use them on occasion. In Australia's climate (high UV) they eventually go opaque or start to peel...and you can't buff it out either.
|
|
|
|
Post by p5rover on Mar 24, 2016 23:27:28 GMT
The primary reason I don't use 2 pak in my work area. It's got cyanide within it's formulation I would also never use paints with iso's in at home, that is one of the advantages of epoxy primer, its iso free. Just because its 2k doesn't mean it contains iso's. |
|
|
|
Post by p5rover on Mar 25, 2016 0:00:28 GMT
As for using etch primer. I prepare a panel and then paint it within a day or 2. I don't store it for a year... The point is that epoxy primer is waterproof and etch primer is not. when you get damage to your acrylic/cellulose top coat, moisture can then get through the etch primer to the bare metal and start rusting, if on the other hand you got damage to your acrylic/cellulose top coat and you had used epoxy primer underneath, the epoxy would stop the moisture getting to the bare metal. It just does a better job at protecting the metal full stop |
|
|
|
Post by enigmas on Mar 25, 2016 4:59:41 GMT
Ok, each to his own.
|
|
|
|
Post by johnwp5bcoupe on Mar 25, 2016 9:04:26 GMT
I agree Vince |
|
|
|
Post by johnwp5bcoupe on Mar 25, 2016 9:23:35 GMT
I am going back a few years a friend had a Ford Granada he took down to bare metal so I gave it a good coat of Acid etch, it was left in a barn for several years while he decided he didn't want to finish it!! it was sold for scrap the body was still rust free That is surprising! could be a few factors why it stayed good, the main one being that barns stay nice and dry with good air flow? Did your friend strip the paint off with nitromors or sand paper? He stripped it I just sprayed it it was a working barn so damp farm machinery was in and out also it was used for potato riddling I think this is a case of what works for you! |
|
|
|
Post by p5rover on Mar 25, 2016 12:21:27 GMT
That is surprising! could be a few factors why it stayed good, the main one being that barns stay nice and dry with good air flow? Did your friend strip the paint off with nitromors or sand paper? He stripped it I just sprayed it it was a working barn so damp farm machinery was in and out also it was used for potato riddling I think this is a case of what works for you! If he had stripped it with nitromors, this leaves on the factory protection from the dipping process that the Granada would have had. One final say is that, most people who have used etch primer on there car will always say that etch is best. At the end of the day whatever paint you use if you keep the car dry all the time and the paint waxed(sealed) it will last many years, but using better paints will just make it last a lot longer with less care needed. |
|
|
|
Post by djm16 on Mar 25, 2016 23:17:23 GMT
That was certainly very informative. I had no idea! Thanks to all who have contributed. So I thought I would summarise for my benefit, and for anyone else who might be as confused as I will be in a week's time when I have forgotten the main points again. I have added a few details gleaned from other resto fora.
1) There is no substitute for good quality paint.
2) epoxy primer direct to metal is the nowadays generally preferred bottom coat as it is impervious to water as opposed to etch primer which is porous, preferably applied to a keyed surface, even better if the metal is phosphoric acid treated and then wiped clean with meths.
3) either high build primer next or filler depending on how much smoothing there is to do, preferably applied within the 7 day curing time of the base coat.
4) filing, sanding to shape, with fresh applications of epoxy primer to any place that goes through to metal
5) coat over any bare filler with primer.
6) top coat over a recent final primer coat. If more than 7 days, then lightly key and recoat with primer.
Primer or filler first?
There also is an argument for putting fibreglass filler direct to metal. Apparently some panel shops do this as that is the way they have been taught. The argument is that filler adheres to metal better than paint. I came across a post with pictures (of course I can't find it again now!) comparing adhesion strength of epoxy primer first, then filler v. filler only, and on metal prepped with 40,80 or 180 grit. The test panels that were primed first, in each case on flexing the test panels the primer peeled directly away from the metal, whereas the filler remained adhered to the metal. Suprisingly, keying with 180 grit was more effective than with 40 or 80.
The argument against, we are probably all familiar with, having seen it on many a now aging resto job from elsewhere, and that is that fibreglass filler is porous to water and oxygen and causes rapid rusting and separation as soon as water and oxygen can get through, even quicker if the top coat is applied in high humidity.
|
|
|
|
Post by johnwp5bcoupe on Mar 26, 2016 9:02:55 GMT
I used REFACE primer after the Etch brilliant stuff not to expensive now!
U-Pol Reface 2K sprayable metal primer is a highly efficient spray filler for large and irregular surfaces, and is ideal for bare metal and glass fibre substrates. It is high build and easy to sand providing the perfect surface for painting. The product is supplied with its own white hardener. U-POL REFACEcan be applied to bare metal polyester putties and bodyfillers and fully cured paint surfaces.
|
|
|
|
Post by p5rover on Mar 26, 2016 15:35:54 GMT
That was certainly very informative. I had no idea! Thanks to all who have contributed. So I thought I would summarise for my benefit, and for anyone else who might be as confused as I will be in a week's time when I have forgotten the main points again. I have added a few details gleaned from other resto fora. 1) There is no substitute for good quality paint. 2) epoxy primer direct to metal is the nowadays generally preferred bottom coat as it is impervious to water as opposed to etch primer which is porous, preferably applied to a keyed surface, even better if the metal is phosphoric acid treated and then wiped clean with meths. 3) either high build primer next or filler depending on how much smoothing there is to do, preferably applied within the 7 day curing time of the base coat. 4) filing, sanding to shape, with fresh applications of epoxy primer to any place that goes through to metal 5) coat over any bare filler with primer. 6) top coat over a recent final primer coat. If more than 7 days, then lightly key and recoat with primer. Primer or filler first?There also is an argument for putting fibreglass filler direct to metal. Apparently some panel shops do this as that is the way they have been taught. The argument is that filler adheres to metal better than paint. I came across a post with pictures (of course I can't find it again now!) comparing adhesion strength of epoxy primer first, then filler v. filler only, and on metal prepped with 40,80 or 180 grit. The test panels that were primed first, in each case on flexing the test panels the primer peeled directly away from the metal, whereas the filler remained adhered to the metal. Suprisingly, keying with 180 grit was more effective than with 40 or 80. The argument against, we are probably all familiar with, having seen it on many a now aging resto job from elsewhere, and that is that fibreglass filler is porous to water and oxygen and causes rapid rusting and separation as soon as water and oxygen can get through, even quicker if the top coat is applied in high humidity. |
|
|
|
Post by p5rover on Mar 26, 2016 16:08:19 GMT
I used REFACE primer after the Etch brilliant stuff not to expensive now! U-Pol Reface 2K sprayable metal primer is a highly efficient spray filler for large and irregular surfaces, and is ideal for bare metal and glass fibre substrates. It is high build and easy to sand providing the perfect surface for painting. The product is supplied with its own white hardener. U-POL REFACEcan be applied to bare metal polyester putties and bodyfillers and fully cured paint surfaces. Yes u-pol reface is good in the right situations, but if used wrong, can be a recipe for bubbling paint(micro blisters) in the future. Because reface is basically a sprayable filler(high talc content) it will suck in moisture like a sponge, so its important to seal it asap, if you can't seal it quickly then its important that its baked in a oven, to bake out any of the moisture that its absorbed before the top coat is applied, otherwise your just sealing moisture in underneath the top coat, which will show up in the future as little micro blisters in the paintwork. |
|
henry
Rover Rookie

Posts: 84 
|
Post by henry on Dec 19, 2016 6:29:10 GMT
If you want the bonnet stripped of paint you should have it soda blasted as that will remove the paint without harming the metal in any way shape or form.
|
|


 You will always get a difference of opinion on materials people use.