|
|
Post by Paul - P5B Coupe on Jul 4, 2013 5:14:13 GMT
Hi Peter,
I am slowly rebuilding a 3.9 and it looks pretty clean - but nowhere near a shiny as your lovely unit.
This is my first rebuild, so could I pose two questions to you please?
Firstly, how do you intend to remove the spigot bearing from your crankshaft, and
I understand the procedure for priming the oil pump via a fabricated tool and electric drill - but how fast do I need to run the drill? I assume that it would be a relatively low speed?
Kind regards,
Paul
|
|
|
|
Post by Warwick on Jul 4, 2013 6:11:04 GMT
Hi Paul,
Just normal drilling speed. The faster the better actually.
|
|
|
|
Post by eightofthem (Andy) on Jul 4, 2013 19:06:10 GMT
Hi Peter.
No spigot bearing required on the crank, or the spacer.
It should all be a tight fit.
|
|
|
|
Post by petervdvelde on Jul 4, 2013 20:37:16 GMT
Thanks Andy. I will remove the spigot bearing from the crank
Peter
|
|
|
|
Post by Paul - P5B Coupe on Jul 6, 2013 8:35:26 GMT
Hi Warwick,
Thanks for your response. Have emailed you (to avoid hijacking Peter's thread).
Regards,
Paul
|
|
|
|
Post by Steve P5b on Jul 6, 2013 11:10:58 GMT
Hi Peter, I am slowly rebuilding a 3.9 and it looks pretty clean - but nowhere near a shiny as your lovely unit. This is my first rebuild, so could I pose two questions to you please? Firstly, how do you intend to remove the spigot bearing from your crankshaft, and I understand the procedure for priming the oil pump via a fabricated tool and electric drill - but how fast do I need to run the drill? I assume that it would be a relatively low speed? Kind regards, Paul A simple way of removing the spigot bearing is to use suitably sized drift the same diameter as the spigot, fill the hole with grease and drive the drift into the bearing. With every blow of the hammer the bearing will be pushed out. . Many other ways, this is one I've used that works easily. Nice work on that engine, looks great |
|
|
|
Post by petervdvelde on Jul 21, 2013 21:27:11 GMT
Then fitted the plate with the starter gear, the distance piece and the flex plate. Torqued the bolts to the specified torque and also torqued the main pulley bolt.
Also fitted the exhaust manifolds and the down pipes. I ordered a set of coolant hoses which should arrive this week and then i will try to get the engine running in the trolley. I will attach some brackets to the the trolley to fit the radiator and will attach the rev counter and oil pressure and coolant temperature scale.
Peter
|
|
dave3066
Rover Rookie

Posts: 26
Location: Scottish Borders
|
Post by dave3066 on Jul 24, 2013 9:39:34 GMT
The studs were coated with special ARP thread lube and then torqued in 3 steps to the specified torque of 150Nm which is higher then the torque of the standard bolts. Before setting the torque, i fitted the rear crankshaft seal. 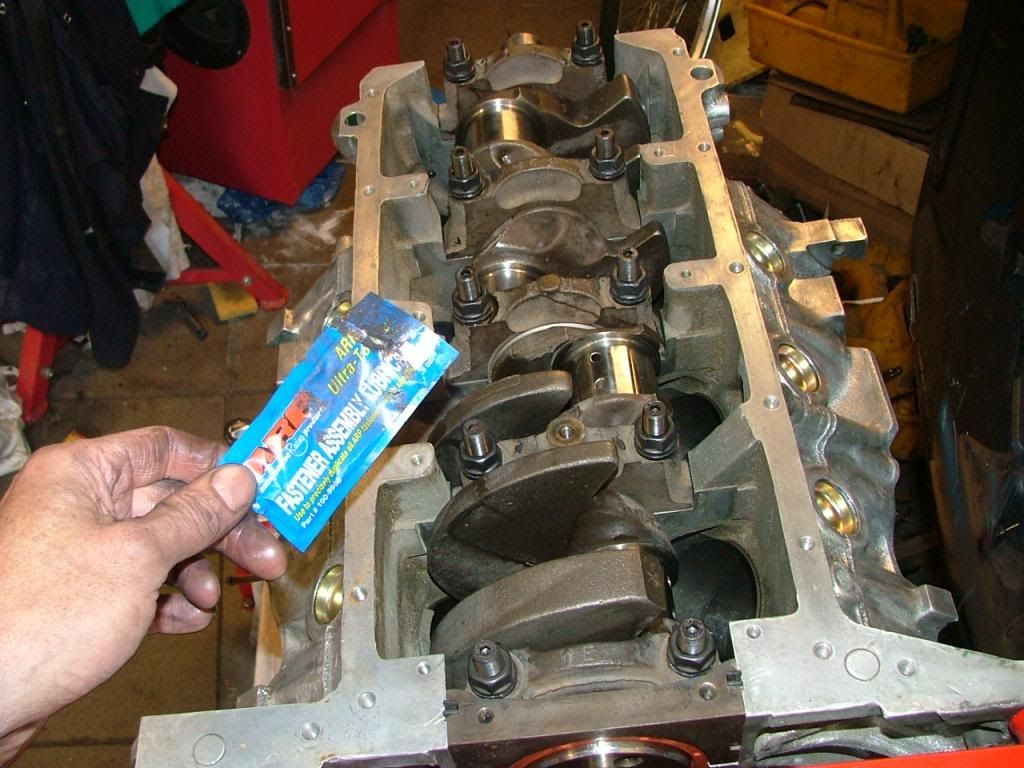 Hi Peter I've been watching your rebuild, amongst others, as I'm currently rebuilding the V8 from my P6. I mentioned over on the Classic Rover Forum that I was considering fitting ARP studs to overcome the tendency for crankshaft main bolts to loosen over time. See my thread here. Someone has pointed out.......well I'll let him use his own words "Hi Dave, if you do decide on ARP Main Studs, be aware that because they are specified to be torqued to 80ft/lb compared to the bolts (50-55ft/lb) then you will have to have the Main Tunnel align bored, and you will have to give the ARP studs to your engine reconditioner so they can fit them and torque them to 80ft/lbs and do the machining of the main bearing tunnel, otherwise if you fit then without without the machining and torque them to 80 you will be distorting the caps with the extra torque and hence distort the shells leading to shell/crank damage. I had mine done this way (as I fitted ARP Studs; AR124-5401) and my engine chap (a very proffessional mob) actually scribed the new torque setting onto the bottom of the block for reference if any one comes across the block in the future with the studs fitted. It does make for extra cost having the machining done as well as buying the studs but this is what needs to be done."Have you had this done on your block? I wondered what others' thoughts were on this. Keep up the good work. Dave |
|
|
|
Post by petervdvelde on Jul 24, 2013 11:23:41 GMT
Hello Dave,
I have seen you thread on the Classicroverforum about the overhaul of your P6V8 but hadn't read Scott's post yet.
As you also can see on my thread, there are lots of opinions about the necessity of using ARP studs. I have used these in my RV8 for my MGB and now for the RV8 for my P5B but i haven't faced any problems with distorted caps and shells and this is the first time i hear about this. I could in both occasions rotate the crankshaft by hand after torquing the ARP studs.
I also visit "the V8 owners forum" and ARP studs are often mentioned there but never seen the remarks Scott mentioned.
As you may have seen, i was professionally involved with lubricating/torquing bolts and studs and the advantage of the ARP studs is that it is a much more controlled way of torquing. With controlled i mean that both the percentage of the torque that go's to friction and the percentage that go's to preload, don't have a wide spread. So you are more assured that the torque is used for the preload. Steel bolts in an aluminum thread doesn't give this assurance.
Good luck with your overhaul and if you have any questions, please let me know.
Regards
Peter
|
|
dave3066
Rover Rookie
Posts: 26
Location: Scottish Borders
|
Post by dave3066 on Jul 30, 2013 7:23:14 GMT
I thought I'd contact ARP to see what advice they give for fitting main cap studs. Their response is below, along with a copy of the instructions for fitting their studs. It does make specific mention of checking and align honing the crank main bores if necessary. I guess there will be some who have not done this and not experienced any problems. " Dave,
The studs in the kit 124-5401 are ½” diameter, attached is the instructions sheet for that kit. Yes the main tunnel should be checked after installing new studs or bolts and for final assembly the same lube & torque is to be used as when they checked the align bore. You can drop the torque to 80 ft/lbs if that is what you need.
Best regards,
Alan Nichols
Sales & Technical
Automotive Racing Products
1863 Eastman Ave.
Ventura, CA 93003
Toll Free: 800-826-3045
Ph: 805-339-2200
Fax: 805-650-0742"  Clarifies the issue for me anyway  Dave |
|
|
|
Post by petervdvelde on Jul 30, 2013 18:27:28 GMT
Hello Dave,
Thanks for the info. It seems Scott has a point.
I am not worried about my engine as i could easily turn the crankshaft by hand after torquing all the main bearing caps with the higher by ARP specified torque.
Regards
Peter
|
|
|
|
Post by petervdvelde on Jul 30, 2013 19:23:13 GMT
i am preparing to let the engine run in the trolley and wanted to "wire up" the rev counter. I had a look in the WSM and according to diagram it should be wired between A and C. But A and C are already directly connected to each other by a wire so plugging the rev counter there doesn't make much sense. Anybody has a solution?
Thanks in advance
Peter
|
|
|
|
Post by eightofthem (Andy) on Jul 30, 2013 20:03:00 GMT
Hi Pete. Do you have a snap on timing light, or similar?, or could you borrow one?. I used a snap on to check mine, it is a lot more accurate, and you can flip between tach and dwell if you needed to. Great progress, and a pleasure to follow your work.  |
|
|
|
Post by johnwp5bcoupe on Jul 30, 2013 20:15:59 GMT
i am preparing to let the engine run in the trolley and wanted to "wire up" the rev counter. I had a look in the WSM and according to diagram it should be wired between A and C. But A and C are already directly connected to each other by a wire so plugging the rev counter there doesn't make much sense. Anybody has a solution? Thanks in advance Peter The wire you are taking about is replaced by the Tachometer Peter in other words it is in series with A & C I hope this makes sense to you |
|
|
|
Post by petervdvelde on Jul 30, 2013 22:15:16 GMT
Andy,
Thanks for the idea. I have a timing light, tacho and dwell meter but i first want to let the engine run for 20min on 2500 to let the cam and lifters bed in. For that i don't need an accurate tacho and i want as few "loose" wires as possible
John,
Thanks. Now i understand the diagram: with the wire its the P5B saloon and with the tacho the diagram is for the Coupe.
I should have seen it as i also have an Haynes Sd1 WSM and the tacho is wired up identical
Regards
Peter
|
|
|
|
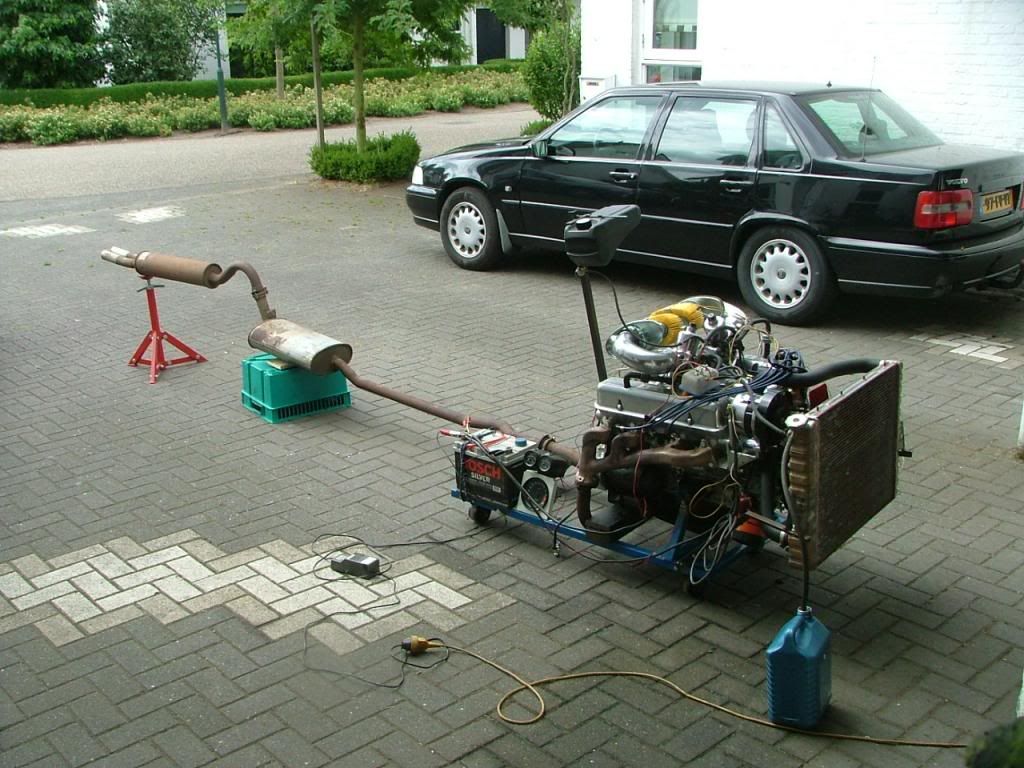
Post by petervdvelde on Jul 31, 2013 23:36:42 GMT
Completed the test set up as you can see in the picture beneath
Year ago i made a box with switches and wires to control ignition, starter motor and fuel pump which is very usefull.
In this case no fuel pump was used so i used the third switch to bypass the resistor of the ignition when staring.
The first start showed a problem as the crankshaft would only turn 45 degrees and then stop. After a lot of attempts i found that the big starter gear fouled the engine block a little. On one of the attemps, i had left the starter motor too long and the coil was burned. This gives a very dirty smell. Luckily i have a lot starter motors so fitted another one. After grinding 1-2 mm from the engine block, the crankshaft turned freely again.
I installed the rev counter, the oil pressure scale and the temperature gauge
I had blocked the heater hoses and as the airfilter housing paint quality was poor, i had to do the test without the housing
[
The engine started running within seconds and i let the engine run for 20min on 2000 rev/min to let the cam and lifters bed in.
After the 20 min i checked the engine for leaks. There was only minor oil swetting from the copper washer of the pressure transmitter.
Then restarted the engine to adjust the carbs and timing. The engine runs smooth, picks up the revs very good and has this nice V8 sound . No strange noises and a happy man.
regards
Peter
|
|
|
|
Post by Warwick on Aug 1, 2013 4:06:19 GMT
Peter, That's the worst example of body rust that I've seen in a very long time. |
|
|
|
Post by johnwp5bcoupe on Aug 1, 2013 5:12:14 GMT
A good feeling well done Peter  |
|
|
|
Post by enigmas on Aug 1, 2013 8:52:59 GMT
I love the exhaust system! It looks like you've set it up in a court yard Peter. It should have been fun for the neighbours kids. |
|
|
|
Post by barryr on Aug 1, 2013 21:09:42 GMT
I loved the tupperware control box.
You could even keep your sandwiches handy!
|
|
|
|
Post by p5rover on Apr 3, 2015 22:06:07 GMT
That polished aluminium looks great, did you clear coat it after polishing?
|
|