|
|
Post by petervdvelde on Apr 28, 2013 20:05:59 GMT
i have rebuild my front brake calipers. Had 3 pairs of calipers. I dismantled all calipers to take the best pair 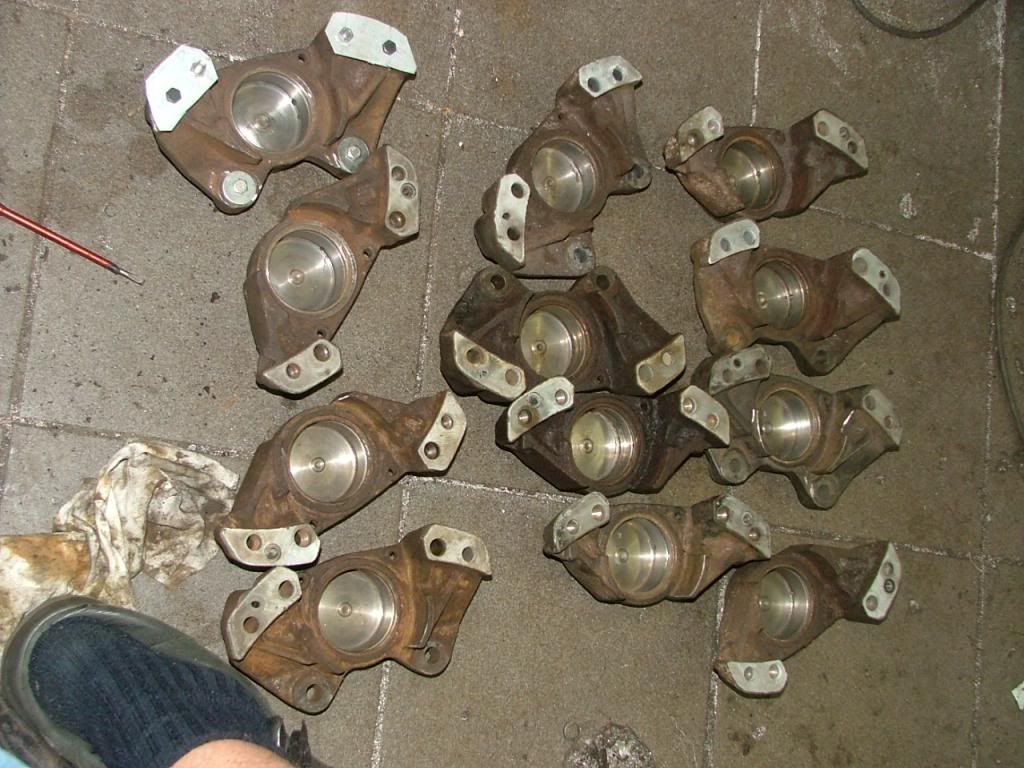 I wanted to get calipers powdercoated so made some protection shield for the parts which should not be coated like the bore, connection surfaces and the bore where the seal are fitted 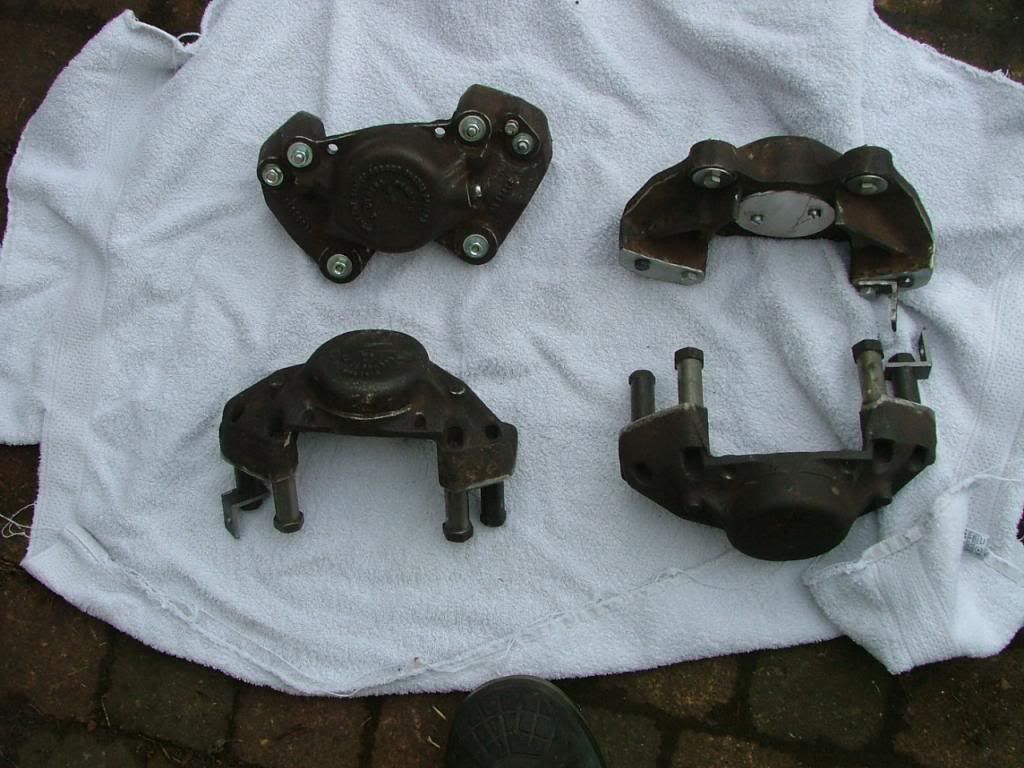 Then bought some stainless pistons, new seals and pads and after cleaning got the bolts zinc coated which gave this result 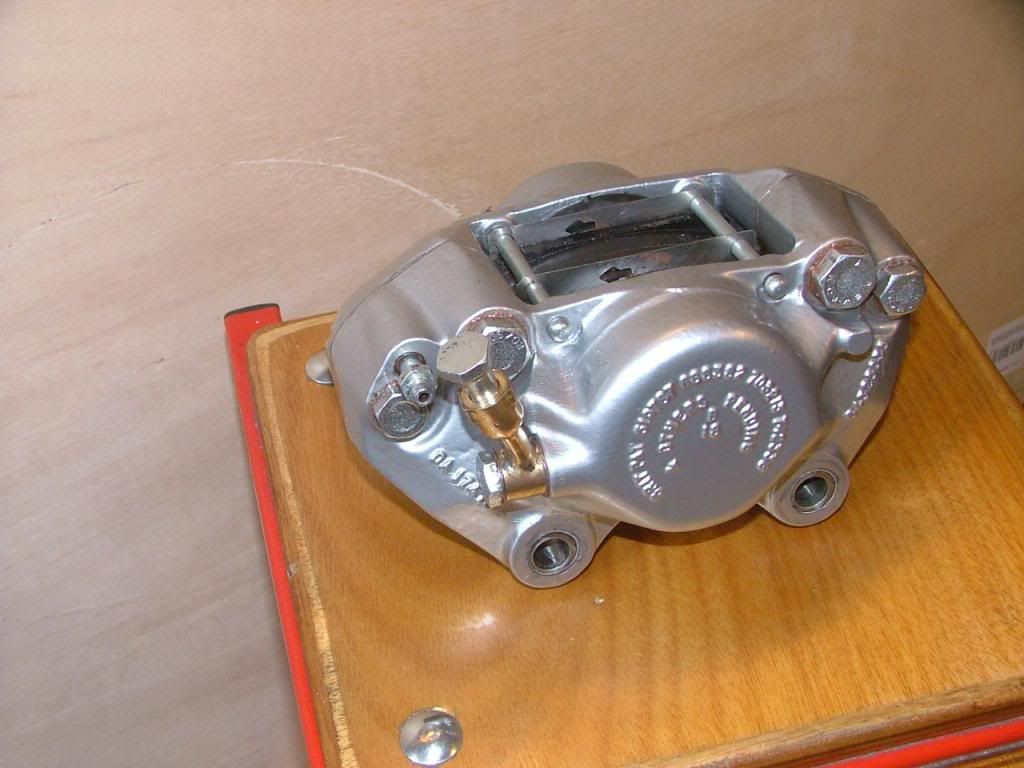 It proved difficult to fit the copper rings which hold the seals and i had to buy a new set of seal because i damaged one. After making a thick aluminium rivet, i could easily fit the rings without damaging the seals. Regards Peter |
|
|
|
Post by barryr on Apr 28, 2013 20:42:57 GMT
They look stunning well done!
I had problems with the seal retaining rings also and I'm still not sure they will stay in place.
What did you mean about making an aluminium rivet?
All the best
Barry
|
|
|
|
Post by petervdvelde on Apr 28, 2013 21:38:00 GMT
Thanks Barry. The problem was that the copper ring which needed to be fitted "into" the caliper popped out again when it was oke on 1 side and i was trying to fit fit it on the other side.
I made a round aluminium plate with a diameter a little smaller then the copper ring and so i could fit the copper ring on all sides at the same time without popping out. Apologies that i used the word "rivet", a round aluminium plate is a better word.
regards
Peter
|
|
|
|
Post by barryr on Apr 28, 2013 23:32:55 GMT
Ah I see - would be good if you could post a pic of your tool. I tried everything I could think of to fit mine. I was getting close to just giving up and gluing the seals on!
|
|
|
|
Post by petervdvelde on Apr 30, 2013 0:00:05 GMT
Barry, Here a picture of the "tool". It is a 4 or 5 mm aluminum round plate which fits in the more or less "L" shaped copper ring. I put the aluminum round plate in the copper ring and could push the copper ring in straight. Before taking the "tool",I was fiddling approx 3 hours and i managed to get 1 in and 1 seal damaged and with this plate i managed to do the other 3 in 0,5 hours. i previously used this plate for protection purposes during the powder coating process and that why the 2 holes are in the plate. Hopes this makes it clear. regards Peter 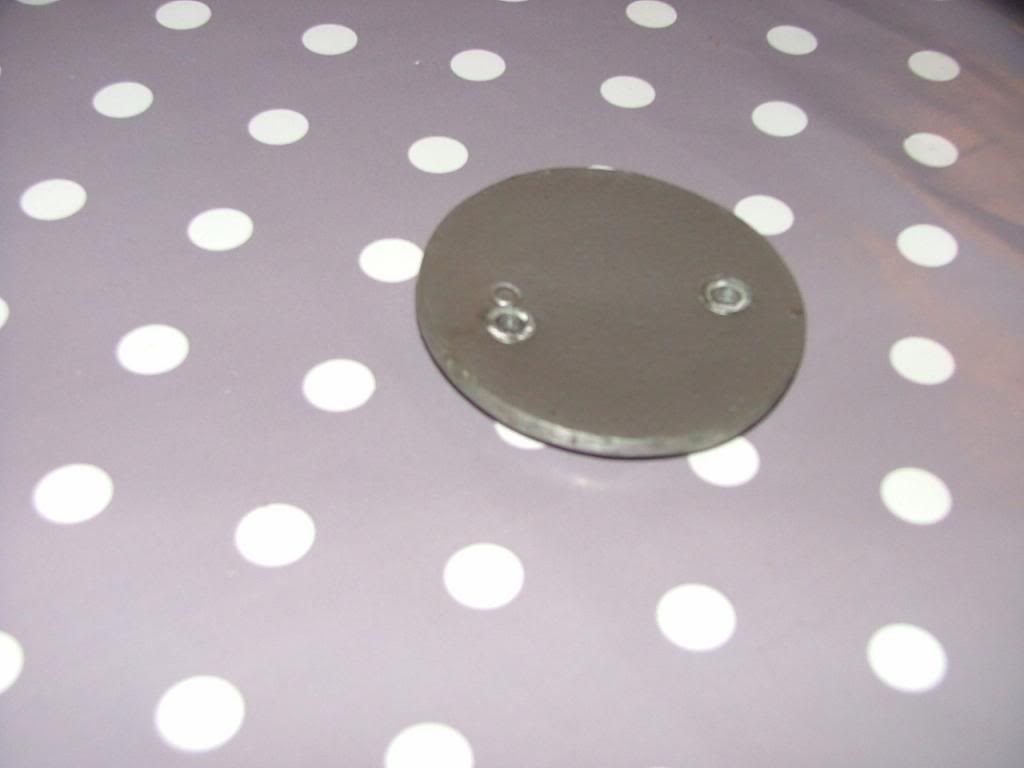 |
|
|
|
Post by barryr on Apr 30, 2013 21:44:25 GMT
Thanks again - great idea!
I am sure my rings will pop out again so I might just revisit them with your solution in mind!
Best regards
Barry
|
|
|
|
Post by djm16 on Jun 2, 2013 9:32:29 GMT
That is a great finish you have fot there.
I am in the process of doing the same thing, cleaning up and rebiulding the calipers on my P5 Mk2 coupe. Something puzzles me though, the calipers seem too heavy to be alloy or aluminium, yet they are not rusted either. When I bead blasted them it certainly felt like cast iron - not much erosion even with 100psi behind the gun.
So what are they made of?
Secondly, what was the original finish? Were they au naturelle (in the buff) or painted?
|
|
|
|
Post by johnwp5bcoupe on Jun 2, 2013 12:36:33 GMT
That is a great finish you have fot there. I am in the process of doing the same thing, cleaning up and rebiulding the calipers on my P5 Mk2 coupe. Something puzzles me though, the calipers seem too heavy to be alloy or aluminium, yet they are not rusted either. When I bead blasted them it certainly felt like cast iron - not much erosion even with 100psi behind the gun. So what are they made of? Secondly, what was the original finish? Were they au naturelle (in the buff) or painted? Cast Iron is the material, finish is a varied one from plating to painting! I used silver caliper paint  |
|
|
|
Post by djm16 on Jun 2, 2013 13:41:25 GMT
That's great. Thanks. I am still puzzled at the complete lack of rust though!
|
|
|
|
Post by djm16 on Dec 27, 2013 1:06:24 GMT
I see Peter that your calipers have some anti-chatter shims. Where did you get them? I could not see any on JRW's site. In answer to one of my previous questions, I am pretty sure that mine were zinc plated. I finally got around to powder coating one side yesterday. My first try was with Ultimate Chrome. Yikes! Much to bling. So I stripped it off again and now it is in grey hammer finish. Photos to follow eventually. BTW, I have ordered SS pistons from etype parts. etype partsFitting the rings! Yes they are a sod. The first one took 20 goes, then second only 5. This is how: 1) they are much easier to fit with the caliper split. 2)ditto - with piston OUT. 3) I slathered the boot inside and out with castor brake grease. 4) I place the ring inside the boot, blunt side down. 5) I located the boot under the lip of the recess in the caliper half. 6) Holding one side down with an open pair of skinny pliers, I worked the ring down around the other side with a blunt screwdriver. 7) the piston goes in last. |
|
|
|
Post by barryr on Dec 27, 2013 17:49:59 GMT
Shims are often on eBay. My car doesn't have them either.
I still have one caliper to do and may try splitting that it. I have done this successfully on a vw beetle but generally I thought splitting calipers was not recommended!
I tried fitting the piston after the retaining ring but each time I found the rubber was so inflexible it was likely to tear if forced and also it pulled the retaining ring out again.
|
|
|
|
Post by petervdvelde on Dec 27, 2013 23:13:09 GMT
Not on all my calipers there were anti-chatter plates. it could well be that your or maybe all calipers were zinc coated during the manufacturing process. On a kind of Dutch ebay site, there is a NOS caliper being offered and it looks like this was also galvanized. I prefer powder coating as zinc coated is being "eaten" away. I also gave the calipers on my MGB the same treatment and these still look like new after more then 10 years.
I also see warning not to split calipers but i have done this more times and never faced problems.
Peter
|
|
|
|
Post by djm16 on Dec 27, 2013 23:17:02 GMT
the rubber was so inflexible
were they new?
mine are from JRW and stretched over the piston just fine without pulling out of the caliper.
Is there a part number to search for on e-bay for the anti-chatter shims?
OK, found them, bought them.
|
|
|
|
Post by Simon H on Dec 27, 2013 23:56:11 GMT
I haven't refurbed any P5 calipers yet (I have a pair ready to start work on). But with others I have done from various manufacturers the technique I used for fitting the dust seal is to push the piston fully into the caliper before fitting the seal and retainer. On all the ones I've done the piston sits below the level of the seal groove giving plenty of room to work with. A gentle squirt of compressed air then extends the piston enough to push inner circumference (can't think of a better word right now) of the seal over the piston.
No doubt I will be proved wrong when I tackle the P5 calipers...
Simon H
|
|
|
|
Post by johnwp5bcoupe on Dec 28, 2013 10:57:56 GMT
Not on all my calipers there were anti-chatter plates. it could well be that your or maybe all calipers were zinc coated during the manufacturing process. On a kind of Dutch ebay site, there is a NOS caliper being offered and it looks like this was also galvanized. I prefer powder coating as zinc coated is being "eaten" away. I also gave the calipers on my MGB the same treatment and these still look like new after more then 10 years. I also see warning not to split calipers but i have done this more times and never faced problems. Peter Splitting the Calipers makes the process of changing the seals and locking ring easier but be sure to change the Gallery Seal |
|
|
|
Post by barryr on Dec 28, 2013 21:15:32 GMT
Where would you get a gallery seal John?
|
|
|
|
Post by barryr on Dec 28, 2013 21:19:04 GMT
Also, re my previous post the rubbers were brand new but were not JRW. I might check them out before rebuilding the second caliper.
|
|
|
|
Post by johnwp5bcoupe on Dec 28, 2013 22:12:39 GMT
Where would you get a gallery seal John? Hi Barry I did post the info a while back if you cant find it I will dig it out |
|
|
|
Post by johnwp5bcoupe on Dec 29, 2013 14:36:12 GMT
Where would you get a gallery seal John? Hi Barry I did post the info a while back if you cant find it I will dig it out I "think" it was these people Barry Brake Spares |
|
|
|
Post by barryr on Dec 29, 2013 20:18:50 GMT
Ahhh yes. They are in Slough as I recall. I asked them to quote for a servo rebuild but I thought they we're expensive with a very long turnaround also.
Thanks for the link
Barry
|
|
|
|
Post by barryr on Sept 25, 2014 22:42:37 GMT
Update - power track were very helpful and gallery seals were £2.50 each. I thought 4 were needed but there's actually only one per calliper so I have future spares!
I didn't want to split the calliper until I had them hence not knowing.
Trying to find a suitable sized drift like peter made to fit those pesky retaining rings now. Try as I might they won't stay when put in by hand!
|
|
|
|
Post by djm16 on Sept 26, 2014 2:38:11 GMT
Have you checked that the boots will locate easily in the groove in the caliper? Does the groove need cleaning out?
Assuming YES and NO,
what I actually did was hold the pliers in my teeth while working around with two screwdrivers. YOu could ov course do as others have done and just glue them in place!
|
|
|
|
Post by barryr on Sept 26, 2014 22:34:02 GMT
Success!
And I have a tip for you all.
When fitting the dust seal retaining rings you could go to the trouble of making up a plate if you have a lathe etc or like me you can turn the house upside down and locate an appropriate replacement.
I can hereby declare that the lid of a Sainsburys basic lemon curd pot is perfect! It has a taper as well so just pop your retaining ring in the dust seal, locate the seal in the groove pop the Sainsburys pot lid on top and press. It took little pressure and seconds to do with a little brake grease all over as per previous recommendations.
I did struggle to stretch the seal wide enough to pop the piston through afterwards but it went in the end with some circling pliers and swearing.
Now then, the big question is tomorrows taste test. You see the lemon curd is in the fridge and in daily use on my wife's toast. I've washed the red rubber grease off so time will tell!.....
|
|
Deleted
Deleted Member
Posts: 0
|
Post by Deleted on Sept 27, 2014 10:07:16 GMT
Success! And I have a tip for you all. When fitting the dust seal retaining rings you could go to the trouble of making up a plate if you have a lathe etc or like me you can turn the house upside down and locate an appropriate replacement. I can hereby declare that the lid of a Sainsburys basic lemon curd pot is perfect! It has a taper as well so just pop your retaining ring in the dust seal, locate the seal in the groove pop the Sainsburys pot lid on top and press. It took little pressure and seconds to do with a little brake grease all over as per previous recommendations. I did struggle to stretch the seal wide enough to pop the piston through afterwards but it went in the end with some circling pliers and swearing. Now then, the big question is tomorrows taste test. You see the lemon curd is in the fridge and in daily use on my wife's toast. I've washed the red rubber grease off so time will tell!..... That's brilliant but pity you had to go for "basic" lemon curd! Would the "organic" lid do the same job?! Did you do the job with the caliper split? |
|
|
|
Post by barryr on Sept 27, 2014 23:28:38 GMT
Calliper split yes. I am going to need to do the other side again soon as i did that one with calliper whole and just couldn't get either ring to fit then.
Nb hartleys seedless jam lid may be even better!
|
|


