|
|
Post by enigmas on Jan 4, 2021 22:34:51 GMT
A local club member recently put me onto some parts he was throwing out. Amongst the pieces that were going to trash was the front lower suspension arm fitted with both top and bottom ball joints. Yes it was dirty, grotty and the rubber boots decayed. On closer inspection though I could see that both joints had never been tampered with as the brass end plugs still had the original peen marks in place. Giving them a light squirt of WD40 also revealed that they had not seized nor did they show any apparent looseness. I've disaasembled several 'old' ball joints both upper and lower and found that they generally exhibit little or negligible wear. With a clean, regrease and nipping up of the brass plug they are usually serviceable once again. There's also no need to remove the larger lower ball joint from the suspension arm as it can be restored in situ. Simply fit the complete lower suspension arm. In the pic shown I've removed the top ball joint...having an oxy/acetylene set helped this process along as the taper had seized in its housing. Similarly the bottom joint needs to be separated from the upright as this is also seized in place. The bottom joint does not lock into a taper but the swivel pin is substantial and locks by virtue of corrosion/rust over time into its locking sleeve. After releasing the pin from the upright and before refitting it always clean and lightly grease the mating surfaces (both the pin and the locating hole of the upright) to ensure ease of disassembly and servicing in the future. This lower joint will require another perhaps several sessions with the 'hot torch' on the pin/upright assembly before it will release. 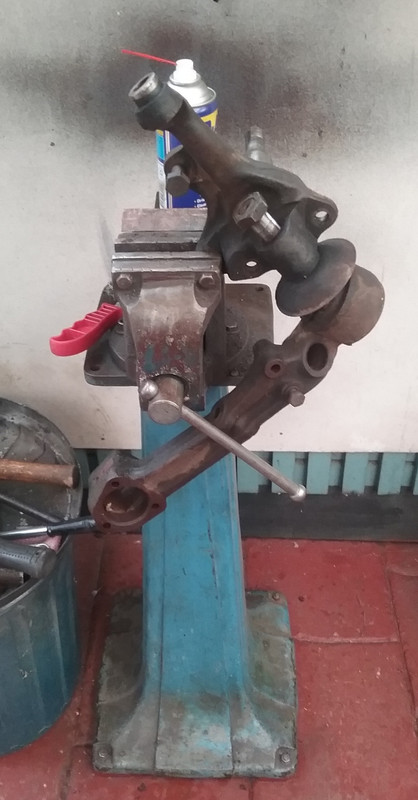 |
|
|
|
Post by westoz on Jan 6, 2021 2:50:46 GMT
Enigmas, Is there a quick method to check the wear in the lower ball joints in situ? Cheers, Tim.
|
|
|
|
Post by enigmas on Jan 6, 2021 8:08:50 GMT
|
|
|
|
Post by enigmas on Jan 6, 2021 8:11:00 GMT
Hi Tim, If the ball joints are original and the car has covered considerable mileage the ball joints won't be in optimal adjustment/condition. They are very robust long lived ball joints though. The well used one in the photo I posted swivels quite freely with just hand manipulation. Of course I can't simulate a quarter of the car's weight on the joint. So if I can swivel it easily by hand, then in my opinion it's too loose. Not only that, but the remnant grease is well past its used by date. From past experience though I'd recommend that you service both top amd bottom ball joints. It's quite a straight forward task and doing so both saves and preserves these very expensive ball joints. You'll find that when you do service them...that large brass plug will screw down further. You may even find that the car steers more precisely, brakes more more positively and perhaps that undefined 'clunk' also disappears!  This link below may also be of assistance. * The 'rubber' repro boots available from the usual suppliers are not fit for the task and are lucky to last 2 years before failing. There's no need to enquire as to how I know this! roverp5.proboards.com/thread/11325/track-rod-ends-tres?page=2Here are some pix of the ball joint assemblies (Upper and Lower.) Source: Richard E and enigmas archive.         |
|
|
|
Post by Ken Nelson on Jan 6, 2021 15:13:41 GMT
As enigmas (Vince) says I was amazed at how sturdy and rebuildable the 4 ball joints were on my car when I got them apart. One was very loose (moveable easily by hand) and the grease had deteriorated, but the gray plastic upper and lower pieces (like cartilage in a human joint) showed no obvious wear to me, and the metal ball looked like new (and probably much better than the hip joints I use daily). To open the joint I peened the brass out of the slot locking it, and then found an impact wrench with a 6-sided socket easily able to unthread it. On reassembly I first failed to align the 4 'tabs' of the plastic piece in the proper cutouts in the metal housing. Once corrected though it all screwed together easily. I tightened it up until I could move the joint with a 12" pipe over the end of it as a lever. It was still stiff, but moveable with pressure and the motion was quite smooth. In my picture below a DPO had put the upper gray piece in the slots, but 90º off, since the top slot is oval and should fit in the correct direction to match the cutout in the housing. It had worn in enough that I left it as is for now and it seems to work fine once re-greased and tightened. Attachments:

|
|
|
|
Post by Sam Bee on Jan 6, 2021 18:03:32 GMT
Watch out with the heat as it may adversely affect the plastic inserts. Usually a good hard wack on the side od the housing with a club hammer will break the taper.
|
|
|
|
Post by enigmas on Jan 6, 2021 20:51:04 GMT
To clarify, the top front suspension ball joint is secured by a taper. The large bottom joint also has a taper but only just below the ball...it's not as obvious. The lower ball joint securing pin is also stepped parallel and locked by 2 very large nuts. This joint also tends to seize in the 'upright' (formerly termed a 'kingpin') housing. If applying heat only heat the pin housing to free a seized joint...obviously not the ball joint! Use an oxy/acetylene set and a suitable sized tip directed only at the pin housing.
As stated previously clean and lightly grease the lower 'parallel' securing pin prior to assembly to ease future disassembly.
A Viable Method for Releasing the Lower Ball Joint.
* Unless competent with mechanical work do not undertake this task as releasing the front suspension spring force without due care may lead to serious injury.
1. Jack the car up under the front cross member.
2. Remove the appropriate wheel.
3. Back off and remove the appropriate sway bar securing link to remove the load from the bar.
4. Place a small floor jack under the outer lower balljoint in question.
Crank the jack up enough to just remove the load off the shock absorber.
Remove the lower shocker securing bolt.
5. Back off/remove the lower ball joint lock nut only.
6. Back off (by 1/4") but DO NOT remove the larger ball joint securing nut.
7. Lower the jack under the outer ball joint so that the suspension arm hangs clear of the ground.
NOTE.
The front suspenion spring pack is now 'loading-up' the lower suspension arm.
The top wishbone arms are holding the load against their stops.
8. Using a decently sized ball peen hammer firmly and decisively deliver a blow to the side of the lower pin housing.
This should jar the pin free.
The joint may release with a bang to the limit of the loosened securing nut.
Repeat the process if the pin fails to release.
9. Once the pin has released, place a jack under the joint to take the load of spring tension on the suspension arm.
Jack up slightly to remove the load off the securing nut.
Remove the nut and then finally lower the jack and to release the ball joint pin from its housing.
10.The lower arm with ball joint incorporated can now be removed from the front suspension.
|
|
|
|
Post by enigmas on Jan 7, 2021 10:20:34 GMT
Here are some images of the lower front suspension arm that I disassembled. This car has sat immobile for quite some time as evidenced by the pitting of the ball joint and the rusty surfaces. Due to the lack of movement, a failed grease boot, water ingress, the ball joint surface pitted and the pin seized in the housing. Directed heat from an oxy/acetylene torch combined with some spirited pounding with a large ball peen hammer failed to release it initially. Only after slotting the kingpin housing with a thin cutting disc, applying heat and finally giving it a good pounding once again with the ball peen hammer did it release. After disassembly and cleaning the component pieces, the nylon seats were found to be in very good condition. The brass plug had never been removed as evidenced by the original peen marks. Although seemingly badly pitted I cleaned the ball up in my lathe using fine emory paper. The ball is pitted but the seating surfaces are still viable (see pix below). Although I have several spare ball joints (similarly found and in excellent condition) I would still use this joint as it functions very smoothly in the nylon seats. Lack of maintenance and sitting idle caused this ball joint to deteriorate. Pix in no particular order. The ball joint as removed.  The cleaned components.      The lower ball joint nylon seat can be seen in this image. It is still in viable condition. Quite amazing and incredibly durable given the lack of maintenance. I'd estimate that this joint has never been apart since it left the factory.  |
|
|
|
Post by Phil Nottingham on Jan 7, 2021 16:27:24 GMT
All very informative. Thanks for sharing. The bottom ball pin can take ages to release from the hub - I had one that took 2 days with heat and leaving it under pressure.
|
|
|
|
Post by Ken Nelson on Jan 7, 2021 18:25:48 GMT
The only additional suggestion I would make to the excellent descriptions and photos above is that if you are going to remove and rebuild both upper and lower ball joints as I did, be sure that you partially release the upper joint before removing the lower joint completely. You will want the torsion bar to still be pushing (twisting) down against the upper A-arms to help separate the joint as you pound on it. If the lower BJ is removed there is no more force from the TB to help break the taper on the top BJ. I also found Phil's advice of hitting both sides of the housing simultaneously with 2 heavy hammers much more effective than just pounding on one side at a time. As always, use extreme caution to avoid injury with these strong torsion bar pressures.
|
|


