|
|
Post by falckdf on Oct 16, 2020 13:52:40 GMT
Coming soon a photo casebook of the secret gubbins, and magic show that is the workings of the autobox. I am no expert in the field of automatics, and always looked upon them as a miricle of wonder, but i find the only way to see how things work is to open them up and have a look. I read as much information as possible ( and still i could not explain to you how they do what they do) but i do know how the parts should look, and how they work in relation to each other. There seems to be much fear over the autobox, when problems occur, so i thought i would post my findings on here so it can be used as a reference. I have found that the strip and rebuild is something that can be done at home, any tools that have to be made i will try and use items that can be found to hand, all comments welcome, and would you like the pictures in a slideshow format or as cyf has done in single pictures?.  I would like to thank Harvey for all his help on this, and also to Allan Thomas who kindly offered to help me  Anyway a taster  |
|
|
|
Post by falckdf on Oct 16, 2020 13:55:25 GMT
Guys.
New here. Restoring a 73 pb5 here in Auzz. None of these pictures are loading?
Is it me or are the links broken? pls help. Really, REALLY need help.
Thaaks.
D
|
|
|
|
Post by harvey on Oct 16, 2020 15:10:15 GMT
None of these pictures are loading? Is it me or are the links broken? pls help. Really, REALLY need help. I think that all the pics have been lost. Start a thread outlining your problems and I'm sure that information will be forthcoming. |
|
|
|
Post by Phil Nottingham on Oct 16, 2020 15:40:21 GMT
Blame Photobucket for charging a lot of cash for hosting photos! They will have been blocked by them
|
|
|
|
Post by voucherboy on Aug 6, 2021 9:46:29 GMT
Hi Guys, After following this excellent guide as best I can without the pictures, my BW35 rebuild is almost complete. But I'm still having some issues with the front brake servo. The rebuild kit I bought came with new brake bands which I fitted OK. Then, the rear servo fitted on without any issues, and with a whiff of compressed air, it operates and tensions the brake band nicely. But the front servo pushes on the brake band tightly. The adjuster is fully released (It's a manually adjustable one, with a nut) and the arm is resting against the body of the servo, so no further adjustment is available. The piston isn't protruding at all from the servo body in the rest position, which is correct I believe. I ensured the strut lever (stamped 215, same as the rear servo) was fully engaged in both the band and the servo arm, but it's pushing too much on the band, and I'm struggling to even get the servo bolts in. So, thinking that the kit band was perhaps shorter than the original (it looks different, it's wider and the band is more flexible than the old one, but appears to be the same circumference as far as I can measure), I popped the old one back in. It's slightly better, but still far too tight. I can't remember how tight it was when I removed it, but the adjuster was in the fully released position, so that may tell a story. But still, when I bolt the servo body in, the arm applies enough pressure to the band, it grips the clutch solidly. So, not sure where to go from here. I'm thinking that perhaps the front servo is not the correct one, which would also explain why the seals in the rebuild kit I bought didn't fit. It looks identical to ones in the manual, but who knows. The gearbox is an unknown unit that has seen a fair bit of butchery in the past ( postimg.cc/gallery/1y6ZKrs ), so I'm not ruling out anything!! I've heard that the struts are available in different lengths, but I can't find any online. The next logical thing is to shorten it myself, but I really hate butchering things and to me 'it should fit', however I cannot see any other way to make it slack enough to free the brake band. Ideas anyone? |
|
|
|
Post by enigmas on Aug 6, 2021 11:49:33 GMT
Without posting any images of what you're doing or the orientation of the parts/components that you're fitting it's difficult to give pertinent advice. The BW35 case will accept 3 front servos of varying sizes (it was a transmission designed for a multitude of different makes and model cars throughout the world) These 3 front servos will all fit in a BW35 case. (Leyland P76 V8, RoverP5 MK3, Ford XF)  When I fit the front band I use a makeshift tool, a 3" bullet head nail bent into a U shape. Hold the band tightly around the drum and fit the U shaped nail through both ends of the band. Then fit the small strut (use vaseline or assembly Goo to hold it in place), then fit the servo. The makeshift tool can be flicked out with a screwdriver. * I'm assuming that you have fitted the internal servo pistons correctly and nothing is catching or seizing within the assembly. * I gather you removed the original front band from the box. If so measure it, (the band thickness) on an unworn section with a pair of verniers and compare it to the new replacement band. NB. Don't go modifying parts within the transmission unless you really, really do know what you are doing. |
|
|
|
Post by voucherboy on Aug 6, 2021 13:03:37 GMT
Hey enigmas, thanks for the reply. Yes indeed, pictures would have been better to explain with. I'll add some. The box is from a 1965 Daimler V8, but it's not the one on the VIN plate, so not sure of the age or pedigree. As I said, it's been butchered to a fair degree and every component has bite marks from a vice, nice! The front servo I have is different from all 3 of yours, but this may well be because of the vehicle it came from.


To the same effect, I've been using a cable strap to 'tension' the band prior to servo fitting with Vaseline holding the strut -


The pistons are all fitted fine, and they function correctly with some compressed air.
Here, the servo is in at a bit of an angle, pivoting at the front, gap at the back between the chassis and servo body. It won't go in straight without tensioning the band. With this gap, there is the smallest slack and I'm able to move the arm just a smidge.

But when I bolt down to here, all play is used up and if I continue, then the band just tightens to lock the clutch because the arm (even with the adjuster fully wound outwards) hits the body of the servo. So, as you can see, we're not talking a massive amount required.

The thickness of the friction material, new & old, is difficult to compare as the metal band is far thinner on the new one. The old bands I took out were worn differently. One was very worn and the other not worn much at all. As posted above, I replaced the new one with one of the old ones just to see if the new band was incorrect. When I did this, I obviously chose the one with most material, which may be clue. The old ones should be identical and interchangeable, so it shouldn't be an issue. But I'm thinking the badly worn one was on here, and the loss of material may be sufficient for the band to be just loose enough, although this is just speculation at the moment as I've not tried it.

Yes, I'm with you there, modifying stuff is not my favoured route. I would be trying shorter struts now, if I could find any, hence the 'last resort', unless of course someone has a suggestion.
|
|
|
|
Post by harvey on Aug 6, 2021 13:35:37 GMT
I don't remember seeing a front servo like the one you have.
I have had front flexi bands that are too short and cause the problems you are having.
Also extra thick bands are available if the drums have been damaged by a worn or faulty band, and then remachined, so reducing the diameter of the drum. Fitting one of those to a standard size drum will give you the problem you are having.
I have never seen a strut with anything other than 215 on it.
I haven't seen one of those early rear servos for a very long time.
|
|
|
|
Post by eightofthem (Andy) on Aug 6, 2021 19:38:05 GMT
Servo is correct for the transmission. ( even though it's stamped 67 )
Front brake band is not ( you should have a solid band not a flexi )
Your servo is sticking because the seals have been nipped when you re fitted them ( probably the front one on the single piston ) Just to prove the point, Remove all the seals and refit without them and it will all fit together
The seals are the problem but so is the band.
|
|
|
|
Post by voucherboy on Aug 6, 2021 22:46:40 GMT
Hi Harvey, Thanks for the info. Yeah, I believe this is an old transmission, all of the manuals and info I've seen, show a different rear servo with an external return spring. As you can see, mine is integrated into the servo itself. I've seen it referred to as 'the old version', but never seen it pictured or illustrated. Interesting that you can get resized bands, but does make sense, especially 'back in the day' when there were thousands of these units in use. Hey Andy! It's Steve (over the mountain!) here. Thanks for your reply. You must have hawk-eyes, as I didn't even spot that 67 mark, but that's good news that it's correct for the box. I have even thought about getting a different servo, but if this is correct, then I'm happy with that. The flexi band was the one that was supplied in the rebuild kit, but when that didn't fit, I popped one of the originals back in (for the reasons in above posts) but the problem remains. I think because the old one I refitted has a lot of material on it, but the one that came off was almost worn through. Obviously the difference in the internal diameter is sufficient to free the clutch drum. Not sure if I've written the issues well enough, but the actual servo isn't sticking. It moves freely when isolated and you give it some compressed air or press it by hand, no issues there. It's not the piston that's causing the problem with the servo, it's the arm hitting the back of the servo body, it hasn't reached the piston at that point because the adjustment bolt is threaded all of the way out and also the piston is still flush with the servo body. So, how best do I resolve this? Obviously putting in the worn brake band isn't an option, even though it would fit (because that's where it came from, although I cannot confirm if it was tight then or not, I can't remember...darn). But the old beefier band (from the rear) is too big, and the new flexi one doesn't fit either. I thought there may be different sized struts, as this picture suggests a few numbers. I guess that they must refer to something else though, especially as none of the numbers is 215! So what other options are there?  |
|
|
|
Post by enigmas on Aug 6, 2021 23:21:42 GMT
Well from the photos you've posted of the front servo it doesn't look as though it's been assembled incorrectly or that the internal pistons are sticking, given that the activating piston pin is fully retracted into the body of the servo. If it physically operates smoothly then this isn't the source of the problem.
If the 'flex band' wraps around the drum without issue then shortening the strut is no big deal. You even state that the original solid band is a very firm fit with the adjusting screw on the front servo backed right off. If the front solid band is an old worn original band, then it follows (my dear Watson) that something other is at play. Like Harvey I've never seen an alternative to the small (215) strut used for both front and rear servos. If there's no physical evidence that you've misfitted the servo components, the servo to the case and the front band stop, then shortening the (215) strut seems like a logical fix given the parts you have at hand.
A bit of time spent using a bench grinder and linishing belt should provide a viable fix to this issue. All that's being done is to accommodate the viable use of the flex band. You even state that the original (badly worn) front solid band is a tight fit. This presupposes that something was amiss there too? Reducing the front strut length incrementally until the front servo adjuster is provided with a degree of adjustment should correct the problem.
As an aside perhaps contacting someone within the Daimler club with real hands-on experience may provide evidence of a couple of unique components or perhaps a unique fix for that particular BW35s application, but the above should suffice.
PS. The picture above does illustrate a solid band and the strut does look to be a 215 type, but for all anyone seemingly knows...the front band may have had a slightly thinner lining material than the rear band?
|
|
|
|
Post by eightofthem (Andy) on Aug 7, 2021 8:56:34 GMT
DONT shorten or alter the strut !find out what the issue is.
Following the advice above is just a bodge and as you mentioned you are keen to avoid such a thing.
Give me a call, you know where I am.
The picture in the illustration is from the Volvo workshop manual, the numbers refer to the models of Volvo = 120. 140, and 164 and not linked in any way to the strut.
|
|
|
|
Post by voucherboy on Aug 7, 2021 10:57:34 GMT
Thanks all for your comments and advice. I'm in the garage this afternoon, so I'm going to have a bit of a drains-up, and see if I can gather more info, even if I can't rectify the problem.
Andy, cheers buddy, however I'm conscious that you're busy and I don't want to pester you every time I have an issue, hence this post. If I'm still struggling, perhaps you wouldn't mind me bringing the box with me when I collect my TC (how long do they normally take?) Just for you to cast your eye over, not to fix for me. As I've said, I'm keen to do it properly, but currently unable to see what else could be wrong. Cheers Steve.
|
|
|
|
Post by eightofthem (Andy) on Aug 7, 2021 12:10:58 GMT
Now you have said the servo is actuating as it should and not sticking we can move on from there.
The flexi band is not the one you require, you need the solid band ( I have them here if you want to swap it )
I think you have set the servo with the flexi and found it too tight ?
Removed the flexi and fitted the old band ? ( still tight )
Did you loosen off the adjuster for the old band or try fitting with the adjuster set as per the setting used with the flexi?, if so loosen off the adjuster and start again with the old band and see if this was the issue.
If the servo had been sticking or stuck when you set it then it would have given you a false setting to start with.
So the issue is the band being used and the setting of the adjuster.
DONT MODIFY THE STRUT !
You are welcome to bring it along anytime, converter should be back this week Tues / Wed
|
|
|
|
Post by enigmas on Aug 7, 2021 14:08:02 GMT
Keep us posted...I'll be interested in the specifics of the fix. Whatever you do though, don't think laterally. |
|
|
|
Post by voucherboy on Aug 8, 2021 18:34:01 GMT
OK, well. It's been a bit of a day, but the good news is, that by absolute pure chance, the servo is in and working correctly. So, how did this seemingly miraculous transformation happen, well, grab a coffee and read on..... I was determined to get to the bottom of this, so I tried to work though things methodically, checking each component as I went. First thing to check, the brake bands. I got them all out and did some comparisons. The new rear and old rear (still good) bands were identical it seemed. 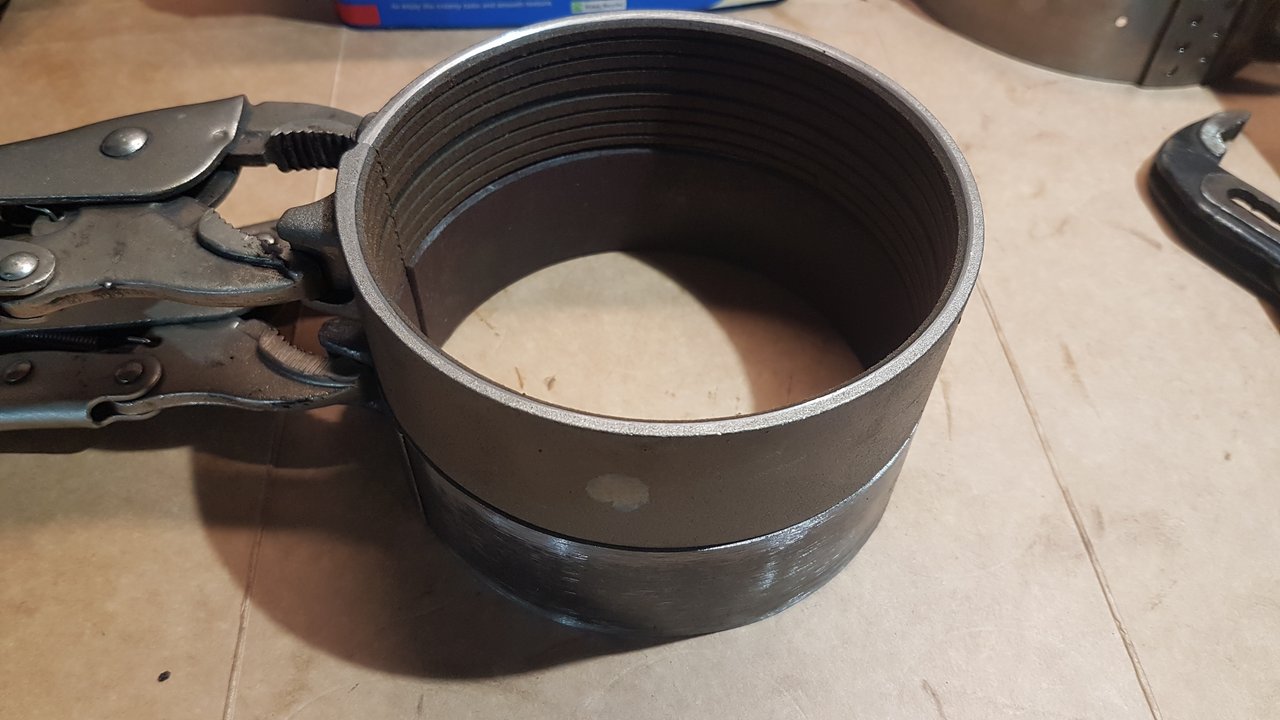 Then I checked the old rear which I'd fitted in the front (remember I ditched the new front one as it's one of those flexy and flimsy things, and instead opted to re-use the old rear which is still good) against the worn out front one. They checked out ok too. So then, all 3 identical in all external measurements, but it was obvious that the internal diameter of the old front was going to be much larger due to the worn out friction material.  So, nothing to report there really. One thing I hadn't checked out since dismantling the box though, was to re-fit the worn front band to see how that worked. So I popped it back in and it fitted fine, as you'd expect. This time however I was able to check if there was any movement. Yes, the band was free enough for the clutch to freely rotate, and was gripped when the servo was operated. All good. So what was the difference between the bands. As above, they looked identical, but how about the strut, did that locate into each of them the same? I marked and checked each one, yup, they were the same.  Were the lugs in exactly the same place? I checked and they were.  So the only difference was seemingly the wear. Surely the loss of some of the friction material wouldn't make that much difference. Could it really make the difference between working correctly and not being slack enough for the servo to be fitted. Well, I measured.  The gap between the band lugs on the worn out band was ~44.8mm, and the gap on the new band was ~47.8mm. So a significant difference, and was more than I'd anticipated. But it still didn't help me because the new one still didn't fit of course. So looking at the new rear band, I realised that the one thing I hadn't tried was to fit the new rear band on the front. They were exactly the same when I made the measurements so should make no difference, but for the sake of completeness (and running out of ideas) I thought I'd give it a try. I fitted it and it really did make no difference, bum. So, feeling quite despondent at this point, I started to refit the band back into the rear where it belongs. I was just fitting in the rear servo when I dropped the strut on the floor. With its Vaseline coating, all of the crud from the floor stuck to it. Rather than put everything back down and clean it, I quickly grabbed the strut from the front servo off the bench So, I hadn't found the issue, started to put everything back together ready to take to Andy's in the week. But then as I put the front servo on, I was amazed to find that it was now fitting, well almost. At least the attachment bolts fitted freely into the holes, no longer under tension and the servo sat down squarely on the chassis. I had a closer look. There was no perceivable slack unfortunately, but the band wasn't giving the clutch a death-grip as it was previously as I tightened the bolts. So a definite and significant improvement. At this point I was dancing around the garage, well, in my head at least! But how is it that it now fits. I then checked the rear servo. There was nowhere near as much movement as there was before but all it took was a quick adjustment of the back-stop and the arm was moving as it had previously done. So, all good there. Simply changing the struts around had made a difference. They are both marked 215, but I'd never done a side-by-side comparison. I'm assuming the difference in tolerance between the two was all it took. But, this improvement still wasn't good enough though as there was still no slack for adjustment, but it did get me thinking. Thinking back, the rear band easily managed to make up some slack because I was able to move the external back-stop adjuster. Unfortunately the front does not have such a device, so where was this going to come from? I definitely didn't want to mess about with the strut length, even though this had made a slight difference by swapping with the rear. I had a little think about it, but thought if you physically shorten the strut, you will also effectively increase the angle that it sits against the band lug. Not something to be messed with and butchery I wanted to avoid. But how about that back-stop. If I could just move that back by a millimetre or so, it would be enough. So, I removed it and had a look. It's a simple press fit into the chassis which obviously can't be moved, but I decided that because I was so darn close, that I'd take just a skim off the face. Because the arm is a high ratio lever, it would take very little indeed to make a noticeable difference at the adjuster end. And indeed, it did. I must have only taken off about a millimetre or so but it was all that was needed. So, there you have it, there was no 'obvious' issue or a single faulty component, but probably all down to poor tolerances of the new components in old gearboxes, and I'm thinking that the thickness of the new friction material played a part. And as I said, it was pure chance of dropping and swapping the strut that let me to a successful outcome. But chance or not, I'm a happy chappie tonight. |
|
|
|
Post by enigmas on Aug 9, 2021 0:06:39 GMT
But how about that back-stop. If I could just move that back by a millimetre or so, it would be enough. So, I removed it and had a look. It's a simple press fit into the chassis which obviously can't be moved, but I decided that because I was so darn close, that I'd take just a skim off the face. Because the arm is a high ratio lever, it would take very little indeed to make a noticeable difference at the adjuster end. And indeed, it did. I must have only taken off about a millimetre or so but it was all that was needed. Congratulations. 👍 Interesting, in the end you did move from vertical thinking to lateral thinking and found a viable solution. Modifying the case stop to arrive at a solution to the adjuster issue might be considered by some as butchering. The slight modification does several things mechanically: * Rotates the band slightly allowing the servo adjuster the freedom to function. * Does alter the pivot angle to the strut due to the rotation of the band (a mechanical inconsequential amount) * Provides precisely the same outcome as slighty shortening the strut. Other methods to arrive at the same outcome would be. * Reface the front clutch drum slightly, to remove a few thousands of an inch from the diameter. Badly scored drums can be reclaimed within limits. Scored drums occur (obviously) when front band friction material has degraded/worn away to allow metal to metal contact.) * Try a range of alternate front drums (for slight variations in manufacturing tolerance) * Look for an alternative component supplier who may provide front bands to a slightly different specification. * The front band you have (given the age of the box) might be for use with a reconditioned front clutch drum. Once again congratulations with your solution. 😎👍 |
|
|
|
Post by voucherboy on Aug 9, 2021 8:41:59 GMT
Hi Enigmas, Cheers. Well, butchering is a bit harsh, it was little more than a skim and polish, and much less than the wear of the original front band (3mm) had created, but I guess I would accept it as being mild butchering!  The new components I had took up more space than was available. So you either reduce the size of the components or make the space bigger. Given the tiny amount of slack I needed to recover, my machining capabilities (or lack thereof) and the components available to me, it didn't leave me with a great deal of choice. I'd argue about the angle (however inconsequential) of the strut though. If you think about it, the band has only rotated at the back-stop end, I've not made any changes to the strut end. The rotation of the band would decrease proportionally as you work your way around to the strut end. Not that I think the angle difference would (in reality) have a massive effect, but I still think 'adjusting' the back-stop was a better solution. Anyhow, I'll be giving it a last 'once over' this week before a final assembly and back onto the engine, and then back in the car. Then the real consequences of my actions will be revealed!! |
|
|
|
Post by enigmas on Aug 9, 2021 10:06:09 GMT
I believe you've done a fine job of it...and you certainly have an analytical brain and have thought through the possible solutions to the problem you were confronted with. Well done. As Henry Ford once stated, "If you think you can, you can, and if you think you can't, you can't. With both outcomes you are correct.  👍 |
|
|
|
Post by voucherboy on Aug 9, 2021 10:51:14 GMT
Whoooaaahh, stop the press! look at this! I was just looking over some old photo's of the strip down and noticed this. It explains totally how the strut swap from the rear made a difference. It's stamped 205 instead of 215. Obviously it still wasn't 'quite' enough to resolve the issue on it's own, but shows that it may be permissible to actually shorten the strut, although I still believe the case-stop modification is a better solution Edit: Ignore the above, it's a bloody one!!  |
|
|
|
Post by eightofthem (Andy) on Aug 9, 2021 18:20:05 GMT
Think you need to go to spec savers, looks like 215 to me.  |
|
|
|
Post by voucherboy on Aug 9, 2021 19:48:08 GMT
Think you need to go to spec savers, looks like 215 to me.  Ah B****r, I think you may be right. The bottom definitely looks like a zero, but it's probably the loop around the one. In the correct orientation it's clearer. Rats, Thought I'd stumbled on something then. |
|
|
|
Post by eightofthem (Andy) on Aug 9, 2021 20:08:54 GMT
This kinda gave it away,.......... not one of your wind ups is it Steve So what was the difference between the bands. As above, they looked identical, but how about the strut, did that locate into each of them the same? I marked and checked each one, yup, they were the same. They are both marked 215, but I'd never done a side-by-side comparison. I'm assuming the difference in tolerance between the two was all it took. [/quote] |
|
|
|
Post by voucherboy on Aug 9, 2021 20:55:31 GMT
This kinda gave it away,.......... not one of your wind ups is it Steve LOL, no. Those photos were taken with the same strut just to see if it sat into the lug the same distance on both, and it's clearly marked on that one. But when I saw that old photo, I really thought it looked like a zero and jumped straight on it, but now you've pointed it out and I've rotated the image to make it clearer, I can see it's just the loop around the bottom of the one. Bum. So yes, looks like I do need to visit SpecSavers.  As well as this issue, I also had an issue with the seals for the front servo. The deluxe rebuild kit I bought didn't have the correct ones for it. I'm guessing because it's an old version. Luckily, a member on a different forum I'm a member on, had the correct ones in his kit, so we were able to do a swap, so that worked out well. So, I'm pleased that everything is all sorted now, and I'm getting ready to finish it this week hopefully if I can get some free time. I want to double/treble check that everything is correct. The only thing I'm not 100% about is the adjustment of the bands. I know there's an error in one of the workshop manuals, so I need to double check I know what the correct method is. I think I saw someone pointed it out in this thread somewhere, I'll have a search later. Really need to get the engine/box back in the car as I want to start on the upper body now. If anyone is interested in anything other than Rovers, you can check out my progress on my Jag here - Click Me! Click Me! |
|
|
|
Post by enigmas on Aug 10, 2021 11:17:25 GMT
That's a really pretty little hemi and deserving of a photo opportunity as it is attached to a BW35...so not off topic. 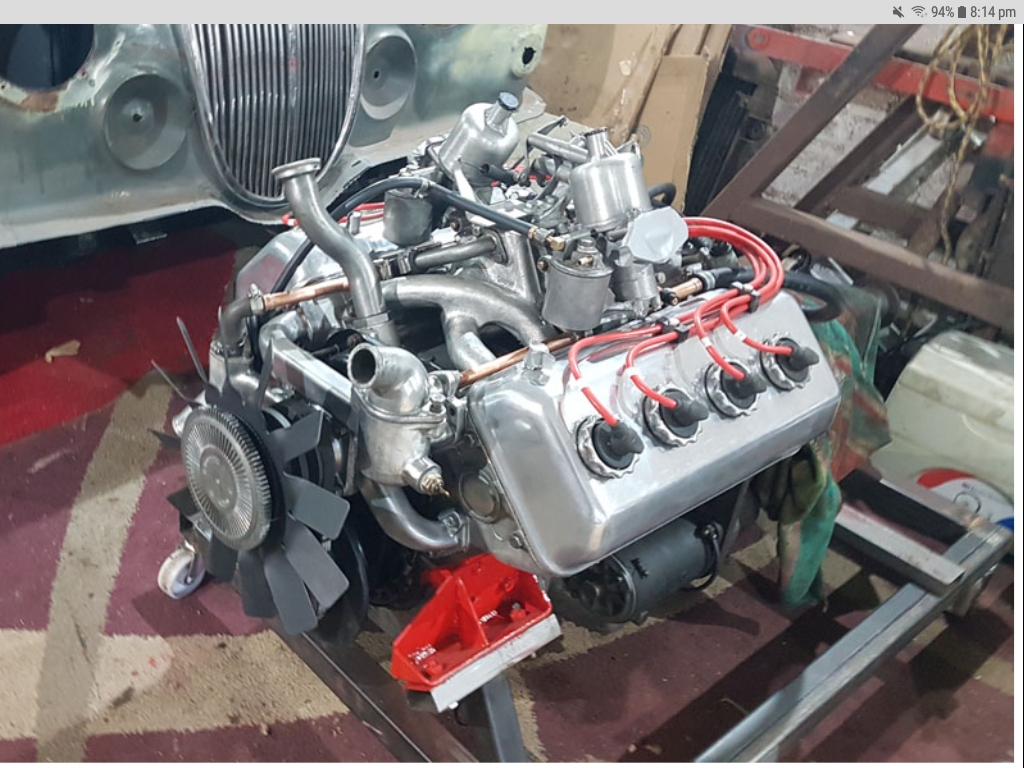 |
|


 👍
👍 
