|
|
Post by Phil Nottingham on Nov 26, 2021 10:20:07 GMT
The new Wadhams springs have slotted fixings - this allows for better alignment particularly where the rear leg replacements may not have be as accurate as they should have been. The Y bushes will then not be under stress at rest. I have loads of pics with narratives on my Public FB album www.facebook.com/media/set/?set=a.2757648487679689&type=3 |
|
|
|
Post by enigmas on Nov 26, 2021 10:39:06 GMT
It makes perfect sense Phil. For those enthusiasts who don't have the spare funds for a complete new spring set slotting the existing holes is a viable option. You could then tack weld the lower fixing plate (using a MIG or stick welder) on either side of the leaf, but it's really not required as the 2 top bush mounts are slotted, yet never pull out under load.  |
|
|
|
Post by tarnowl on Nov 26, 2021 14:13:31 GMT
When I was a young boy, many many years ago, my father, who had a mkI followed by a mkII, had exactly the same spring strengtheners to help support our Safari caravan when we went on holiday each year. That would have been about 1962 ish.
|
|
|
|
Post by enigmas on Nov 27, 2021 10:36:29 GMT
More Electrical Stuff.
Today Tony and I focused on sorting some more of the electrical issues with the car. Specifically this included all the interior lights which now function as designed both through the individual light switches and of course when opening the doors. God and perhaps only the previous guys who worked on the car know why the power to the interior lights is supplied from an unattached wire hanging loosely in the engine bay but exiting the firewall near where the under bonnet light switch would be fitted if the car were a coupe? Tony spent quite a while cleaning the individual earths and insulating some bare power feed wires.
I focused on the seemingly non operative fuel gauge, which like most of the other instruments had poor connections and bad earths/grounds, including the sender. This gauge now appears to function but we'll need to top the tank up to check it properly.
I check the amp gauge wiring again at the instrument, as I removed it from the binnacle the faceplate, locking bezel and glass fell off. Fortunately the workings stayed intact. Some careful fettling with a hot glue gun and a pair of needle nose pliers had the instrument together and secure this time. It still functions perfectly.
I also ran a couple of feed wires through to the "unwired" coupe oil pressure gauge in the pod under the binnacle. One for the sender and the other to "ign" power at the fuse box.
Now that I have both new senders (gauge & light), I can fabricate a suitable fitting for both to attach to the oil pump.
Mike.
The "instrument lights" in the "coupe" pods of your saloon are the incorrect fittings for the coupe gauges. Coupe instrument lights, push into a small tube fitting on the back of each gauge. The instrument lights currently wired for the coupe pods are designed to lock into a hole AFAIK in a saloon instrument gauge.
We also got the electric "booster" fan going but only by accessing a connector plug. So it ain't broke! AFAIK, currently it doesn't switch on thermatically, but then again the car doesn't seemingly run hot.
Tony also fitted your VIN plate to the PS A pillar, where it's meant to reside.
That was it for today's effort. Next up will be sourcing the hydraulic fittings for the oil light and oil gauge senders and adapting both to the pump.
PS. Mark Richmond is dropping by my place Monday morning to drop off a few pieces for your saloon.👍😎
|
|
|
|
Post by enigmas on Nov 28, 2021 9:58:14 GMT
Pod Instruments & WiringTony and I spent a few hours today doing some residual tasks. This included: Repairing, rerouting and tidying up some more errant wiring, fitting the new oil gauge sender to the oil pump and providing the necessary connections to ensure that all the 4 "coupe" pod instruments fitted to the saloon now work reliably. A lot of the electrical work on this car has been focused on soldering, repairing bad connections and adding/crimping new spade terminals. Last but not least, the 4 rear muffler hanger bolts were properly secured. I noticed whilst replacing the rear contrasonic bushes that the securing nuts had been left half undone. Someone obviously forgot to finish this small task and no-one checked the work. Apart from finishing off these small residual tasks, we just need to wait for Eddie to complete the refurbishment of the power steering components, hopefully towards the end of this coming week. PS. I'm also going to make an adaptor so that both oil senders (light & gauge) function in the saloon. Being Sunday, no hydraulic parts suppliers are open as I need a couple of specialized fittings. Here's a couple of pix showing the pod instruments working. The petrol tank is about 1/8th full. Good news, the engine illustrates oil pressure right in between the 2 small dots on the gauge. It's just nice to visually confirm oil pressure now that there's a functioning gauge. 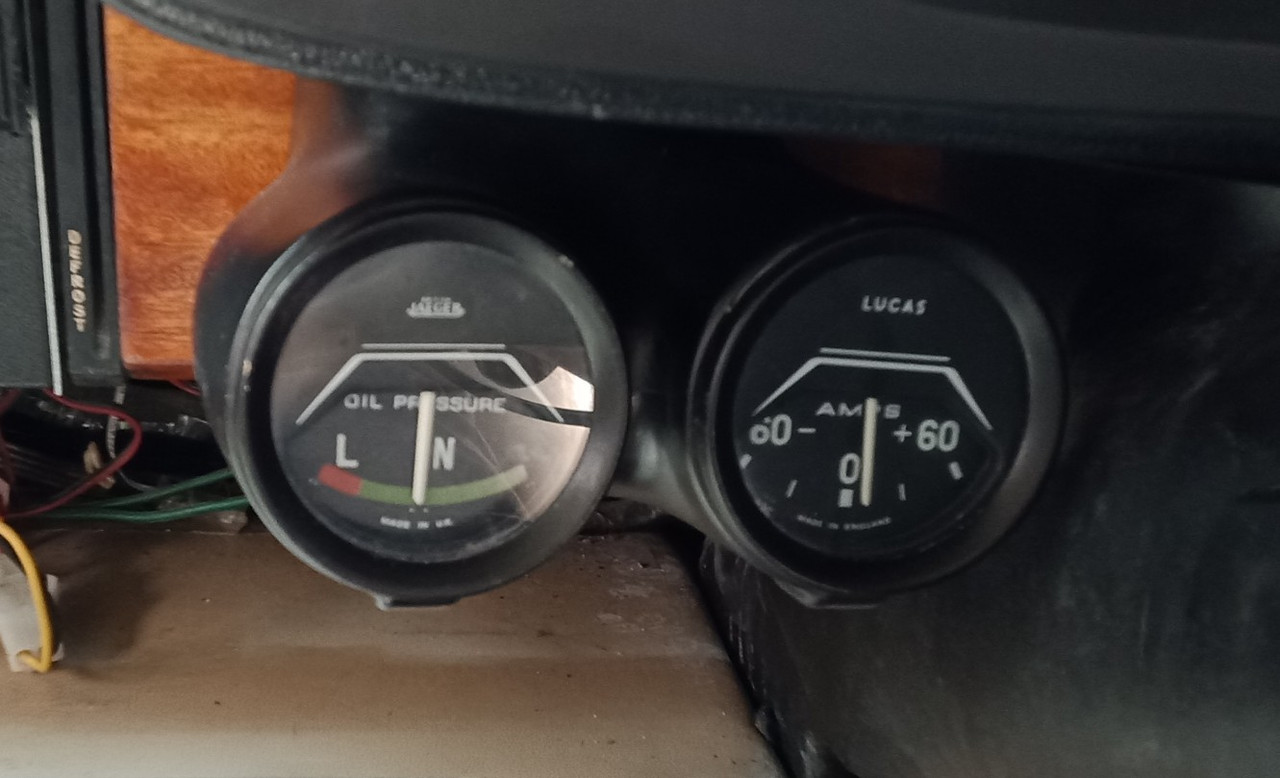 
|
|
boz
Rover Rookie

Posts: 12
|
Post by boz on Nov 28, 2021 14:19:01 GMT
I notice on the temp guage engine is up to normal temp, would you expect the oil pressure to drop? or is this the normal running pressure, boz
|
|
|
|
Post by Ken Nelson on Nov 28, 2021 15:10:56 GMT
I have a question about my electric oil pressure sender and gauge on my Coupe. While changing my starter motor I disconnected the wire from sender to gauge and drove around before remembering it. The gauge then read off the scale, but I believe it briefly grounded out (read zero) before I reattached it. Now the gauge only reads in the low range (previously mid-range) although the oil pressure is fine. Any idea what I could have done to throw it off, or to fix the reading again? Thanks.
|
|
|
|
Post by Phil Nottingham on Nov 28, 2021 16:40:14 GMT
Reading to full scale has probably passed full scale in practice and the needle needs gently realigning by removal of the front bezel and glass
|
|
|
|
Post by enigmas on Nov 28, 2021 23:07:13 GMT
Ken as it's an electrical driven gauge, the connections are all important. A lot of the contributing electrical issues on Mike's saloon were down to poor, eroded or high resistance (dirty) connections, this includes bad grounds/earths. Clean and check all relevant connections including the fuse holders. That's about it.
Senders and gauges don't last forever either and the only way to check them is by substitution. I have a few factory gauges from my own coupe set aside, so I could check a couple of Mike's for function.
Most of them seem to get power from the 10v module under the dash so check that too. I wired Mike's oil pressure gauge directly to keyed power (ignition control) at the fuse box and from the sender, as his car is a saloon and the factory didn't fit the gauge or instrument pods below the binnacle.
Even if the appropriate wiring was included somewhere within the existing saloon loom, I don't have the patience/time to troll through a jumbled morass of wiring trying to locate them and then verify that they're safe to use!
I think Mike's been very lucky with this engine. Neglected for a long period with very thin and black oil within the sump, as well as the oil pump issue with the filter bypass valve.
I've currently got Penrite Classic Light 20W/60 oil as well as Morey's oil stabilizer in the engine, including a fresh filter. The car really needs a good, hard and fast run to free the hydraulic lifters properly and then drop the oil/filter when hot and repeat the process. Incredibly, it starts up quickly and idles very smoothly with an even exhaust beat.
Boz, the oil pressure obviously will drop some when the engine is up to temperature and idling. Although according to the "colour coded" Factory gauge on this engine it stayed quite stable. But, I've used a good quality viscous oil (Penrite Classic Light 20W/60), added Morey's oil stabilizer (a very tacky oil additive that clings to components), resurfaced the base plate on the oil pump and used the thinnest base pump gasket I had. The base gaskets can vary from .009" - .013" in thickness. Computer paper at .005" makes for a good base gasket. The details all add up.
|
|
|
|
Post by Ken Nelson on Nov 29, 2021 13:37:42 GMT
thanks Vince and Phil, I'll ry your suggestions.
|
|
|
|
Post by dmaxwell on Nov 29, 2021 14:41:49 GMT
I changed the same brushes yesterday on my Mk 11c. After reading the maint manual, I jacked up the car and put jack stands under the rear jacking points to support the car while I used a floor jack under the differential to support the rear end while I unbolted the brushes. Mine looked pretty much like the ones in your pictures! I'm disappointed that they lasted only 56 years! I also replaced one side at a time. Total time for me was about 2 hours to do both sides. We'll see if it makes a difference in the ride tomorrow.
David
California
|
|
boz
Rover Rookie
Posts: 12
|
Post by boz on Nov 29, 2021 18:19:38 GMT
Hi, re the oil stabilizer, would you recommend it for a newly built up engine? You know my engine rebuild, would you think I should put it in, boz
|
|
|
|
Post by enigmas on Nov 29, 2021 21:58:50 GMT
Define what you mean by you're engine rebuild Boz? Full rebuild or partial? Did you assemble it or someone else? What was replaced and what was left?
Mike's engine is long lived and wasn't dismantled apart from the oil pump, accessing the rocker gear and cleaning the oil feed through the heads. At some point in the near future the sump and oil pump screen should still be removed and cleaned. Both these items accumulate grunge/sludge up over time. It does make a difference even on a well cared for, long lived engine.
I added the Morey's oil stabilizer for added insurance, given the history and appearance of Mike's engine under the rocker covers. He was very lucky
As an aside, the camshaft and tappets are seemingly still in good working order (counter to what is often said about these engines) as the pushrods were all observed to rotate freely with the engine running. This means the camshaft lobes and lifters still function as designed and retain their profiles, otherwise this wouldn't occur.
Use a quality oil (Penrite or equivalent) of the correct formulation and viscosity for the engine, (this has been fully discussed ad nauseum on this forum) keep an eye on the condition of the oil over time as you use the car, change it as required, and the engine will not sludge up or blacken internally. It's the cheapest form of insurance for your engine. Skimping, being parsimonious on oil quality, is about the worst option for the engine.
|
|
|
|
Post by lagain on Nov 30, 2021 16:59:58 GMT
Agree about the oil. My engine was rebuilt about 25 to 30 years ago and since then I have only used quality oils, for some years now it has been Millers 20/50 semi synthetic. Last year I noticed that the sump gasket was leaking a bit and I have just had the sump off to paint it and put on the new gasket. When I took the sump off there was absolutely no sign of any sludge, just clean oil, which was good.
I put on the new gasket, dressed each side with instant gasket, then just nipped the bolts up and left it for a couple of days for the instant gasket to set, then I torqued it up to 8lb/ft and the gasket split !
I shall have to do it again, but will ignore the handbook and tighten to what seems about right.
|
|
|
|
Post by enigmas on Nov 30, 2021 21:59:46 GMT
Well I think it's obvious to anyone who is a regular on this forum George that your coupe takes pride of place and is very well maintained and cared for.  |
|
|
|
Post by Mike’S-a-loon on Dec 1, 2021 11:14:31 GMT
Hey Vince, I can't wait to drive it either! 7 days to go until I arrive in Melbourne, hopefully the 72 hour isolation doesn't become 14 days of quarantine...
On top of all the recommissioning work you and Tony have done, I think the Vredesteins, the new rear hanger bushes and the power steering will make the car a completely different beast. Looking forward to meeting you and Tony in person!
|
|
|
|
Post by enigmas on Dec 2, 2021 8:31:29 GMT
Hydrosteer Power SteeringOne of the primary tasks related to recommissioning Mike's P5B saloon was the removall of his ailing power steering system and to have it refurbished thoroughly. After its removal, the complete PS system was taken to (Edward) aka Eddie Jedrys, a specialist mechanical engineer with an extensive work history and familiarity with this system. Details of the specialist work he does can be found at the following link... roverp5.proboards.com/thread/12161/eddies-hydrosteer-rebuildMoving on. I refitted virtually all of the PS system today with the exception of the PS reservoir. All of Eddie's modifications with regard to the additional hose plumbing, incorporating one brass T piece and one 90° brass elbow have been fitted to this slightly revised system. According to Eddie, his modification to the pump, drops power assistance at the wheel by 10 - 15%. Tomorrow (based upon sourcing a suitable a power steering drive belt) I'll complete the assembly, add Dexron ATF to the reservoir, fire up the engine and bleed the system. This will be done with the front wheels raised off the ground, so that no initial load is placed on the system whilst it is being bled free of air. Eddie advises to leave it over night and rebleed the system the following day. He says this allows any entrained air to purge itself from the initial bleeding process. I'll also post a few pix of the revised plumbing associated with Eddie's modifications to the PS pump.
|
|
|
|
Post by enigmas on Dec 3, 2021 13:51:40 GMT
Finishing UpTony and I finished off the installation of the power steering system today. Most of it related to mounting the reservoir, bleeding the system and ensuring there were no leaks. The hardest part of the work today was fitting the power steering belt. My coupe runs a P76 engine and the P5B pump but the mounting is slightly different, about 40mm or so with the belt's circumference. I had a spare belt and I thought that I'd try it for fit. Unfortunately no go! So off to Bursons for a slightly larger belt. We were lucky and guessed at one slightly larger that was a perfect fit for a P5B power steering pump assembly This size belt fits precisely with ample adjustment for tensioning. Please note, the belt shown within the packaging is not the new belt we used.  The Rebuilt Hydrosteer and modified Pump. The Rebuilt Hydrosteer and modified Pump.The PS system as rebuilt by Eddie worked perfectly straight up. No further adjustments were required. Bleeding the system was absolutely hassle free. The most frustrating part was fitting the PS belt as I never realized that on a standard P5B the water pump pulley needs to be removed to gain clearance to fit the drive belt. Here's a few pix of the modified plumbing for added pressure relief valve on the pump. 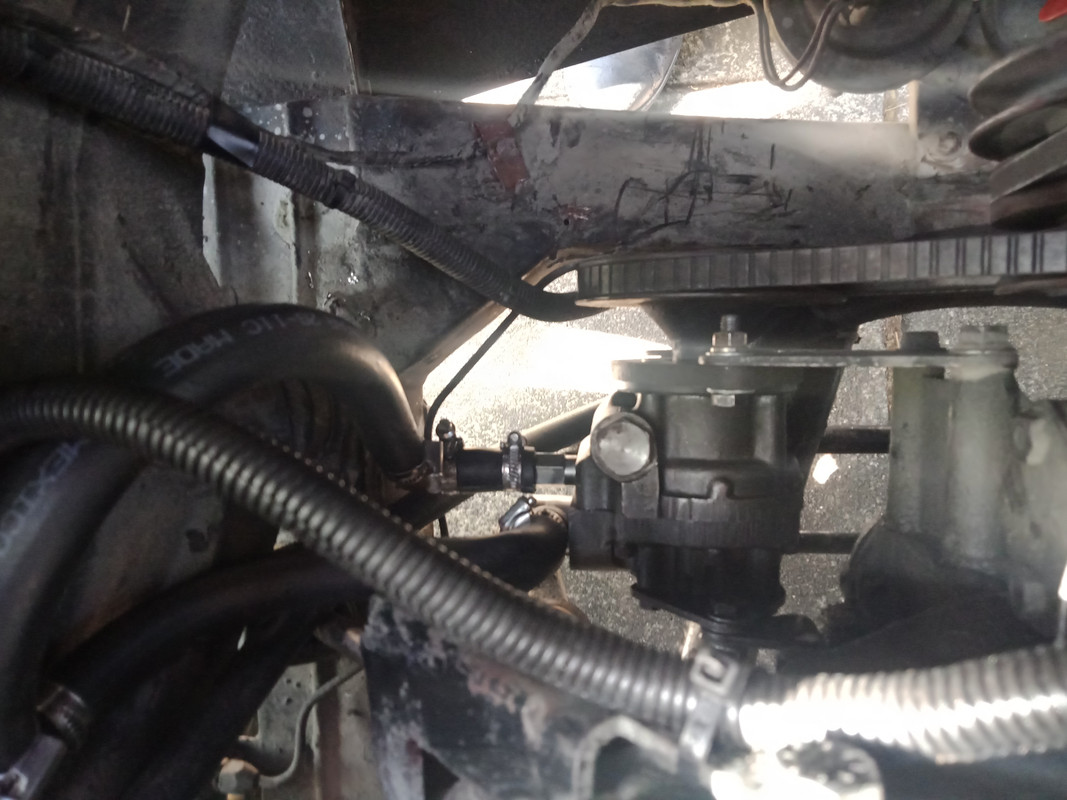 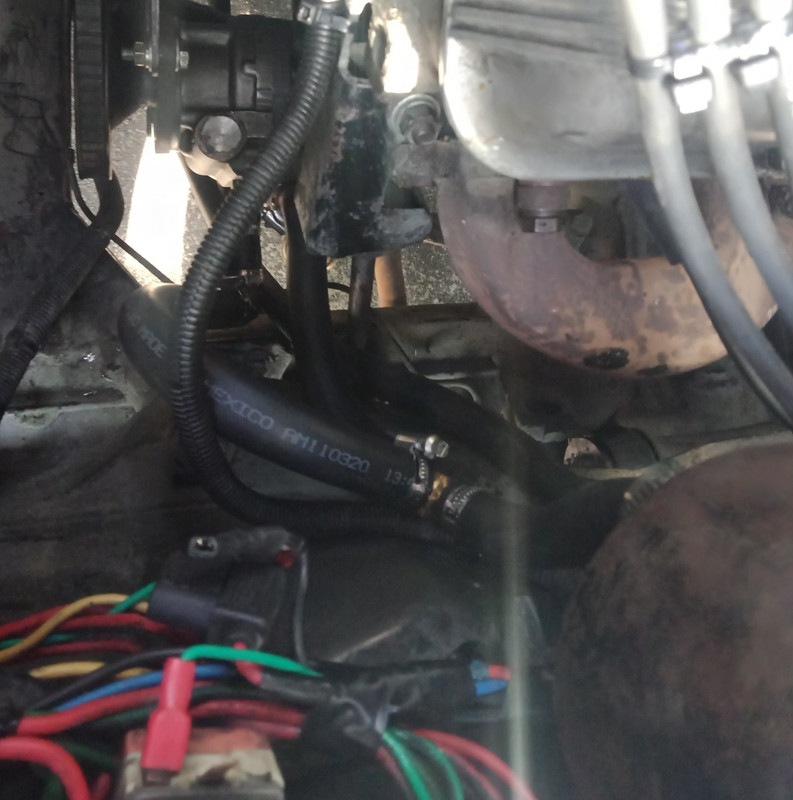 The Road Test. The Road Test. The PS steering system worked well during the road test. No notchiness or groaning and still relatively light but then again I'm used to the system. P5B BW35.The transmission was down quite a bit on fluid so I topped it up. I couldn't verify this properly until I'd driven the car long enough to bring the transmission properly up to temperature. There was no evidence of slipping but it definitely likes to hold onto first gear for longer than it should. Using "light-foot" shifting allowed it to make upshifts and as the trans warmed, it improved marginally. I backed off the kick down cable slightly but there was virtually no adjustment left for this option. The transmission initially wanted to hang in first gear, then bypass second and jump straight into top. If it were mine, I'd be wanting to upgrade the valve body and throttle cam to one from an XE to XF Ford Falcon. This simple swap enables more throttle responsive shifts as well as part throttle shifts back to 2nd and 1st. For anyone interested in upgrading the existing transmission the following parts are required: A complete XE to XF valve body, the larger front servo, the internal fluid transfer tubes and the sump for added clearance for the larger front servo. The original P5B governor can remain. All these Aussie developments to the BW35 components simply bolt straight into the UK case. Engine Running TemperatureThis was a bit of a concern as the colour coded (meaningless information) gauge showed the engine as running hot. There was no evidence of boiling and the engine ran well but I'd prefer a 3 core radiator for the hot Aussie summer or any place with a similar climate. The thermatic fan is functional but fails to switch on. A decent thermal switch (Craig Davies) and a bit of rewiring to remove the confusing jumbled mess on the PS inner guard beside the power steering reservoir wouldn't go astray here either. 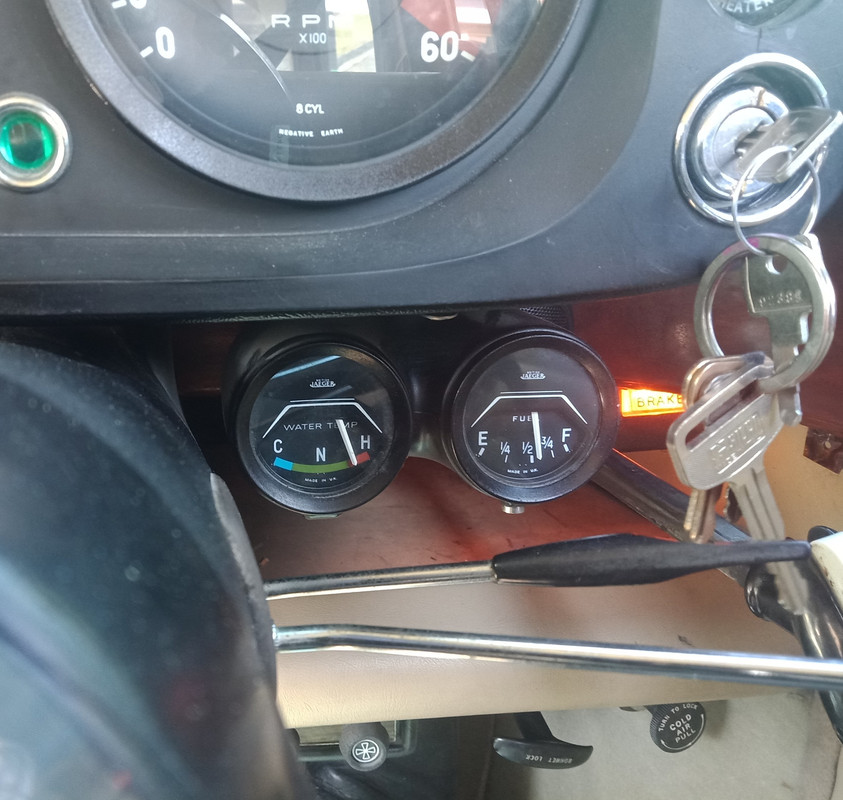 Alternator Belt Tensioner. Alternator Belt Tensioner. (Image to follow) There's also one other issue. Whoever fitted the upgraded alternator made a dog's breakfast of re-engineering the top bracket used to adjust the belt tension. The current bracket is both at the limit of belt adjustment length and geometrically incorrectly designed to permit any adjustment.
|
|
|
|
Post by enigmas on Dec 4, 2021 8:45:58 GMT
A Few Small but Essential Last JobsBefore we hand the car back to Mike Tony and I wanted to fix a few small but important things. Interestingly Mike has now got quite an assortment of keys. Initially both front door locks were sticking. This could be purely down to the long period of storage and also the dust and dirt from the panel shop when the bodywork and paint was done. Both front door locks have different keys as does the boot lock. The boot latch had been thrown together with an odd assortment of screws and small bolts, one of which had been sheared off. The viable threads were retapped and fitted with new matching bolts (small BA something or other which Tony identified.) The sheared off bolt was drilled out and retapped for the remaining BA bolt. The latch assembly was then refitted to the boot lid and the small rollers positioned within the latch correctly. The opening and closing latch on the boot now operates smoothly. The boot locking fixture (the thing the boot latch hooks onto) also needed remedial repair. With a bit of filing, linishing and repositioning, the two opposing boot latch components now open and close as designed. But wait, there's more! 😉 Using the appropriate key I locked the boot or thought I did, only to realize that the lock internals no longer functioned. Conclusion, a new locking cylinder is required for the boot. It shuts, opens and holds closed, but won't lock. The last item to fit was the air cleaner assembly. When this is in place it impacts on the synthetic/rubber fuel line that traverses the engine to the PS SU, where it connects. Also the small fire arrestors and the plumbing for it on the DS are not ideal. I believe some of these parts although for a P5B may not be for this particular year saloon. Test Drive. Always a good idea to ensure that nothing weird occurs or goes astray. I drove the car around our local neighbourhood several times and all seemed well. Coming back and turning into a sweeping access carriageway from one major road into another, I throttled the car a bit more and the throttle pedal stayed down. Danger "Will Robinson!" Fortunately I was driving and not someone unaware. I initially pulled the car back with the brakes and cut the throttle as I coasted to the curb. Opening the bonnet I could see that the mechanical throttle linkages on the DS had got caught/held by the thick fuel hose on the DS SU. It was easily physically released, then I drove the short distance back to Tony's place. Once back we made some necessary alterations to both the fuel line and the fire arrestor hose. At some point the complete fuel hose that enters the engine bay should be replumbed so that it is fixed to the PS or DS inner guard and then cross over to the appropriate SU. Traversing across the top of the engine from the rear is not an ideal place for it. At this juncture with the major aspects of the recommissioning completed and the car quite useable, Tony and I have exhausted our mojo. A few final pix of Mike's P5B Saloon waiting patiently for his return on Tony's front lawn.   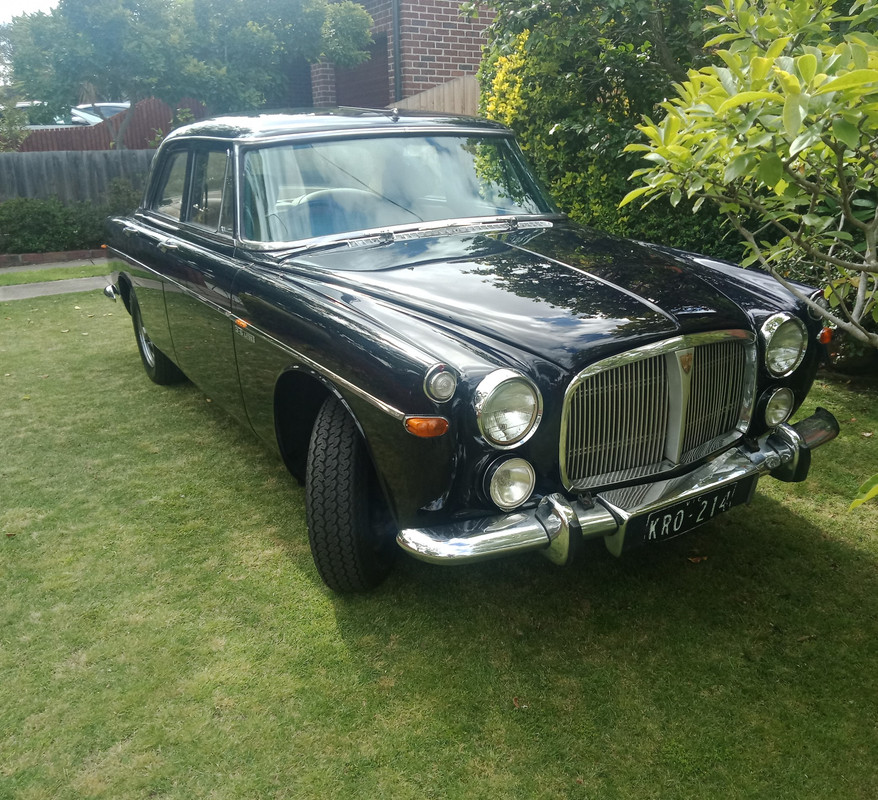
|
|
|
|
Post by Phil Nottingham on Dec 4, 2021 9:44:02 GMT
The fuel line from the changeover valve on the front subframe should pass along to the rear of nearside sub and then along the n/s engine block to to mechanical pump and then up the front of the engine behind the drive belts via inline filter and then to the n/s carb.
I substituted an electric Facet piston pump on the n/s inner wing low down in place of the weak and vapour-lock prone mechanical pump
|
|
|
|
Post by Mike’S-a-loon on Dec 4, 2021 10:40:42 GMT
Wow. Vince, Tony, this was not what any of us signed up for. A simple request to get an old car up and running after 5 years of stagnation and a bare metal respray has become a deep dive for you guys into going way beyond the brief, and genuinely caring about this car and doing your damndest to make it as good as you could.
Thank you.
I cannot even begin to express how much I appreciate the obvious love that you guys have put into Winston. This old car has in many ways been my best friend and constant companion through my adult life. There have been long periods when I have been unable to take care of the old boy in the manner he deserved, but he never let me down through many of lifes ups and downs, some of them devastating. Always, this old car took me where I needed to be, gave me a sense of home, and defined me. There have been moments in my life when the only thing I had, the only thing I could rely on, the only thing that was constant was Winston. Old Rover guy? That's me.
I guess I'm not the only P5 owner to have a deep emotional connection to a collection of steel, aluminium, copper and leather, but I can tell you that this old car is so much a part of my life that there is no way I would contemplate a future without it. As a bumbling would be mechanic, it has been an honour for me, seeing you two capable and passionate men take this car under your wings and lavish the love on it that it deserves.
Thank you.
|
|
|
|
Post by MK IA Norway Viking on Dec 4, 2021 12:29:17 GMT
Wow. Vince, Tony, this was not what any of us signed up for. A simple request to get an old car up and running after 5 years of stagnation and a bare metal respray has become a deep dive for you guys into going way beyond the brief, and genuinely caring about this car and doing your damndest to make it as good as you could. Thank you. I cannot even begin to express how much I appreciate the obvious love that you guys have put into Winston. This old car has in many ways been my best friend and constant companion through my adult life. There have been long periods when I have been unable to take care of the old boy in the manner he deserved, but he never let me down through many of lifes ups and downs, some of them devastating. Always, this old car took me where I needed to be, gave me a sense of home, and defined me. There have been moments in my life when the only thing I had, the only thing I could rely on, the only thing that was constant was Winston. Old Rover guy? That's me. I guess I'm not the only P5 owner to have a deep emotional connection to a collection of steel, aluminium, copper and leather, but I can tell you that this old car is so much a part of my life that there is no way I would contemplate a future without it. As a bumbling would be mechanic, it has been an honour for me, seeing you two capable and passionate men take this car under your wings and lavish the love on it that it deserves. Thank you. What is being said here is SO TRUE ! it has been terrific for the rest of the Club Members to monitor the works done, and to read the exciting reports. Not only the Owner is impressed with the care and affection you have displayed but also "us other" Roverage petrolheads. I too have had my car being one of the few - if only - constant features in my life since I was 17. So, the excitement that is in the air is something I can relate to. Thanks for being so supportive to the Rover community ! |
|
|
|
Post by enigmas on Dec 4, 2021 13:02:06 GMT
Well thank you, from Tony and myself Mike. They certainly are heart felt words. I don't think you're alone in having a strong affinity with a machine. If you put enough time, sweat, money, emotion and on occasion blood into a seemingly inanimate object and have also relied upon it as you have, it certainly becomes imbued with a lot of your own personal energy.
I fully understand it and so I believe does Tony. These cars carry history but as inanimate machines they can't convey their stories.
Look forward to meeting you.
Cheers ~ Vince 😎👍
|
|
boz
Rover Rookie
Posts: 12
|
Post by boz on Dec 4, 2021 15:15:46 GMT
Thanks Vince and Tony for a very well documented recommission of a lovely car, Boz.
|
|
|
|
Post by enigmas on Dec 7, 2021 13:17:47 GMT
Front Wheel AlignmentAs a last recommissioning task on Mike's car I'd arranged for a front wheel alignment. As the saloon had 5 new Vredestein tyres recently fitted, it seemed sensible. So I booked the car in to a local tyre and wheel business to check and correct the alignment if required. Sounds like a straight forward task doesn't it. As there's only one adjustment that can be made to the car to alter the steering geometry, I'd have thought so too! Toe-in or toe-out, that's it. I get a call back a couple of hours after dropping the car off, "Ah, we can't do it, there not enough adjustment." I was a bit stunned by this comment. So I got my wife to drive me over. I also took my factory WSM opened at the relevant page. I showed the technician, he looked at it sheepishly, I don't think he comprehended the very simple explanation(?) and said, "I can't do it." It really is a worry if both basic English and simple measurements are not understood by technicians who seemingly do this all day for a living. The technician (a misnomer for this individual if ever there was one) did print out some data from the wheel alignment machine. See pix below. 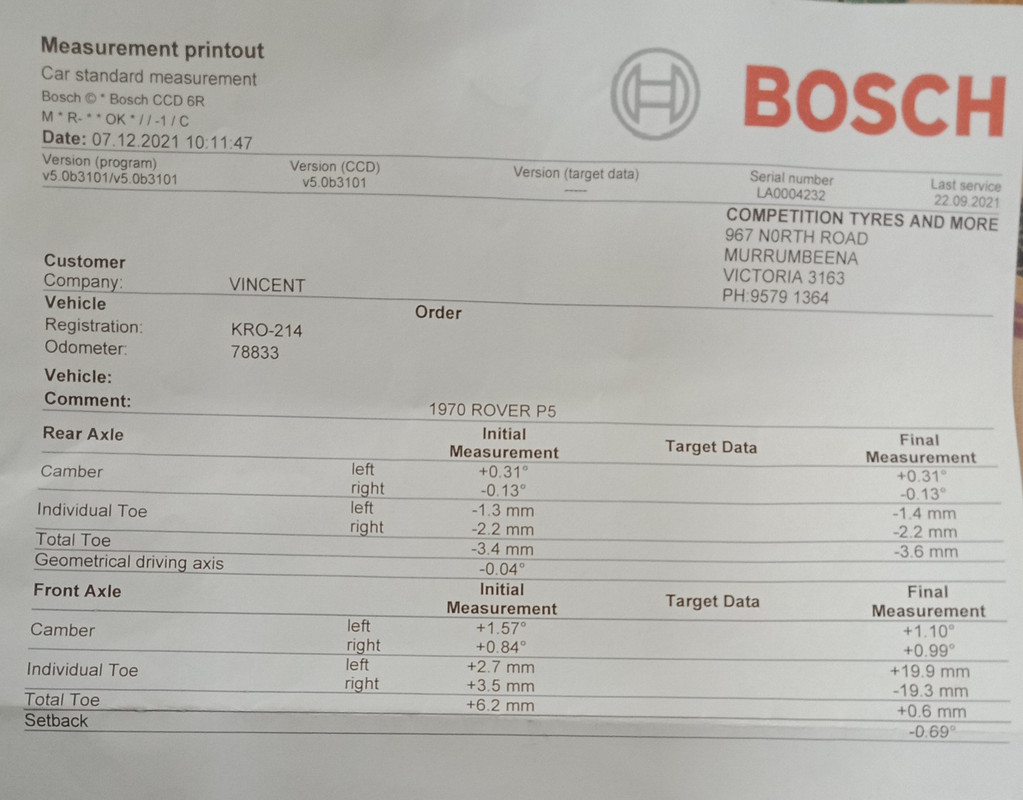 Wheel Alignment Procedure Wheel Alignment Procedure (P5 Rovers)  PS. Perhaps I'll have to resort to a hi tech method I've been using for years...(checking and correcting toe-in/toe-out) with a straight length of wood, 2 nails and a marker pen. From the print out shown the car's front wheels are toeing out a total of 6.6 mm instead of the specified 1.5 mm total (either in or out)
|
|


