|
|
Post by enigmas on Jan 27, 2022 8:46:42 GMT
Investigating Hydraulic lifters and Engine Valley
2 brief videos below illustrate the issues. There was also no coolant thermostat fitted wthin the thermostat housing on the inlet manifold. Running without a thermostat means that there is no regulation of engine temperature. Even during hot weather coolant needs to reside within the radiator for a period of time, this ensures viable heat exchange. Here are a few pix of the valley cover, note the sludge build-up in the PS rear coolant passage. This passage is generaly blocked off due to the factory inlet manifold design.  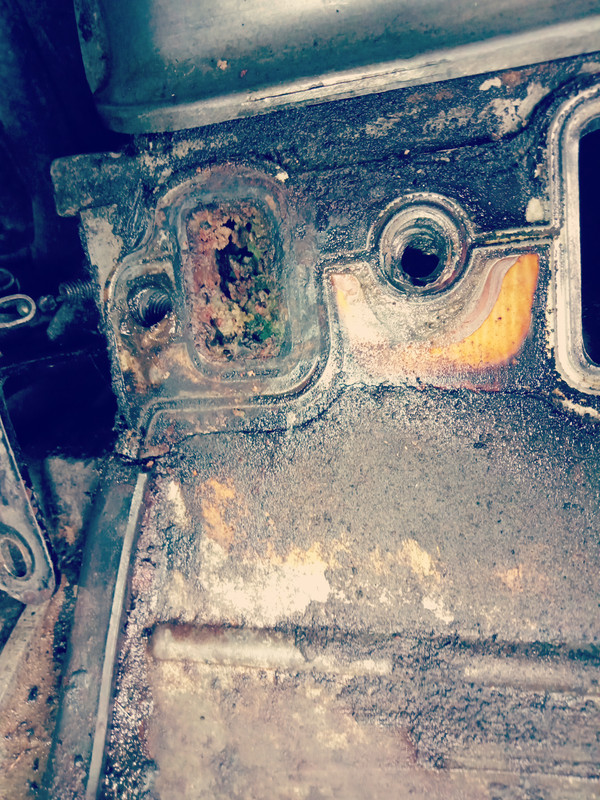 I expected the valley to look worse. I'll get my trusty 'used' toothbrush involved in a bit of cleaning here before it's buttoned up again. 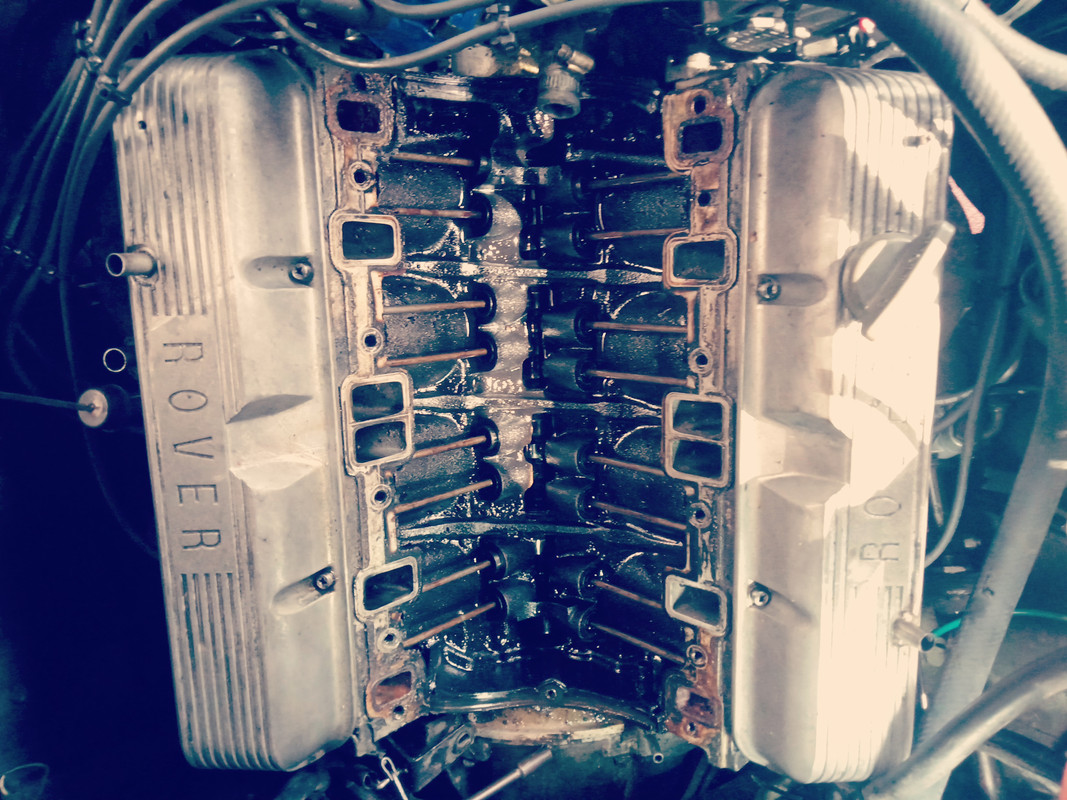 Hydraulic Lifters. Interestingly the lifter valving internally is slightly different from the one I posted previously. Rather than use a small metal ball as a valve, a tiny disc and very small light spring is used internally at the lifter base. Both lifters are the same diameter and height. The oil feed hole to the lifter shown previously is slightly larger. I'll include photos of the internal components of this lifter in my next post.
|
|
|
|
Post by enigmas on Jan 28, 2022 7:00:32 GMT
Shopping ListDid a bit of shopping today and picked up a few bits and pieces for the task ahead. Included in the bundle of goodies are a new set of hydraulic lifters from Clive Cams in Ferntree Gully. Clive has been in the business for decades specialising primarily on camshaft grinding for the automotive industry. These lifters though new, have all had their convex bases checked for accuracy and are matched precisely to counter any manufacturing inconsistences. He also checks the hardness of the lifters he sells using the Rockwell scale. Lifters should all be matched for hardness but be softer than the camshaft lobes. Other Stuff. * There's a 160°F thermostat included below as well. * 515 Flange Sealant. I don't like silicone sealants used for any internal engine assembly work (for obvious reasons) and always use loctite 515 flange sealant or similar. This anaerobic sealant sets in the absence of air/oxygen. It dissolves harmlessly within an engine if it doesn't set, so won't clog oil galleries. 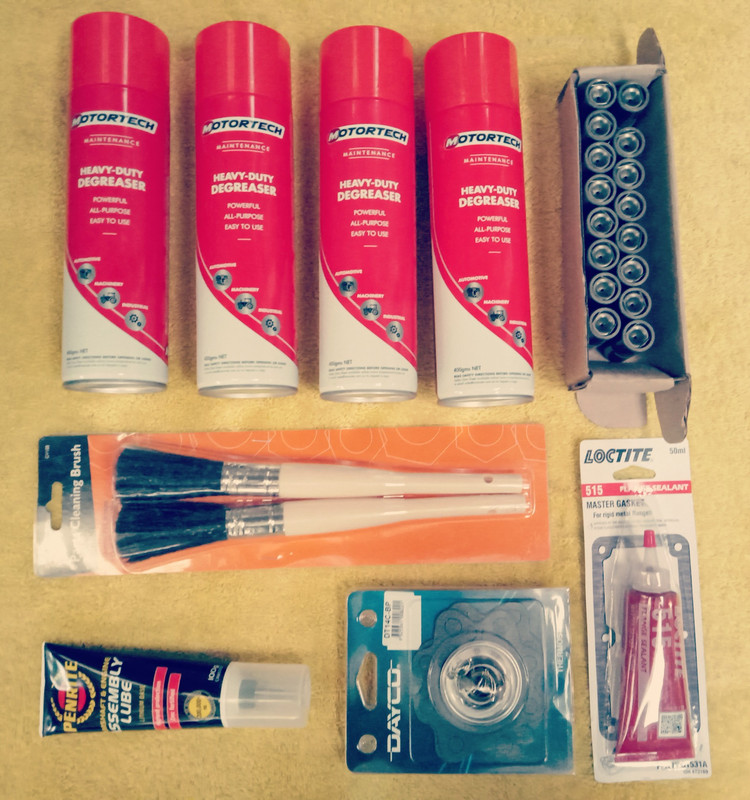 And this VRS set below arrived a few days back courtesy of Ebay and will provide a new valley cover, valley cover end seals, thermostat gasket and other related gaskets if required. 
|
|
|
|
Post by enigmas on Jan 29, 2022 13:32:25 GMT
A Bit more Cleaning.As I now have most of the parts needed to sort the noisy lifters, it's time for a bit more cleaning of the engine's internals. Messy and tedious is a good description of the cleaning process when doing this with the engine in situ. All you need is lots of paper towels, degreaser, WD40 and a patient disposition trying not to dislodge black grot into critical areas. The picture below shows half of the engine's accessible interior section (the valley) cleaned up. This isn't an ideal way to do it, but it's certainly better than leaving the black goo and sludge in place. 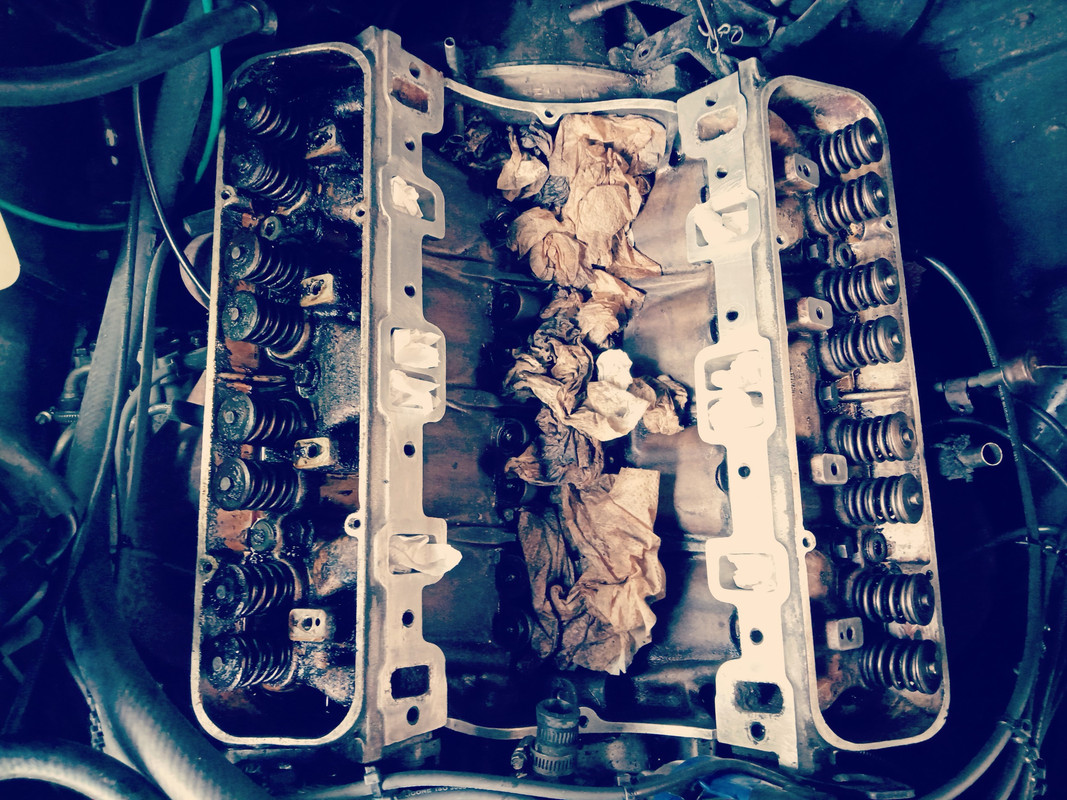 The DS rear cylinder head coolant port (below) also illustrates some erosion. I'll use a 2 part epoxy called "Fasmetal" to reinstate some integrity around the edges and ensure there's no coolant leak when the new valley cover is fitted. (If anyone is wondering I've done this before on another alloy V8) www.ebay.com.au/itm/DEVCON-FASMETAL-10-ALUMINIUM-REPAIR-EPOXY-184gm-SPECIAL-F-D19770-/312991083591?redirect=mobile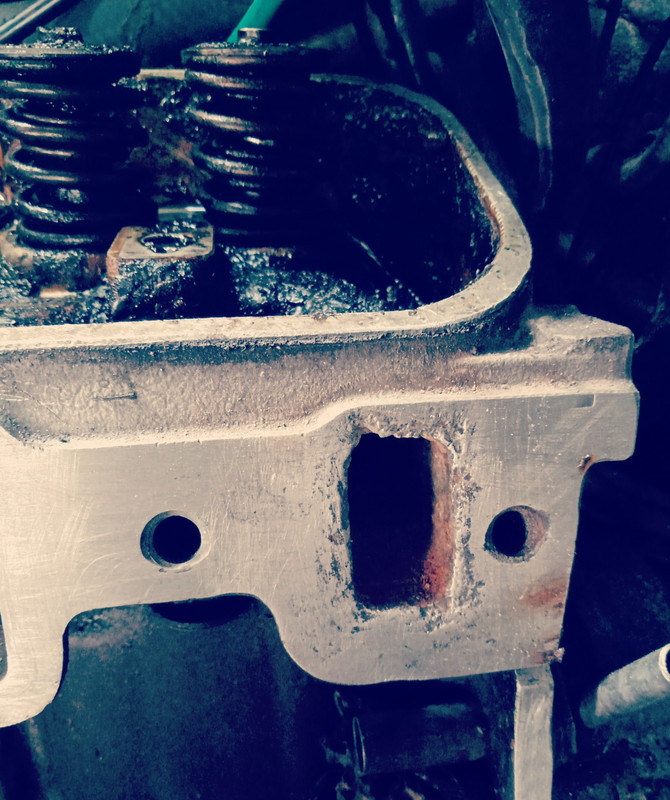
|
|
|
|
Post by enigmas on Jan 30, 2022 4:01:47 GMT
Fasmetal 2 Part Epoxy Repairs for Cooling PortsI did all 4 ports, but here are 2 on the DS shown. The epoxy takes 24 hrs to cure properly so I have to wait until tomorrow before I can fit the valley cover. I'll sand the epoxy level once fully set. In the mean while, all the cyl head inlet manifold threads can be cleaned up with a tap. 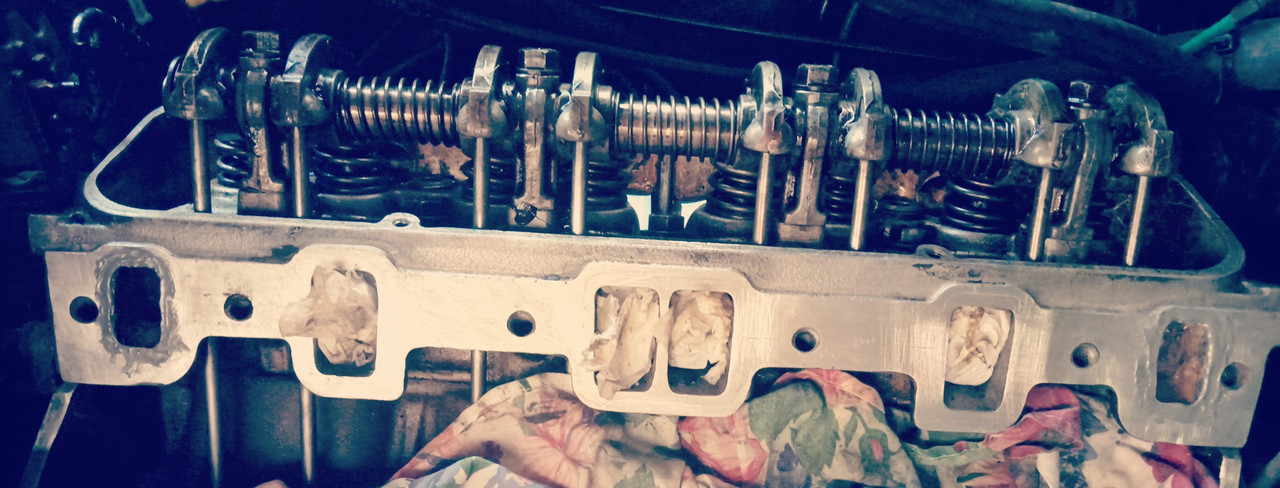  With the ambient temperature once again up to nearly 30C today, the Fasmetal epoxy hardened a lot quicker than usual and I was able to sand it level. Here's the result. 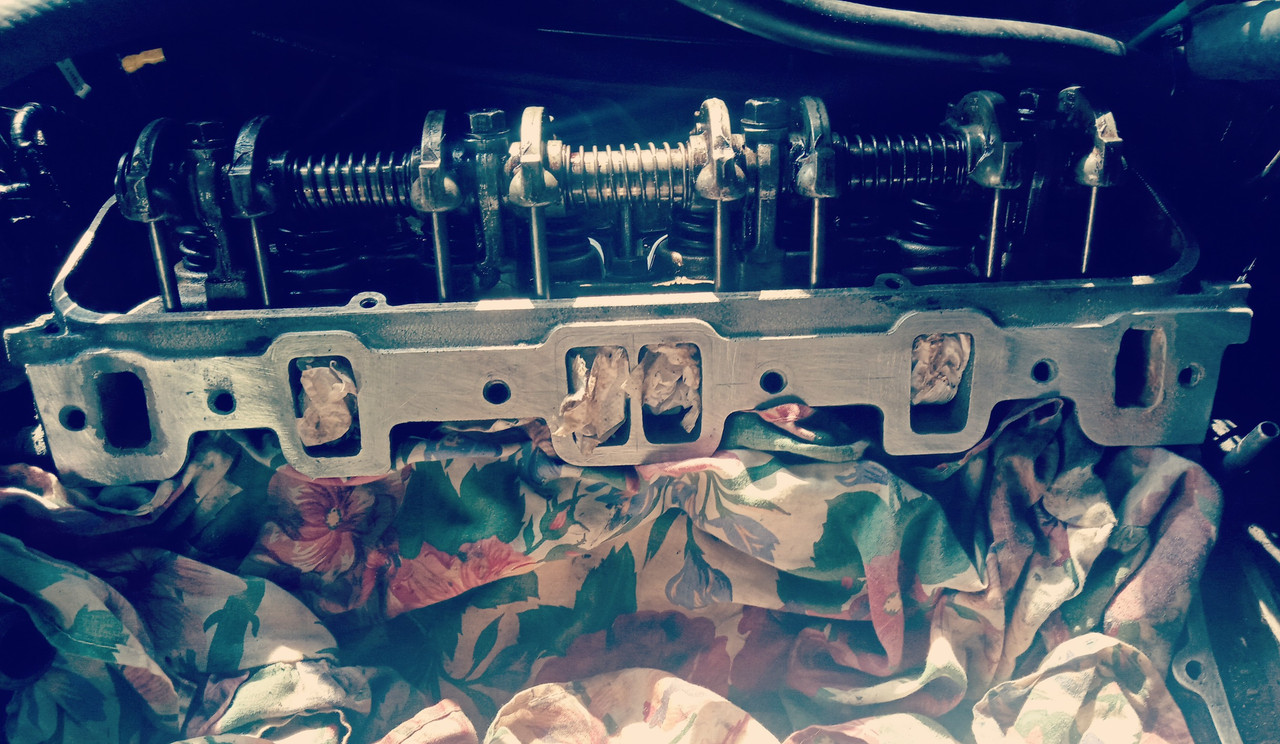
|
|
|
|
Post by enigmas on Jan 31, 2022 12:58:16 GMT
More Cleaning and more Fasmetal Epoxy.Most of my efforts today was spent on cleaning the inlet manifold and prepping it for a reinstall. This not only means degrimming years of caked on crude but also ensuring the manifold faces are clean, smooth and unpitted. The last part is especially important when it comes to the ports both inlet and coolant. The latter tend to often suffer serious erosion. The thermostat housing also required some TLC and Fasmetal epoxy repairs. One final item requiring fettling and adjustment is the transmission cable and its bracket. Note the use of a split pin and and where the helper return spring was hooked up. The cable adjuster was maxed out for pressure reduction of the trans but still needs to be backed off a tad more as the BW35 wants to hold first too long unless light footing the throttle. This item will require a bit of heat to improve the geometry and allow more adjustment. There was also an overly long bolt holding the trans cable bracket to the engine block using a castellated nut as a spacer. Lastly, both metal coolant tubes attached to the manifold need a slight weld repair for both corrosion and pin holing. The pix below outline what was required. Coolant port erosion.   Epoxy applied. Not yet sanded flush. 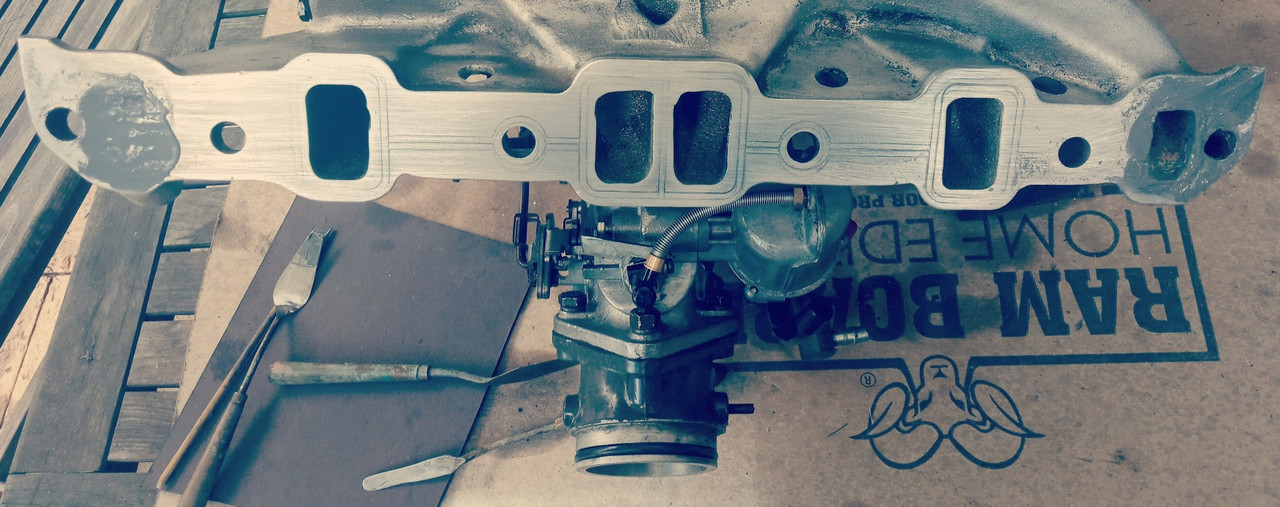 The cleaned up inlet manifold. 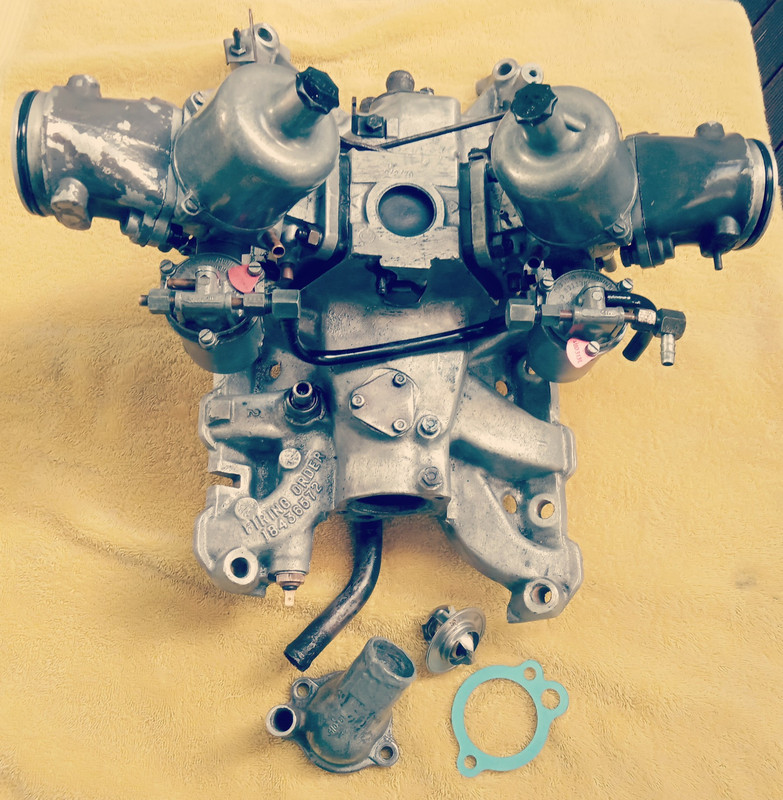 The thermostat housing. 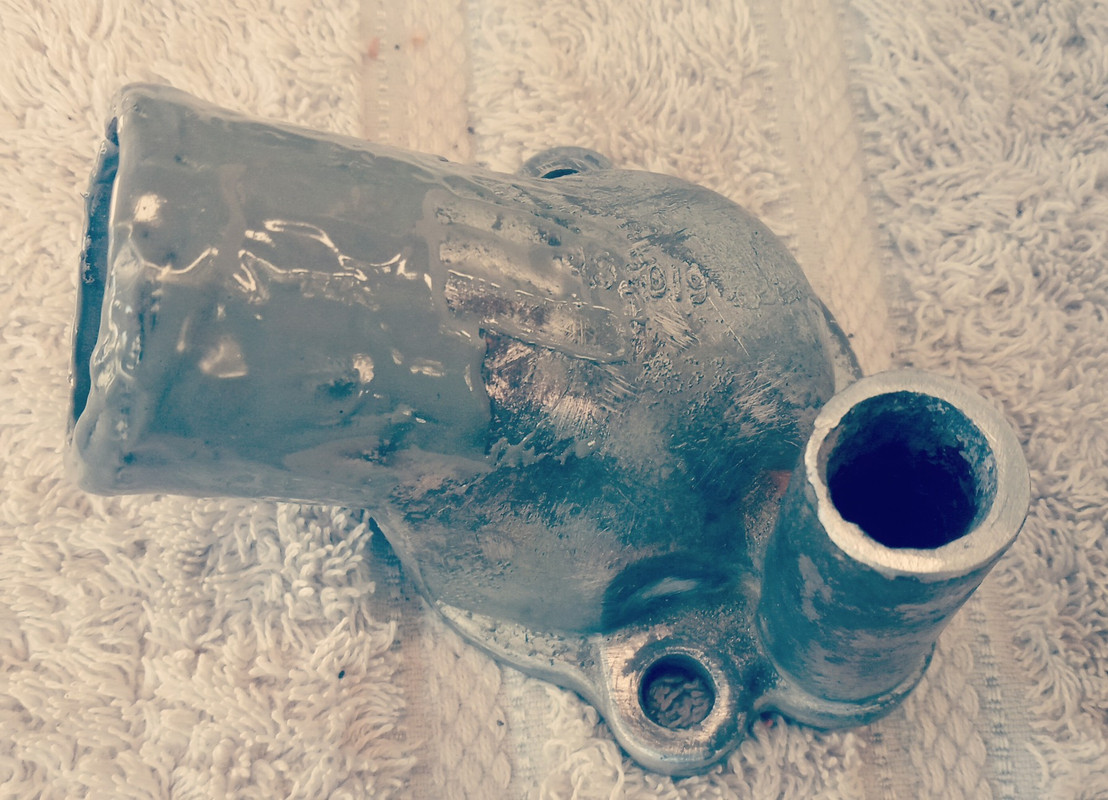 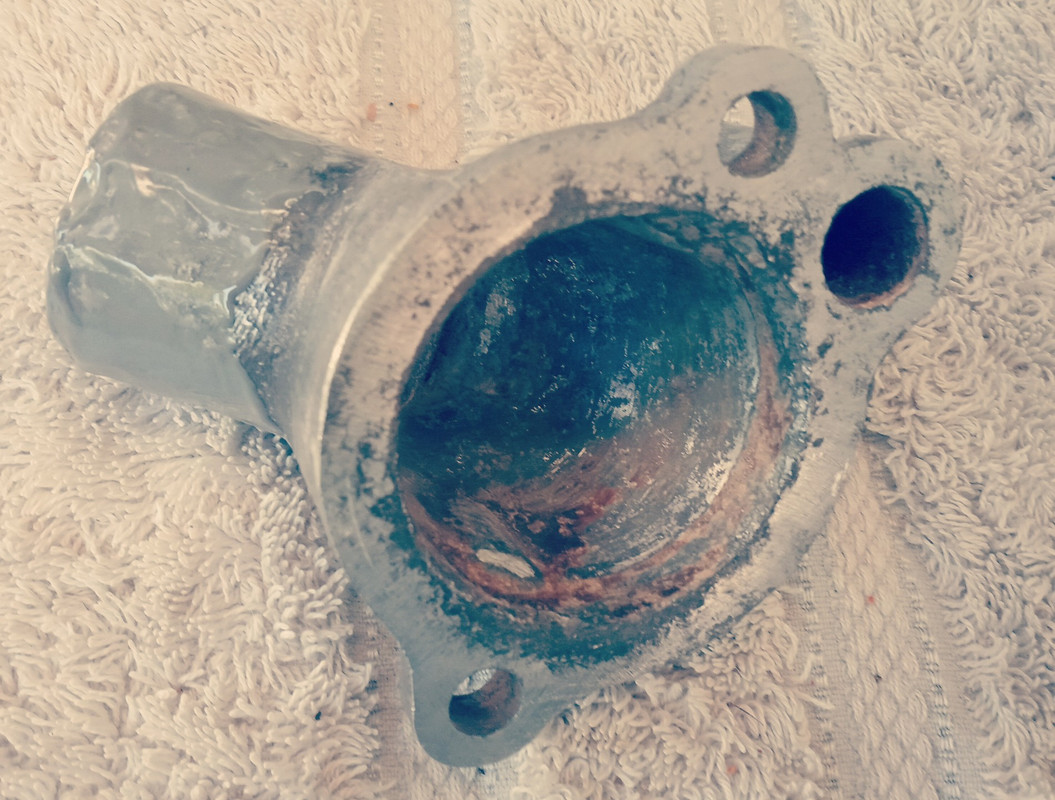 The trans kickdown and pressure cable mechanism. 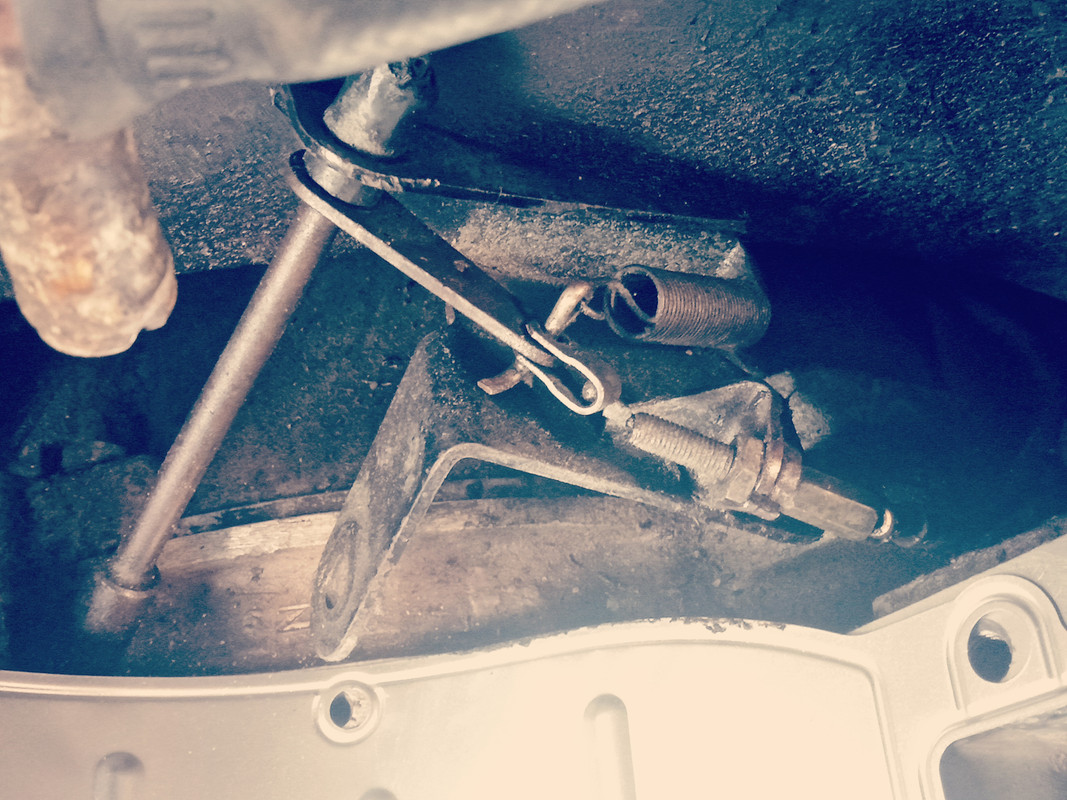 The steel coolant tubes 
|
|
|
|
Post by enigmas on Feb 1, 2022 10:40:12 GMT
Reinstalling the Inlet Manifold & Other Things.Big day today. The weather was a lot cooler so working on Winston was pleasant (mostly).  The valley cover was fitted using new end seals, then the inlet manifold. I'd cleaned all the threads and bolts yesterday and this generally simplifies matters during assembly. As the heater is out of action, Mike or someone had plumbed a coolant hose from the rear of the engine over the top and to one of the waterpump inlets. The metal tube under the manifold was not connected for coolant transfer. I cobbled up a U bend at the rear of the manifold and found a couple of U shaped coolant hose pieces in my stash to complete the replumbing exercise. So now, apart from the heater, both manifold coolant pipes are connected and functional. Theres also a new thermostat in place and the kickdown/pressure control cable mechanism for the BW35 is sorted after a bit of tweaking with the oxy/acetylene torch. The fuel line was also rerouted and no longer runs over the top of the throttle mechanism and under the air filter. Set up like this, it caused the throttle to jamb on whilst I was testing the car on one occasion. A few things still to be done including: Reconnect throttle and choke cable, connect one return spring on the DS. Refill the radiator with coolant. Drop the existing oil...as there's probably too much degreaser floating on top of it. Fit a new oil filter. Add fresh engine oil. I purchased 5 litres of Penrite 15/50 diesel engine as it's also high detergent and has ZDDP in its additive package. Partly to clean the engine internals and partly to protect the new lifters.  Here's a few pix of today's effort. 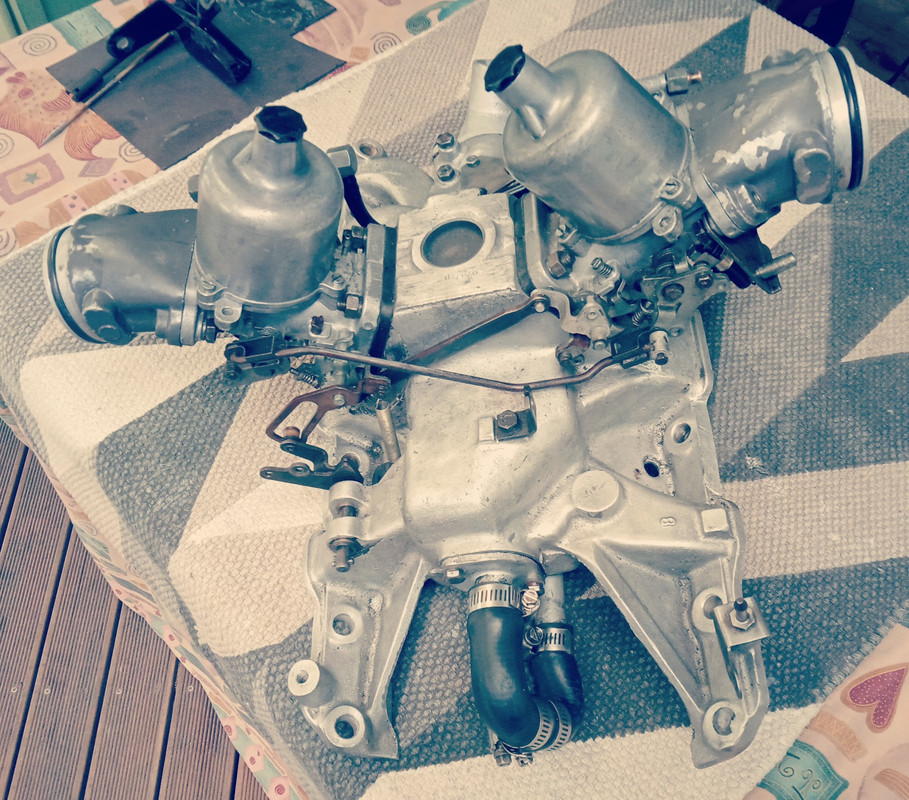 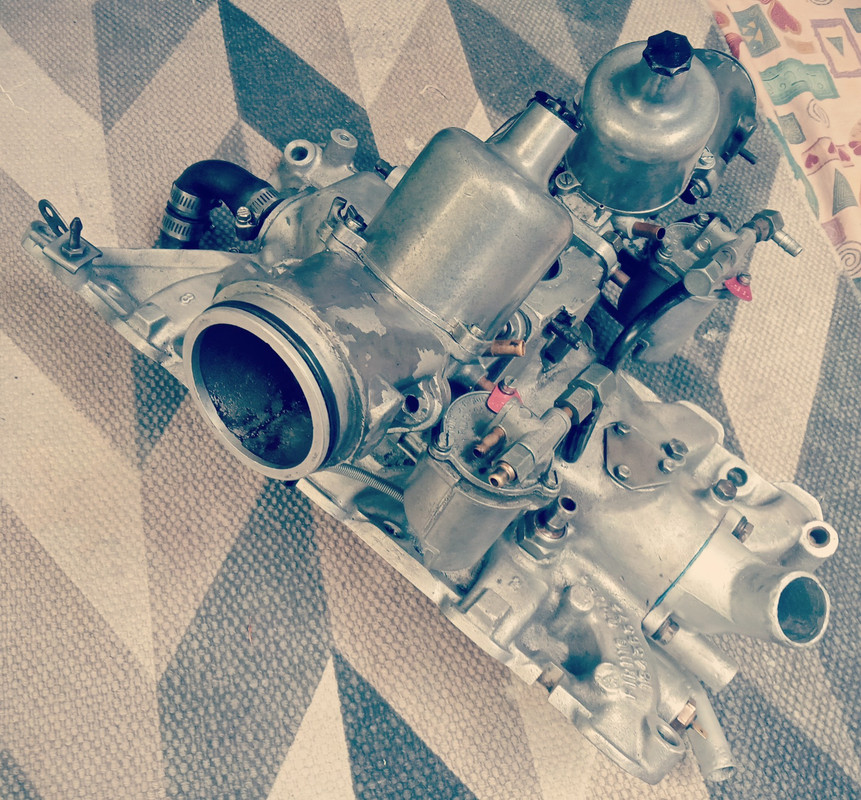  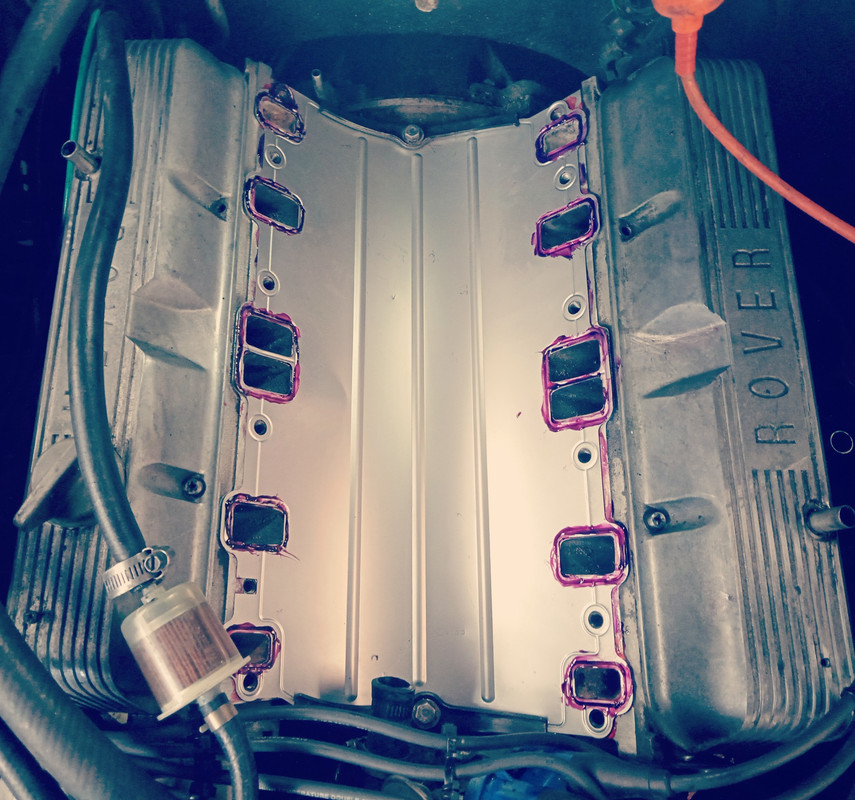 The front bypass and coolant return hoses 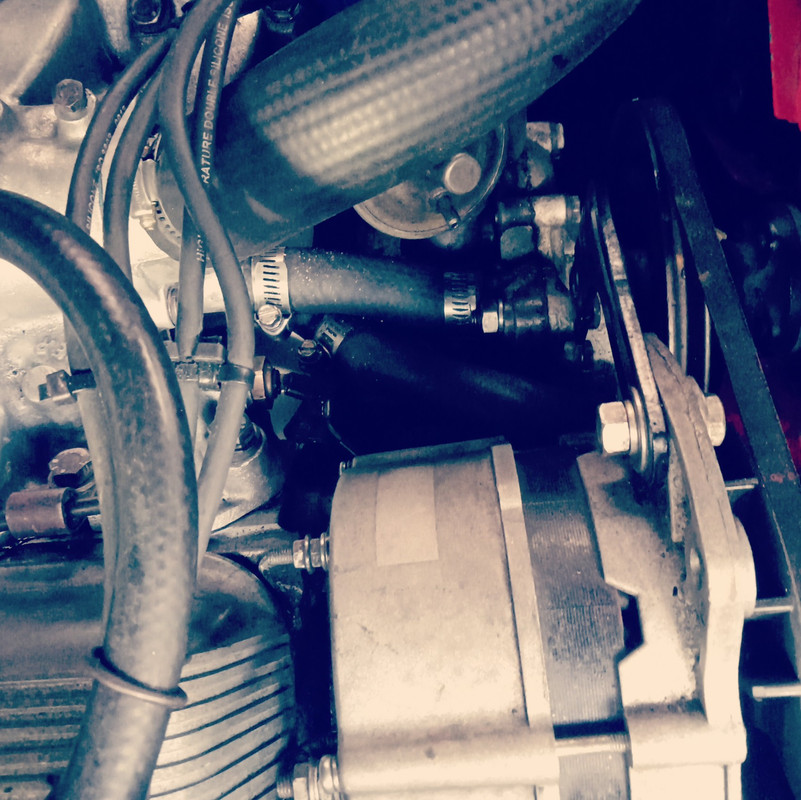 The new looped coolant return line at the rear of the manifold. 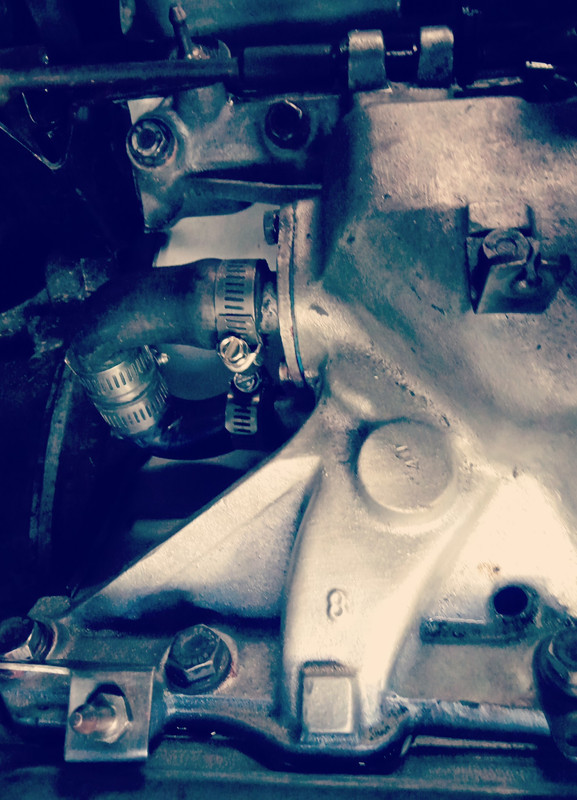 The days work with the inlet manifold and most hoses & connections in place. The fuel hose from the filter to the carburettor will be replaced with a longer length. The fuel filter and fuel hose will then sit further back. 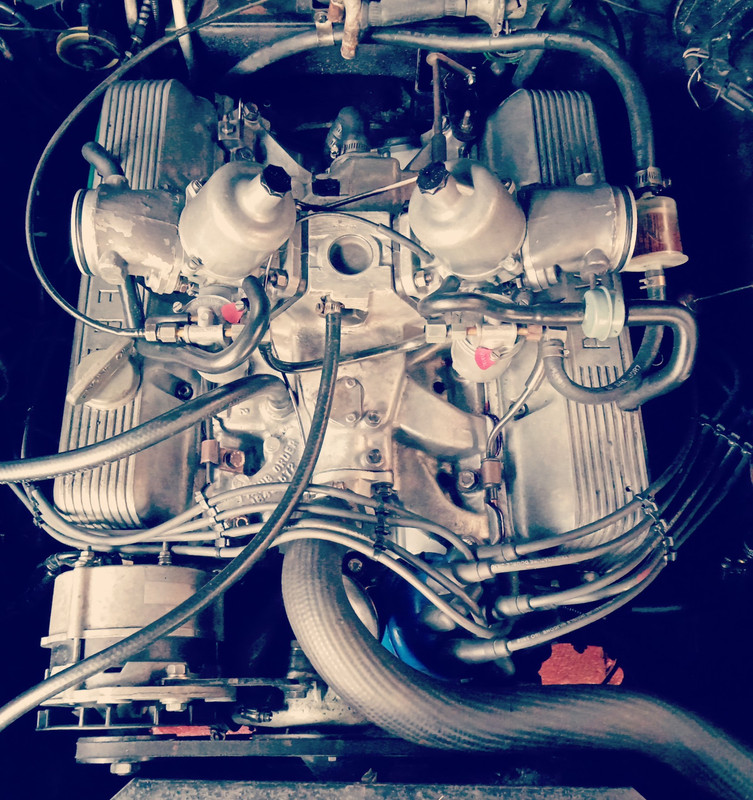
|
|
|
|
Post by enigmas on Feb 2, 2022 3:31:47 GMT
It's Alive
I put in a couple of hours this arvo finishing off the remaining trivia (choke, accelerator and fuel line connections) from Winston's new hydraulic lifter/tappet replacement and fired up the engine.
PS.
Interestingly now, sitting in the car with the engine idling, the loudest noise to be heard is the facet petrol pump ticking away under the floor. 😉
|
|
|
|
Post by Mike’S-a-loon on Feb 2, 2022 5:51:33 GMT
Very, very, happy!
It sounds great, Vince, excellent work!
|
|
|
|
Post by enigmas on Feb 2, 2022 7:16:35 GMT
Mobile phone microphones aren't the best audio device for sound recording as they seem to pick up reverberated sounds as well. Listening to an engine idling with a good set of hydraulic lifters there's actually a very soft ticking like the sound of fuel injectors opening and closing on an Efi equipped engine.
When the valley cover was off I did note that the cylinder head gasket had 2 small half moon protrusions on either side extending out into the engine valley. From this, I could gauge that the head gaskets are composite and quite thick. Couple this with aged, worn lifters that bleed down too fast and also have marginal preload due to tolerance stacking.
There's quite a difference in thickness between the pressed tin and composite cylinder head gaskets.
Running without a Thermostat.
When was the radiator core last professionally cleaned Mike?
I fitted a 170°F (76°C) thermostat which is a cool running thermostat by any standard. The engine warms up fast, as it should, but the factory gauge reads high. There's no indication of boiling whilst driving or idling. No gurgling sounds within the coolant hoses, so there's no trapped air in the system.
Perhaps a major contributor to the rust and scale under the rocker covers when Tony and I first started working on the engine was that it never got hot enough to purge itself of internal condensation. I really don't think much of the Factory colour coded temperature gauge, it's kind of meaningless.
|
|
|
|
Post by Mike’S-a-loon on Feb 2, 2022 7:40:18 GMT
The radiator was replaced in 2017. As you know, Winston has been pretty lazy since then, lounging around the panel shop for a number of years.
I guess a colour coded temp gauge eliminates accusations of "inaccuracy"! Lucas being Lucas?
|
|
|
|
Post by enigmas on Feb 3, 2022 4:50:39 GMT
Boot Latch and Lock Repairs & New Boor SealI spent the latter part of the morning and early afternoon removing and repairing the boot latch and locking mechanism, and then fitted the new Scott's boot seal. A series of images of the tasks follow. The boot locking mechanism relies not only on the key barrel but a small protruding pip at the base of the barrel that engages a small rectangular sliding block with an off centre slot machined into it. If the small pip/protrusion is broken off as this one was, the lock will not work. When the key is turned the "pip" engages the slot in the small rectangular sliding block which then drops down and stops the boot latch from lifting. Note: If when attempting to lock the boot lid the key does not rotate the full 180°, stop immediately. If you persist in turning the key using force, the pip will break off and the lock will not function. Note: I repaired Mike's lock by drilling a small hole where the pip formerly stood, then used a small self taping screw as the "pip" replacement by cutting off the head. It all should work smoothly if the mechanism is carefully fettled. Mechanism removed and partially dismantled. 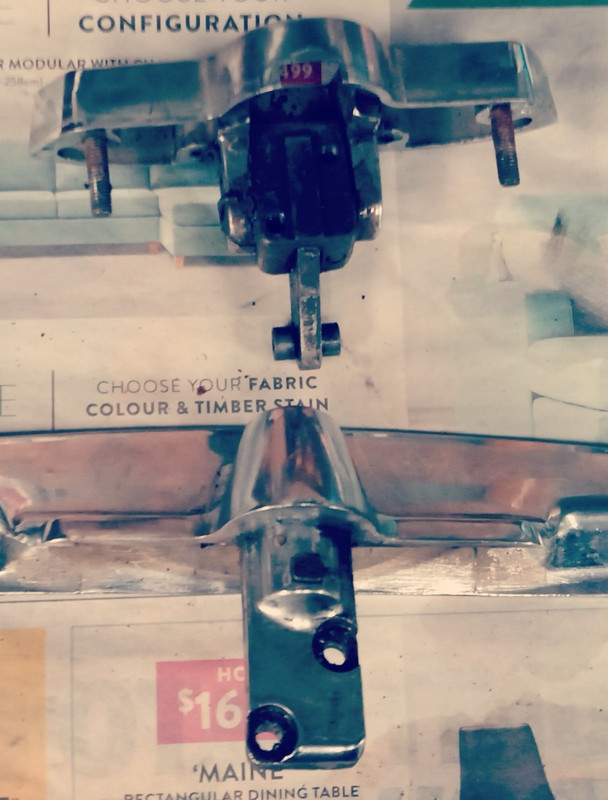 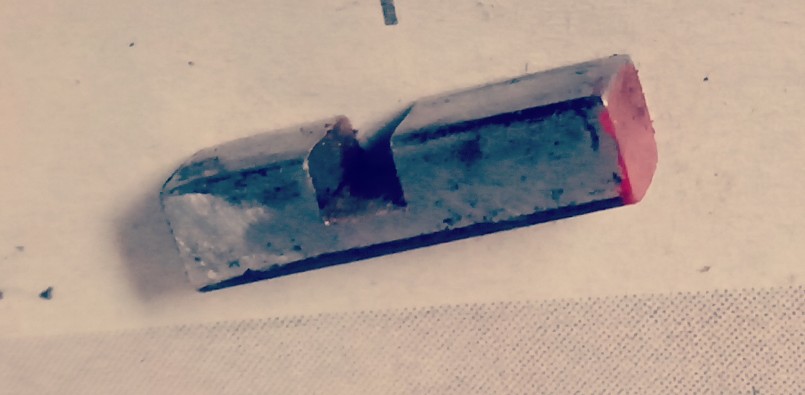   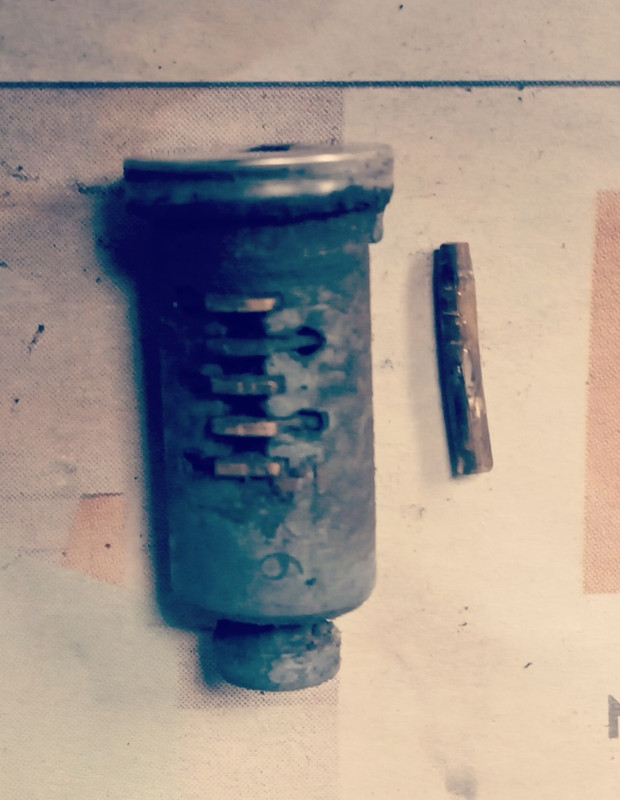  
|
|
|
|
Post by Mike’S-a-loon on Feb 3, 2022 4:58:40 GMT
Mate, you really are the right man for this car.
|
|
|
|
Post by enigmas on Feb 3, 2022 6:49:02 GMT
Winston's had a lot of rough treatment in it's life Mike. There's a lot of evidence that supports this thesis. Simply looking at the exhaust manifold bolts for instance. A few fitted with washers but mostly not. One has an oddball spacer because the bolt is too long, obviously a makeshift repair. There's an oddball stud that comes out at a weird angle on the DS rear exhaust manifold flange. The cobbled up generator adjustment bracket geometry is all wrong, as it actually allows no adjustment for the belt. I'm not trying to find things to fix, they just keep appearing!  |
|
|
|
Post by 3litrekiwi on Feb 3, 2022 8:59:55 GMT
I think a lot of our cars have gone through a period of dodgy repairs, either by previous owners doing a bit of DIY or "professionals" who are not very skilled. Owners place a lot of trust in mechanics and in many cases this is misplaced in my opinion. I could write a long list of both really poor repairs and outrageous quotes for repairs. Quite a while before I decided to dabble in this addiction we enjoy I had decided I had had enough of doing any more than basic servicing but found it really frustrating that finding a mechanic who did good work for a reasonable price was like finding a unicorn.
A couple of examples:
I had a wheel alignment done on my ute and noticed a knock in the front suspension shortly after. The garage had left the top wishbone bolts loose on the drivers side. Could have been interesting if they had come out. There was about 3mm of slop when I had a look.
I took my daily driver for a WoF and was quoted $2100 for repairs. Apparently the front rotors needed replacing among other things due to being under thickness. Funny thing was that I had replaced them at the previous pad change. The actual cost was less than $100 for parts and about three hours labour (mine) to pass the check once I did my own inspection and went back to argue the various points.
Most owners have to trust that repairs are done with care and skill and pay the asking price. I think Winston has possibly encountered the Auzzie version of the professionals I have encountered.
|
|
|
|
Post by enigmas on Feb 3, 2022 9:33:55 GMT
I worry about the term expert. Similarly there are several very highly skilled engineers (not mechanics) that I call on when I need some precision fabrication or machining done. Crankshaft Rebuilders and Headworks are two businesses within range of my locale that do outstanding work. The difference being, their work is both visible and tangible, usually an item (cyl head) or one off specialty component that I'll fit to an engine. See below. Such as this precision fit 'saddle piece' made to repair the damaged centre bearing thrust area of the P76 V8 I recently finished rebuilding. 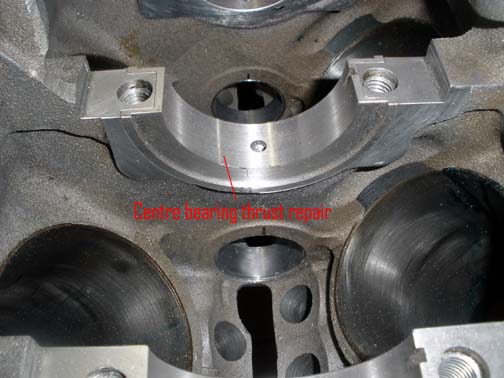 I think a lot of mechanics today specialize in 'servicing work' which provides quick returns for minimal energy or thought expenditure. It's quite different from repairing and or recommissioning, which is tied more into engineering. Restorers have a different mind set due to replacement parts not always being readily to hand. Modern cars are like domestic white goods, fridges, driers and washing machines...when they break down you throw them away. |
|
|
|
Post by enigmas on Feb 4, 2022 10:08:32 GMT
New Door and Boot Seals in place.Both front and rear door seals, including the boot seal are all in place. The front doors are probably the most complex to fit as there are 3 differing profile seals to use. For those interested in fitting door seals, my preferred adhesive for this task is "super glue." PS. It's best to stay focused otherwise you'll have your fingers glued together in no time. Scott's seals were used and they look good and also fit and work well.  
|
|
|
|
Post by enigmas on Feb 6, 2022 10:03:11 GMT
Refabricating Alternator Tensioning Bracket & Cleaning the Fuse BlockA couple of small jobs this afternoon just after the heat wave peaked. The badly "cobbled-up" alternator tensioning bracket looked terrible and was effectively non functional as far as allowing for any further adjustment, so I modified it, then linished it to improve both the aesthetics and function. It doesn't have to look like a dog's breakfast even when it's non factory. The other task only came to light after I'd washed the car and attempted to use the wipers. No go! Bummer. Tony and I had repaired virtually all the electricals the last time we worked on the car together. The original switch is a bit iffy but it worked. So what is it this time. Went to investigate the fuse, and yes it was blown. There's a large current draw on the wipers especially during startup. Took a good look at the fuse block holder and saw that most of the contacts were covered in a heavy residue. This creates high resistance and of course the fuse then blows. Then spent 45 mins with sandpaper cleaning each terminal contact point till it was bright. If you've never looked at the fuse block on your 50 year plus, old classic, it may be about time to consider investigating the contacts. Here are a few pix of the alternator adjustment bracket being modified. Directly below are 2 views of the bracket prior to being modified. Note: No adjustment available in it's current form. 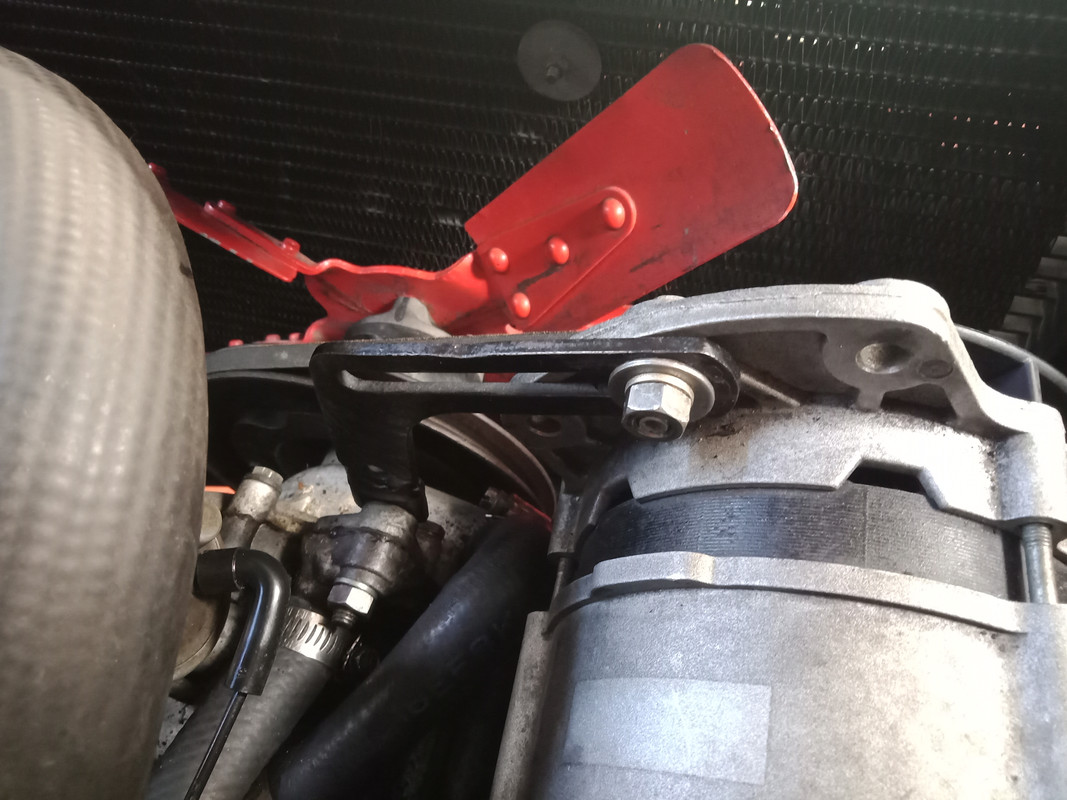 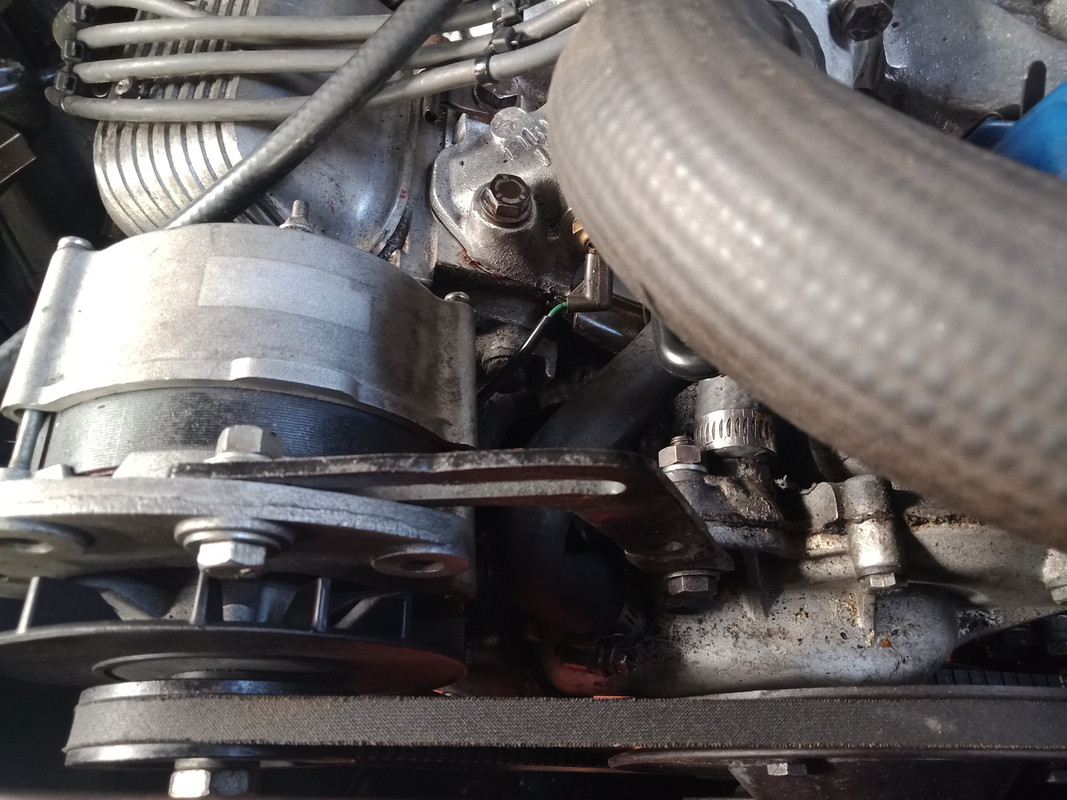 This is the culprit  A little bit of sectioning.  Hit it with the welder. 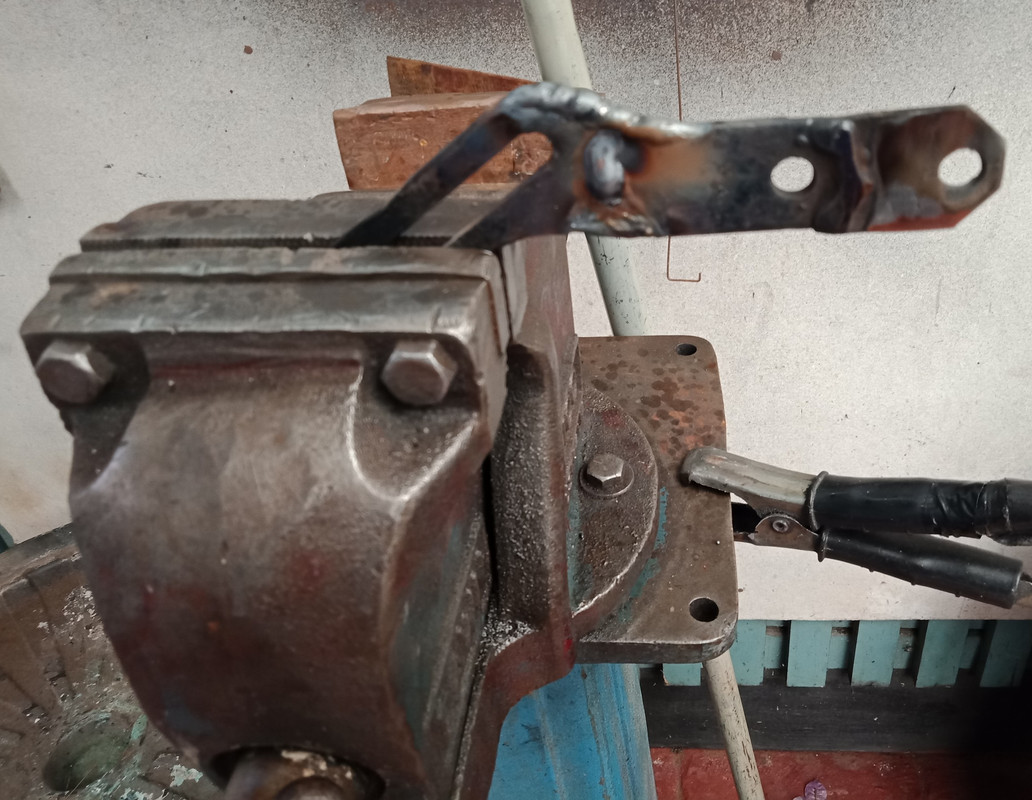 Linished. 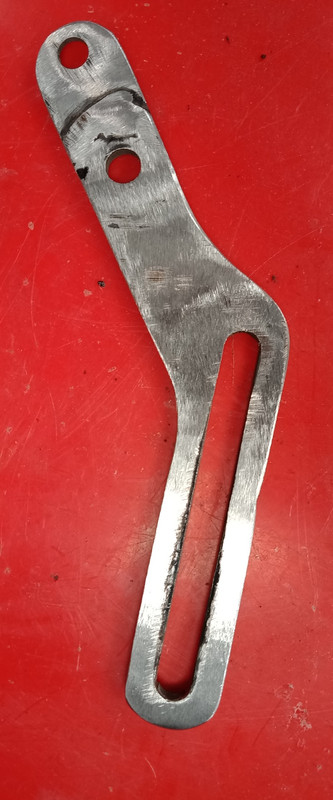 A couple views of it in place. We now have adjustment and it doesn't look like a dog's breakfast.  
|
|
|
|
Post by enigmas on Feb 9, 2022 13:19:26 GMT
Boot Floor Tribulations. It seems everytime I think I'm done with Winston another issue raises its head. This time it's the boot floor or at least sections of it. There's obviously been water ingress into the boot area at some time in Winston's life evidence by a few areas of corrosion that sadly the body guys missed. This is the boot area, emptied of stuff and with the floor pan scrapped free of years of grunge. 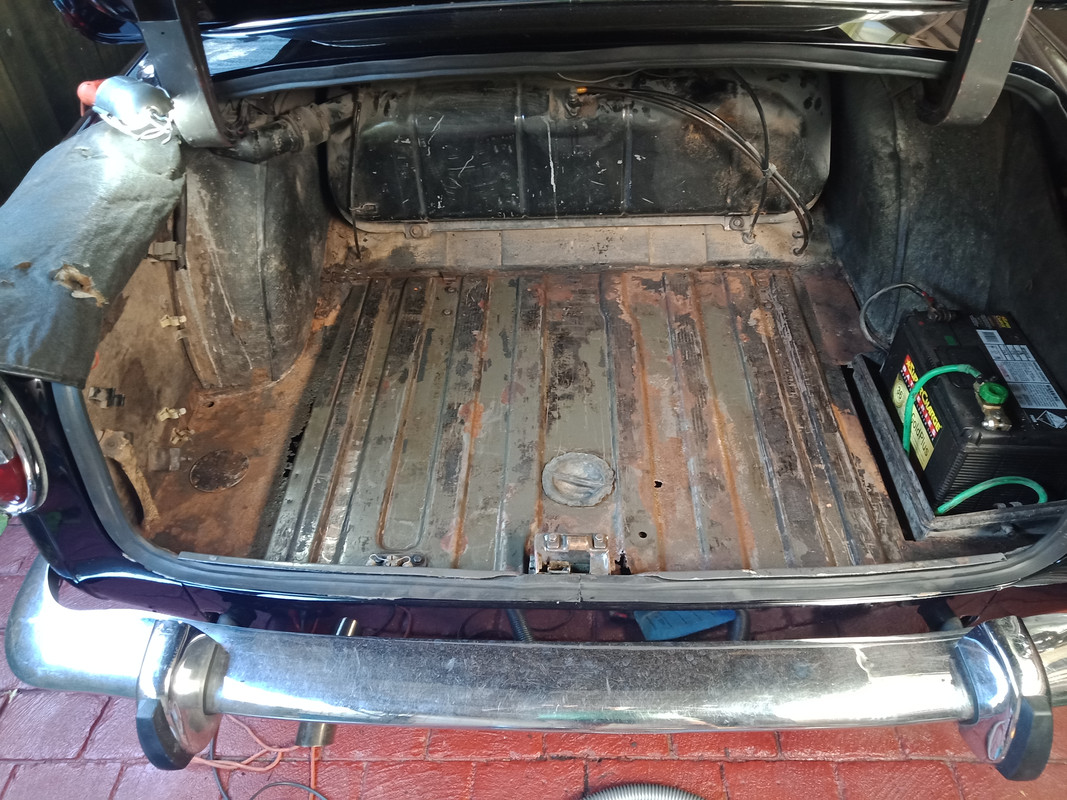 This is the area of main concern. The LHS rear section where the tools usually reside. Note the floor pan corrosion through to the subframe. 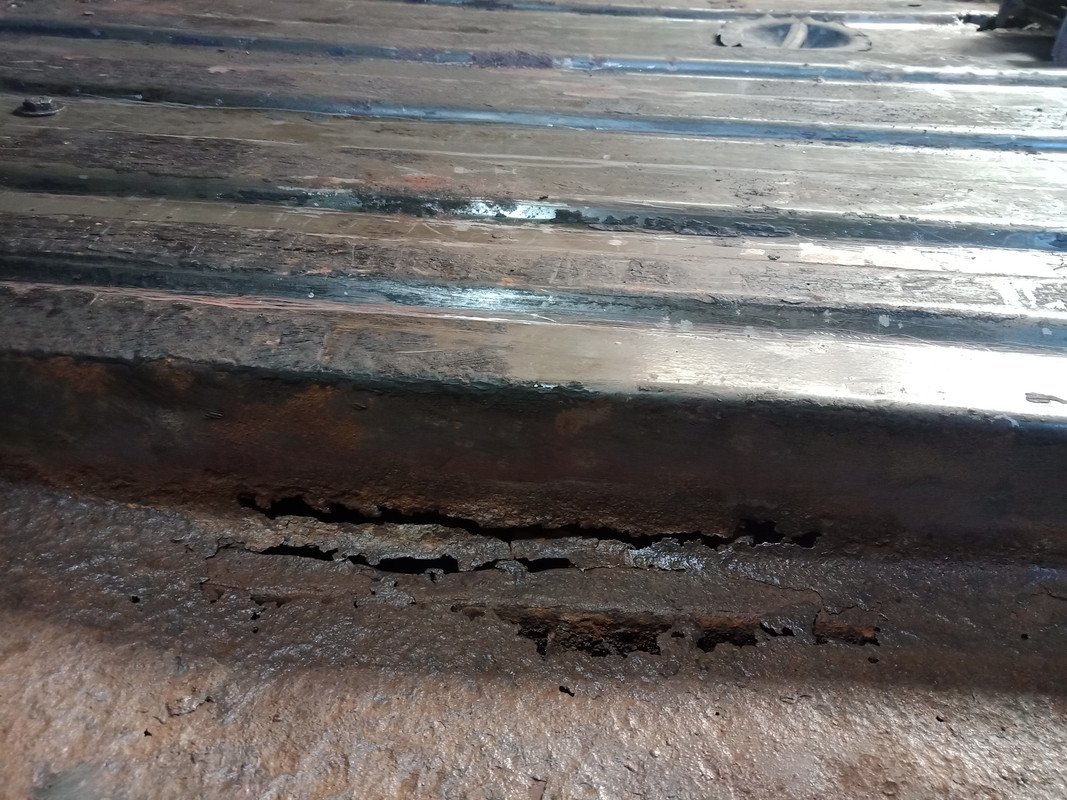 Here's a closer view. 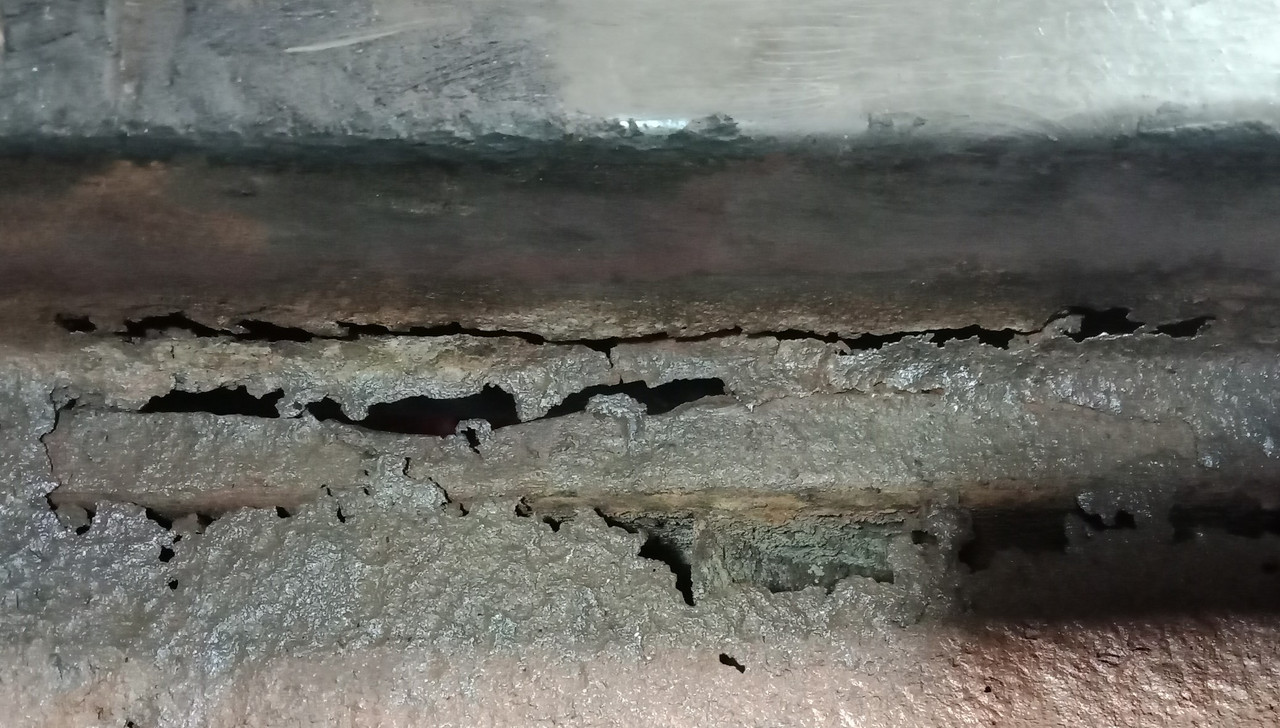 This is another smaller section of corrosion near the boot latch. 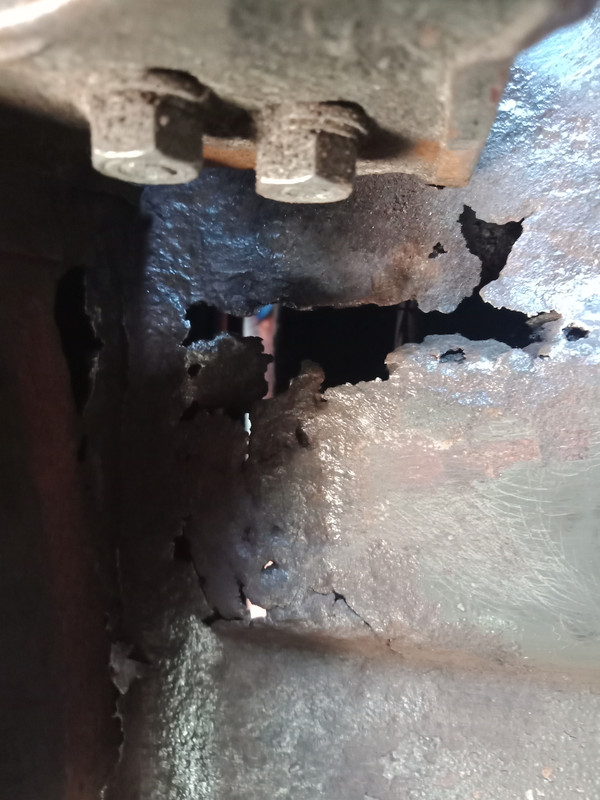 This next image shows where and how petrol fumes managed to gain entry to the car's interior.  It's a pity that the panel shop guys missed these areas of issue. It's always easy if you don't have to worry about the paint.
|
|
|
|
Post by johnwp5bcoupe on Feb 9, 2022 18:03:22 GMT
If anybody can sort it Vince you can  |
|
|
|
Post by enigmas on Feb 9, 2022 21:41:32 GMT
Thanks John, I'm just trying to finish the remainder of either the missed and/or neglected areas of repair. Definitely not looking to find additional things to fix. After this piece of surgery Mike should be more than capable of maintaining Winston and providing the ongoing care. |
|
|
|
Post by enigmas on Feb 10, 2022 9:28:44 GMT
Boot Floor Repairs.I spent 2 - 3 hrs today cutting out the rotton sections of the boot floor, cleaning areas to bare metal and fabricating a couple of cardboard templates in preparation for the steel pieces that I'll need to bend up. I've got some good quality 18 gauge mild steel care of a 1940s Hoover Junior washing machine that had some useful flat steel panels. Nothing like a bit of recycling. Doing my bit to save the planet by refraining from adding more carbon (newly manufactured steel) to the atmosphere.😉 Whilst doing the above I found a bogan of a repair to the lower rear boot panel behind the spare wheel. Will post a picture of this cocky excrement welding repair tommorrow. I suppose what can't be seen can be fudged. Structurally OK, but it's a dog's breakfast repair to my eye. For this particular repair I'll use my MIG welder and plug weld the repair panels. This is done by drilling a row of holes (approx 1/4" in diameter) evenly spaced ( approx 1" apart) in the repair patch to replicate spot welding. If the car didn't have such pristine paint work I'd most likely use my oxy/acetylene set and seam and butt weld the pieces. Paint doesn't like heat or a stray flame so I won't be going there. Here are some pix of today's effort.  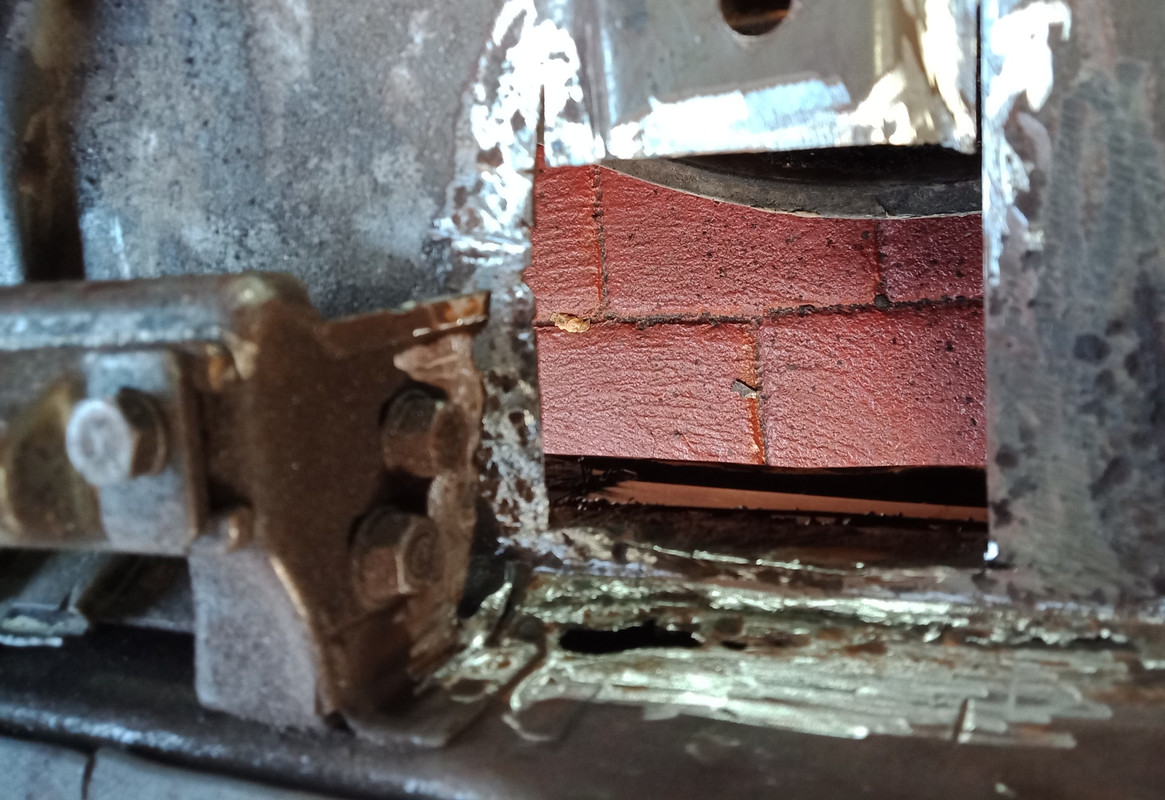 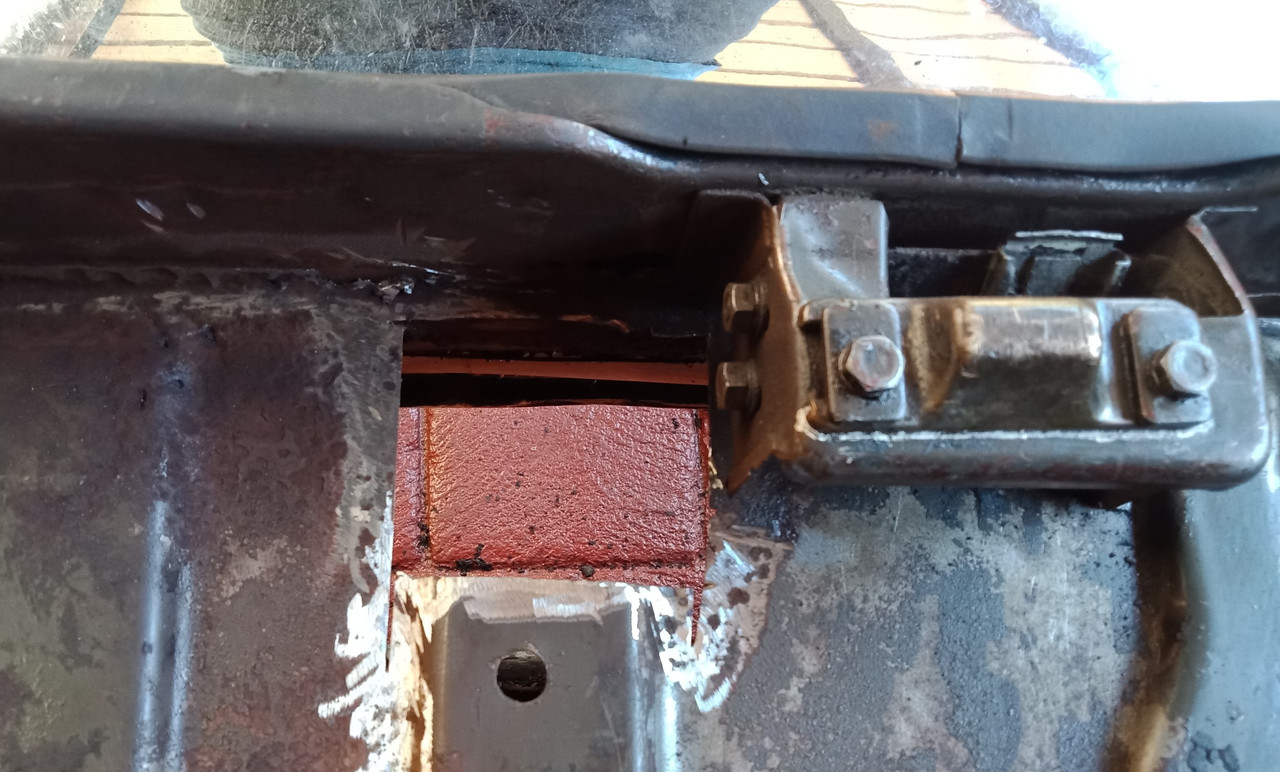 Cardboard template in place. i.postimg.cc/FRQ6z82b/IMG-20220210-161858.jpgThe section of rot LHS of the boot.  The piece removed 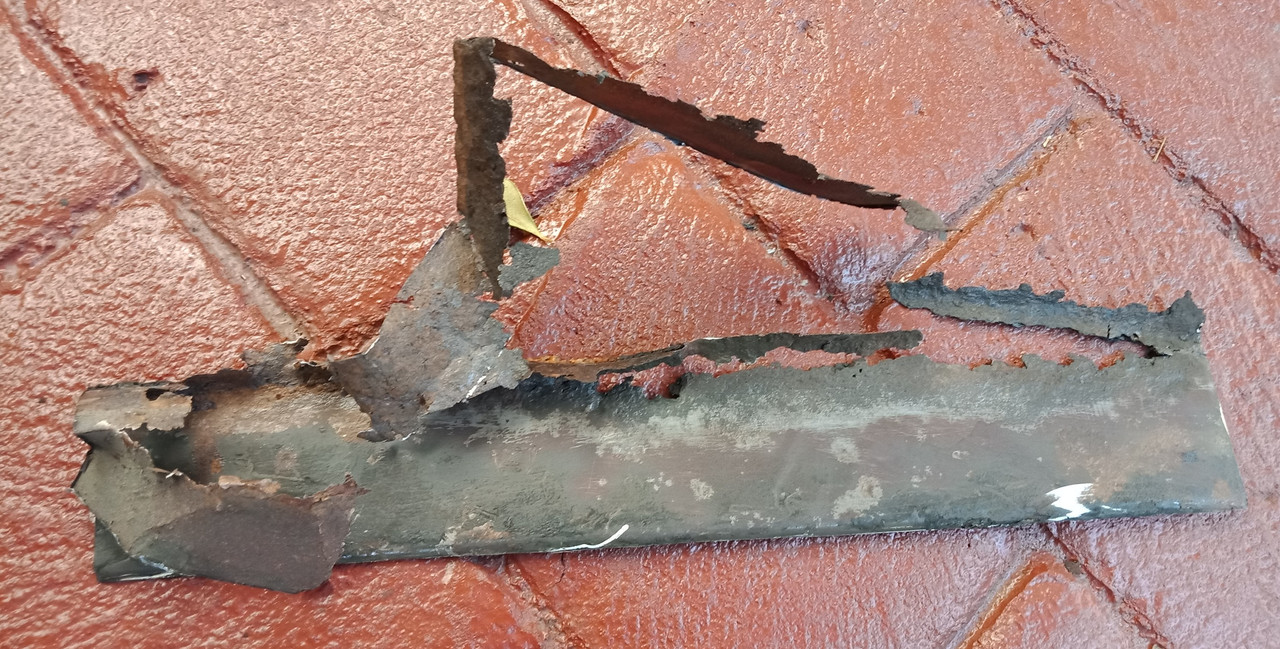 Note all the debris, dirt and whatever within the monocoque box section. 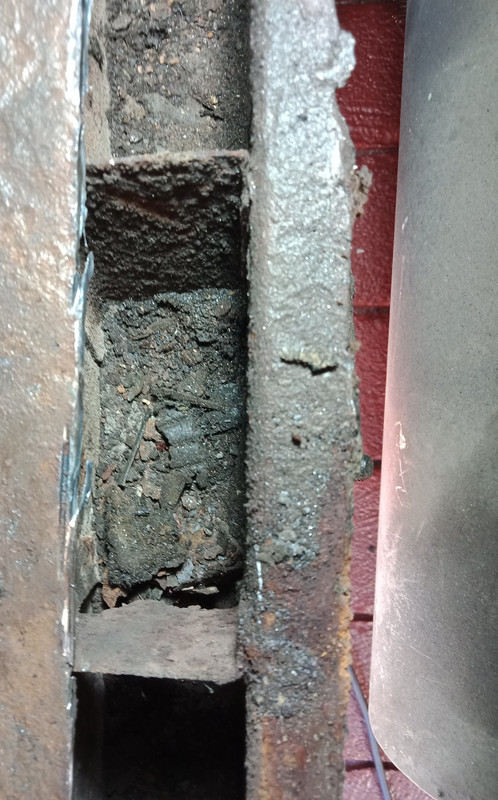 Cleaned up and ready for the repair piece to be fitted. 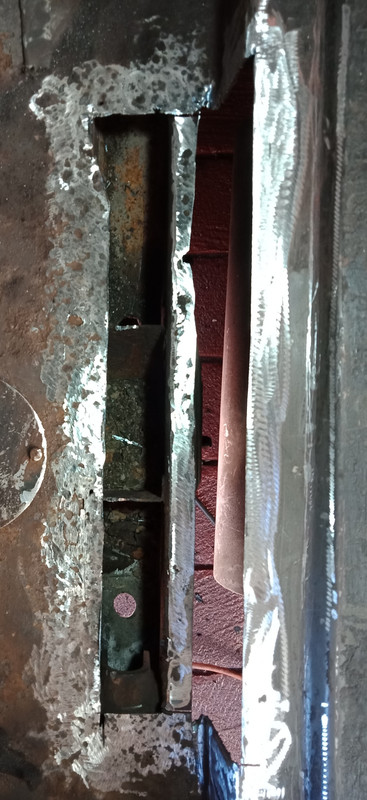 The rotted area from underneath near the contrasonic bush. 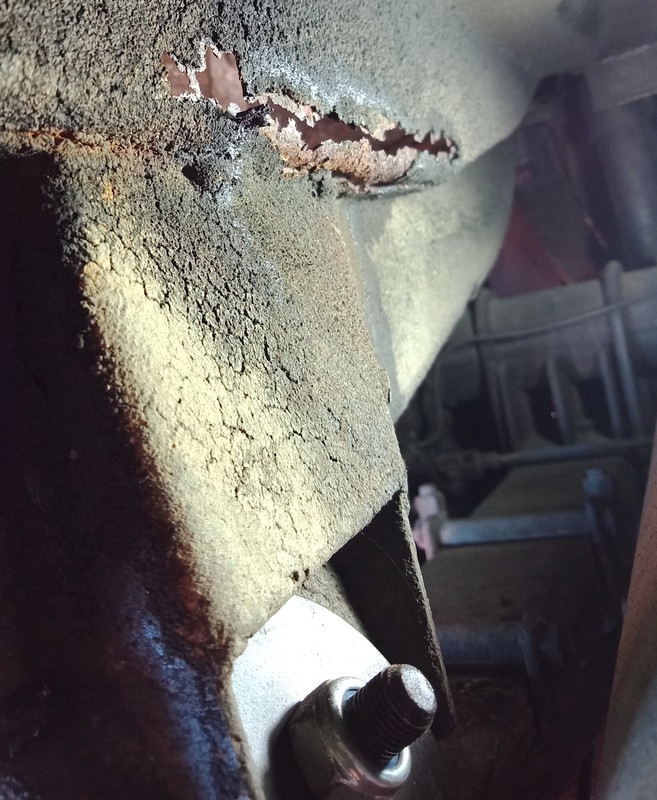 The small cardboard template in place beside the boot latch.  The larger cardboard template in place on the LHS of the boot floor. 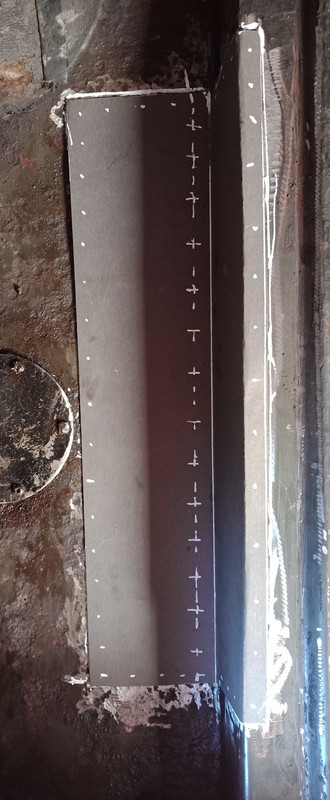
|
|
thor64
Rover Fanatic

Posts: 138
|
Post by thor64 on Feb 10, 2022 18:37:06 GMT
Hi, just wanted empathise with Mike'S-a-loon-Saloon. There was a hole in my boot also. I really enjoyed the view through. Glad to say it's all fixed now and the car is road ready. My wife complained about the piles of rust. |
|
|
|
Post by enigmas on Feb 10, 2022 21:35:11 GMT
There's nothing like battery acid to make a mess of sheetmetal. Hope you've go a tray in place for the battery now. Good luck with the restoration. |
|
|
|
Post by enigmas on Feb 11, 2022 10:47:57 GMT
Boot floor Repairs cont...Managed to put in a big effort today. I completed all the boot floor repairs as I want to be done with the taxing physical stuff. I didn't manage to start any fires whilst welding on Winston and that's always a plus. 😉👍 Been there done that. The boot floor will get a coat of Schutz to finish off and that should do it until Mike's boot kit arrives. Rather than talk about the repair procedure the following photos should outline what was done. The silver tape you may see in 5he images is 3M self ahesive aluminium tape. Great stuff for sealing things in. The undercoat I used is etch primer, then Schutz over the top. Here are the pix. Templates cardboard and 18 gauge panel steel care of 1940s Hoover Junior. 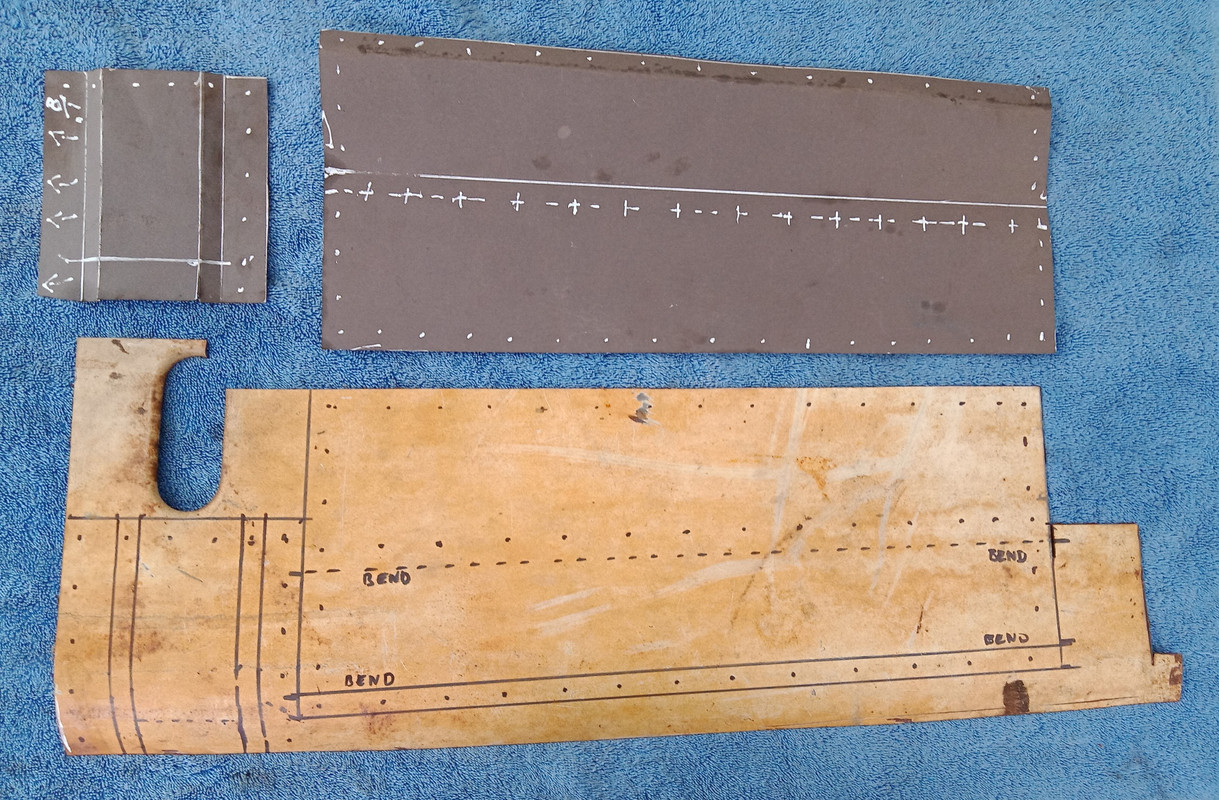  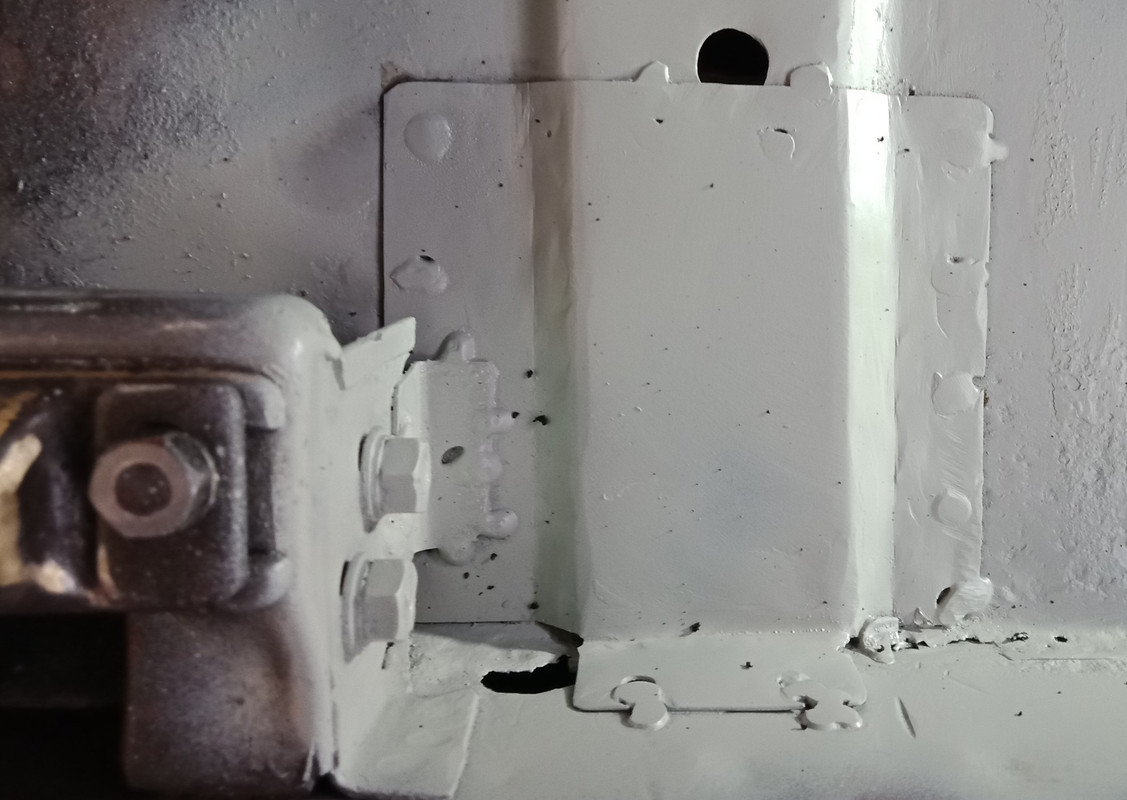 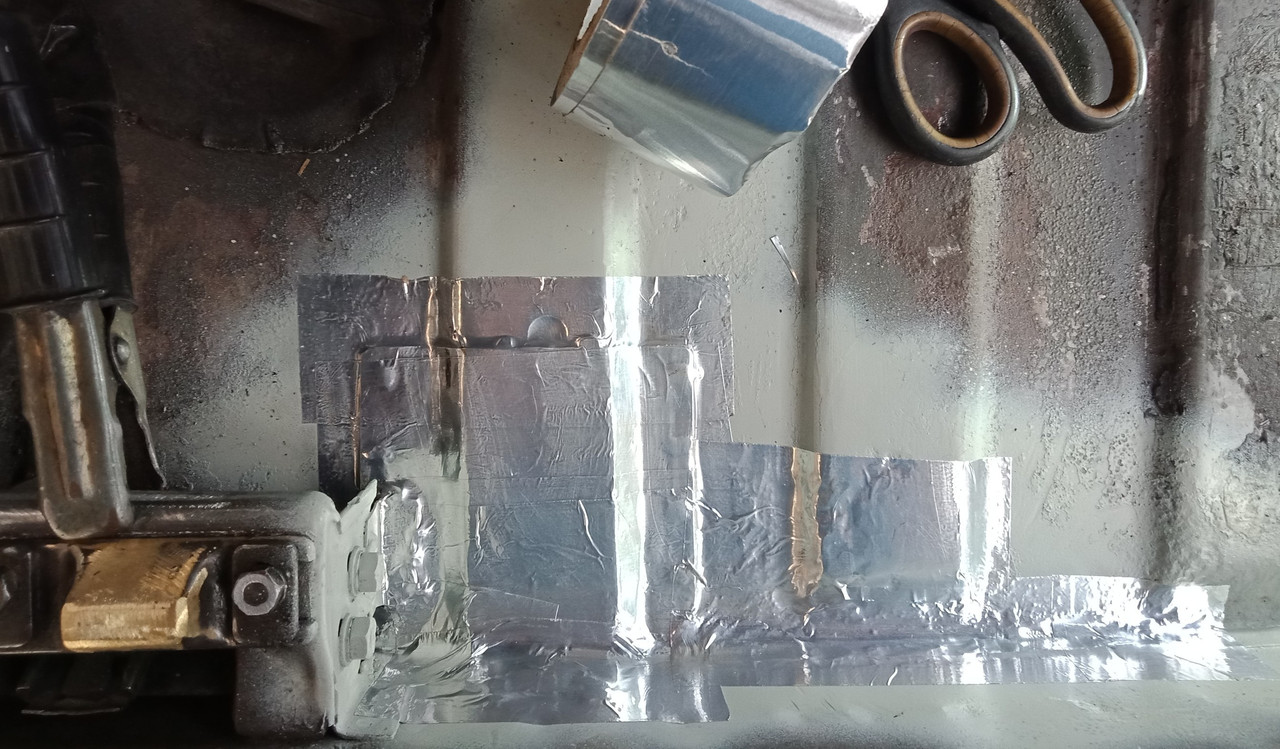 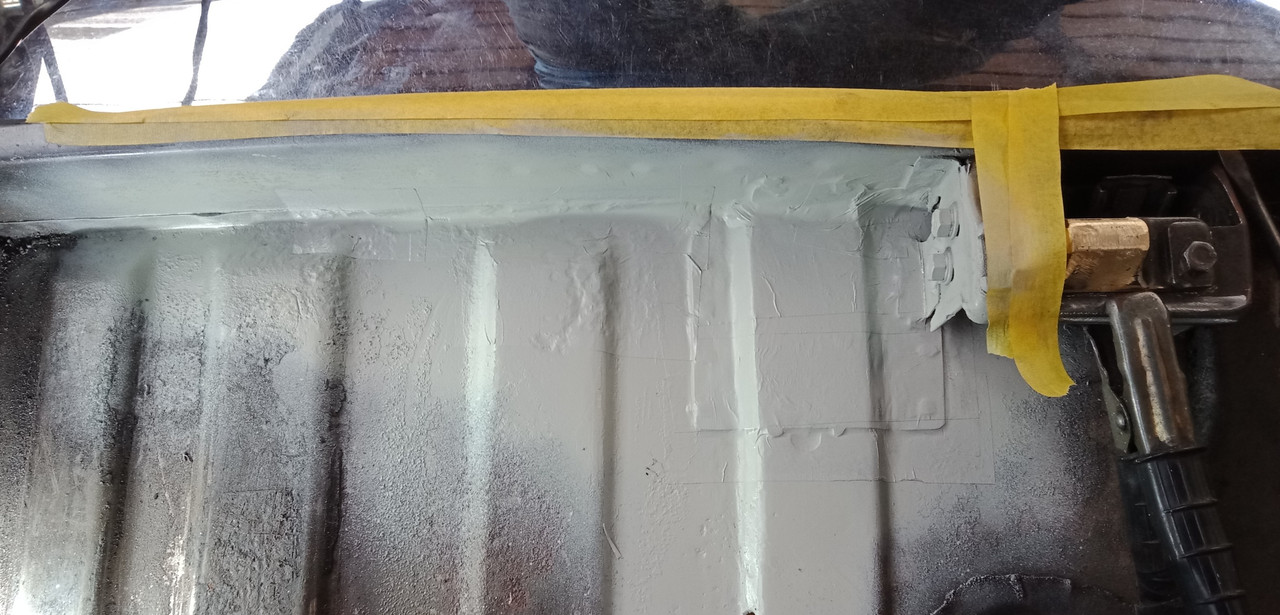 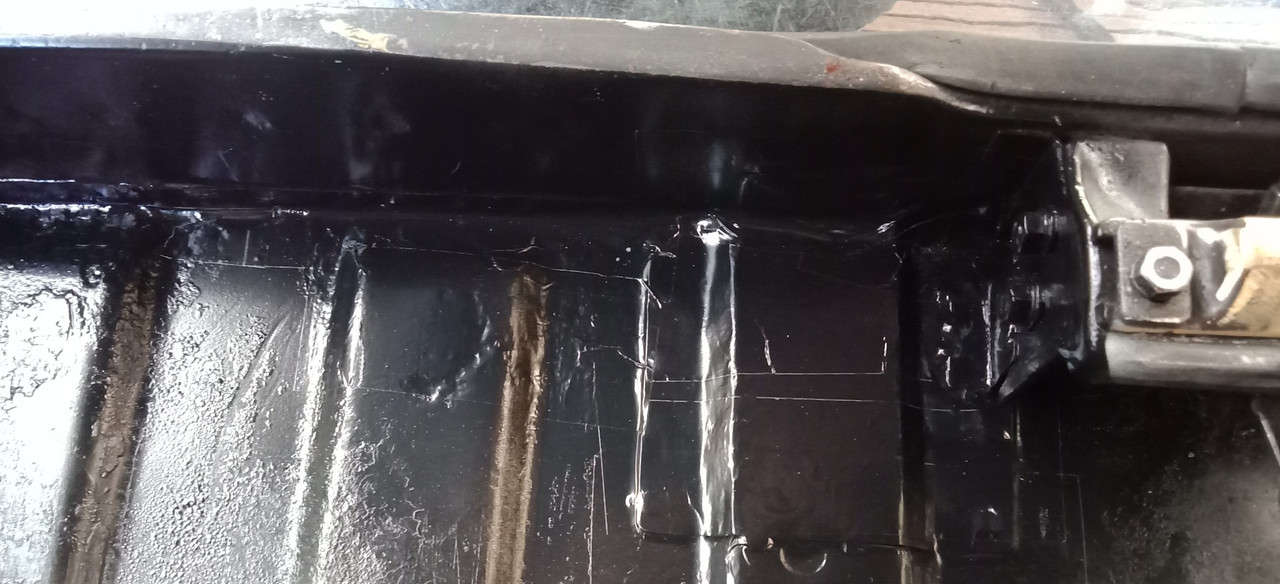 Now for the LHS Boot repair above the rear frame box section. 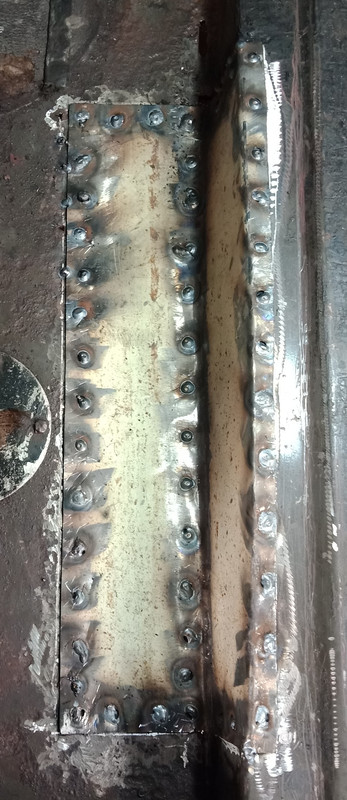  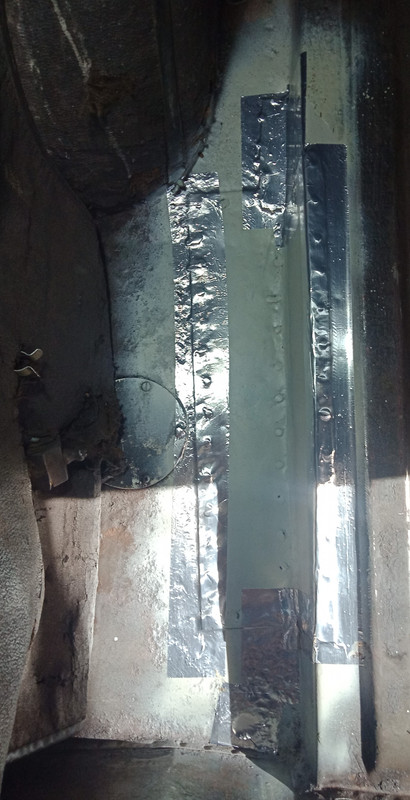 The schutz coating appears gloss until it dries to a matt textured finish. 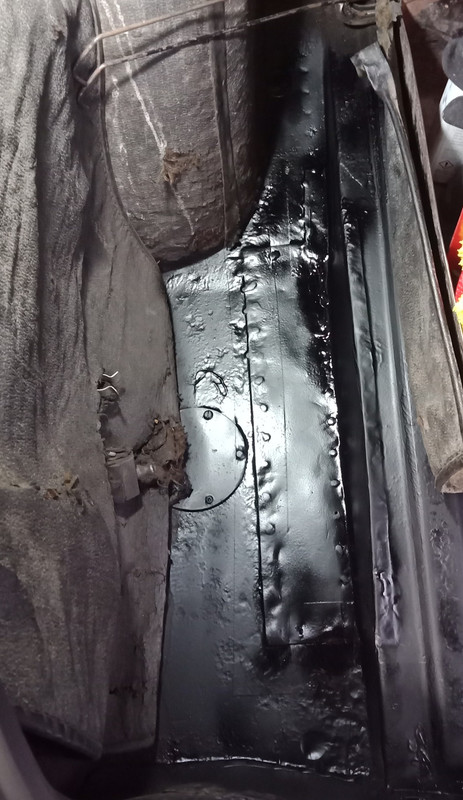
|
|
|
|
Post by Mike’S-a-loon on Feb 11, 2022 18:16:55 GMT
Hey Vince, Looking great, mate! As the car now has a bit of washing machine in it, will it be self cleaning?  Hopefully it won't spin out of control... The boot trim stuff should be leaving the UK shortly, I ordered and paid a few days ago, but haven't heard back from Wadhams about the shipping cost, which is charged separately. Once they've quoted and I've paid, it usually makes it to Melbourne in about a week. Thanks for taking so much care around the new paint. I too am disappointed the panel shop didn't make any attempt to repair the rust damage in the boot. As you say, the repair would have been less tricky if you weren't having to be extra careful of damaging it. |
|


 Hopefully it won't spin out of control...