|
|
Post by enigmas on Feb 11, 2022 21:49:33 GMT
Heat with welding is always an issue Mike and obviously it's alway best to do things ideally in a particular order when possible. Physical body repairs first (minus the engine trans and full interior.) In this way all the body issues, corrosion, rot, whatever can be sorted and metalworked with relative ease before any final paint work. Specific panels if available can then be carefully unpicked and welded to the skins and box sections directly. Working around full interiors, petrol tanks and bituminous body sealer can be stressful.
Moving on.
I'll purchase a few cans of Shutz today and finish painting/sealing the boot floor and also replace the faulty vent hose at the fuel filler (the source of the petrol fumes)
The panel shop was also seemingly adverse to using washers too, (boot lid trim for example, nuts straight onto the freshly painted surfaces (underneath) and the number plate screws loose and ready to fall out.) The paint is amazing but the assembly work of body sections and trim lacked focus. Perhaps these tasks were given to thevir apprentice. Who knows?
|
|
|
|
Post by enigmas on Feb 14, 2022 2:01:12 GMT
Fuel Smell in the Interior.A small update today. The last time Mike was in OZ he was able to spend some time working and driving Winston. He later pointed out to me that he could smell the odour of petrol in the car. Of course I couldn't at the time, but later whilst doing the repairs to the boot floor I noticed that the fuel vent/overflow hose at the filler was suspect. The original hose had dried, cracked and crumbled in several places along its length. If you haven't ever checked this hose on your P5 then its definitely worth an inspection Here's a few pix of Winston's cleaned up boot floor and the new breather/overflow "hose" in situ. 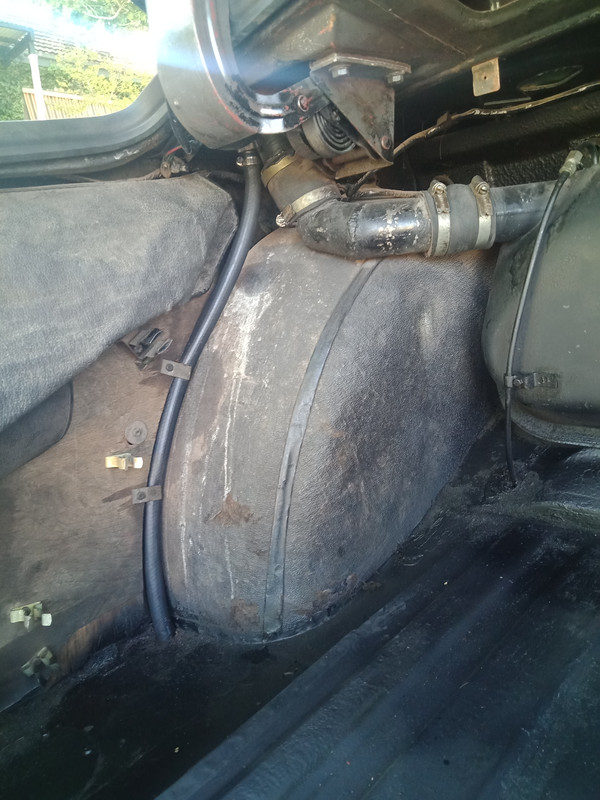 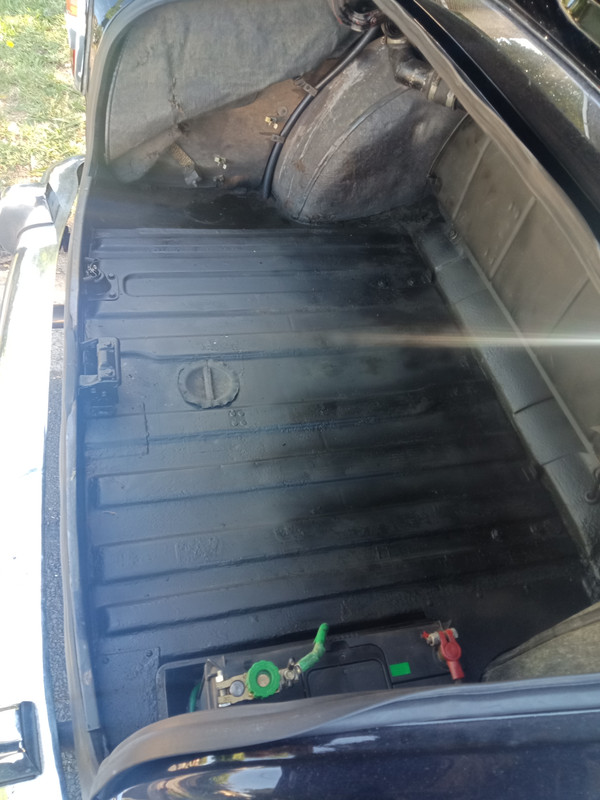 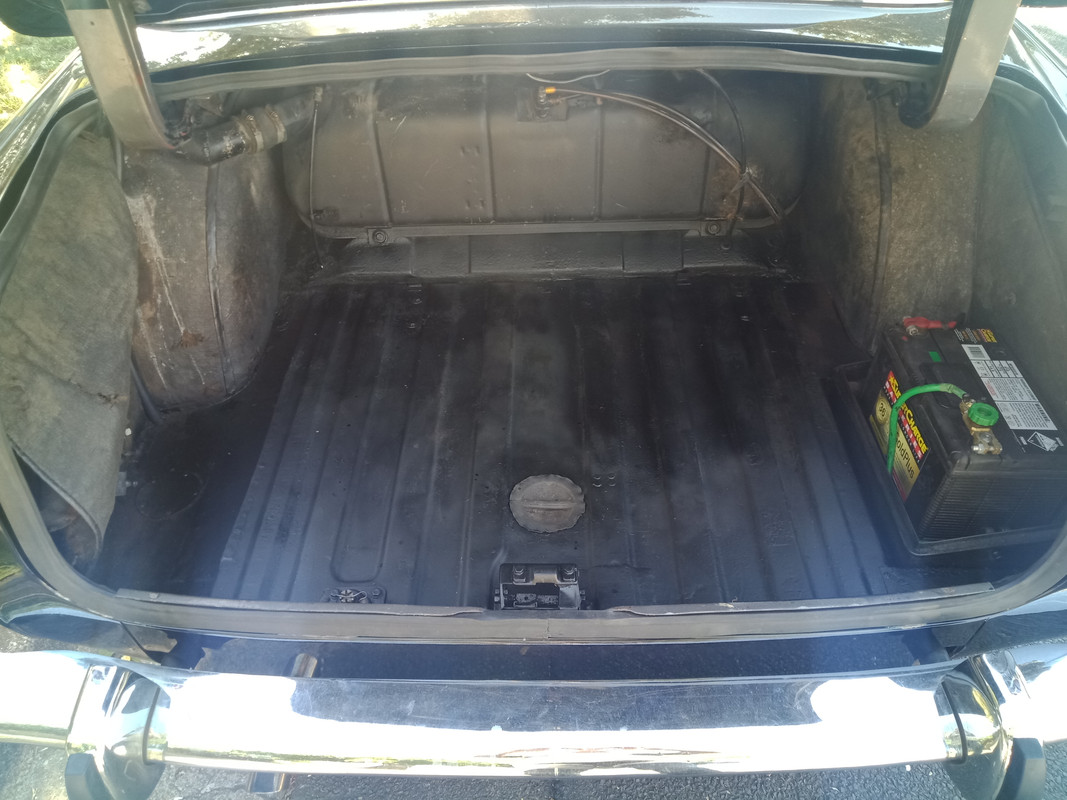
|
|
|
|
Post by enigmas on Feb 14, 2022 9:35:55 GMT
Winston's Radio Works.I was looking at the Radio/CD player this afternoon and thought why isn't it working. Fortunately it was easy to remove, tidy up some spaghetti wiring, check the obvious fuses and power supply wires for both the memory function and operation. These were good. I then pulled the rear plug from the back of the radio and found a blown mini spade fuse, hidden under it. Replaced this with one I had in a jar and it lit up. 👍 After sorting most of the spaghetti hanging under the radio and on the parcel tray, 2 mini speakers on either side of the dashboard started functioning. It appears the panel shop cut the speaker wiring to both doors and to the speaker fitted to the rear parcel shelf. I found a small speaker in my shed and wired it up to the LHS door speaker wires where they'd been cut exiting the A pillar. This improved the sound quality greatly (I'm virtually deaf in my right ear) but obviously not to the standard of the correct speakers. Here's a short video There's a little black box with some lights and wires hanging off it Mike...I have no idea what it is? 🤔 
|
|
|
|
Post by Phil Nottingham on Feb 14, 2022 10:37:45 GMT
The parcel shelf floor just lifts out, gripping it from the rear edge where the main wiring loom runs. Any cables can be hidden underneath or alongside the loom.
I note the radio panel seems to be a very early one with its narrow raised edge. All mine have a much wider hole and no edge or bottom ledge
A modern radio is more use than a LW/MW period! A Dual stereo loud speaker may fit in the original speaker hole. Yours looks good so far
|
|
|
|
Post by enigmas on Feb 14, 2022 13:03:35 GMT
Hi Phil, the panel piece that forms the roof, sides and back of the parcel shelf is laying in the back seat area. Unfortunately it's not in the best shape, if it was fitted the wiring would be covered. The little speaker I fitted is only temporary. Both front doors have the correct speakers fitted to them including a large one on the rear parcel shelf. Unfortunately all the wiring has been cut.
|
|
|
|
Post by enigmas on Feb 15, 2022 11:17:54 GMT
Front Door Pockets and Speakers.I spent this arvo removing and repairing both front door card map pockets and reconnecting the front door speakers. Both pockets were hanging limply and just looked terrible. It's interesting what you find behind a door card when it's removed. It says a lot about the individual or business that did the work. Just because it can't be seen doesn't mean that it shouldn't be done properly. Other small things, such as lubricating dry hinges, fixtures and mechanisms within a door cavity should be done as routine, but generally these things are never done. And so it was with the inners of Winston's doors. Most of the mechanisms hadn't seen a glimmer of lubricant in decades. In the photos below you'll see that I heavily coated most of these pieces with spray lithium grease. Amazing how the mechanisms seem to work much smoother after a dousing of lubricant. There were also some odd ball bolts used and several I standardized to ease fitting and removal when required. The map pockets were tightened at the rear by severly shortening the tie wire that holds the now "very tired" elastic in tension. Truly, I wouldn't place anything in the map pockets as it loads the elastic, even if new. Just leave them as a decorative element. I also wired both door speakers and they work a treat. Truly I'd forget about a functioning rear speaker. There are now 5 functioning front speakers of various size, including the one I added. Here are today's pix of the task outlined above. The PS door card. Note the shortened connector restraining the map pocket  The PS door card . Note how loose the elastic restrainers are. 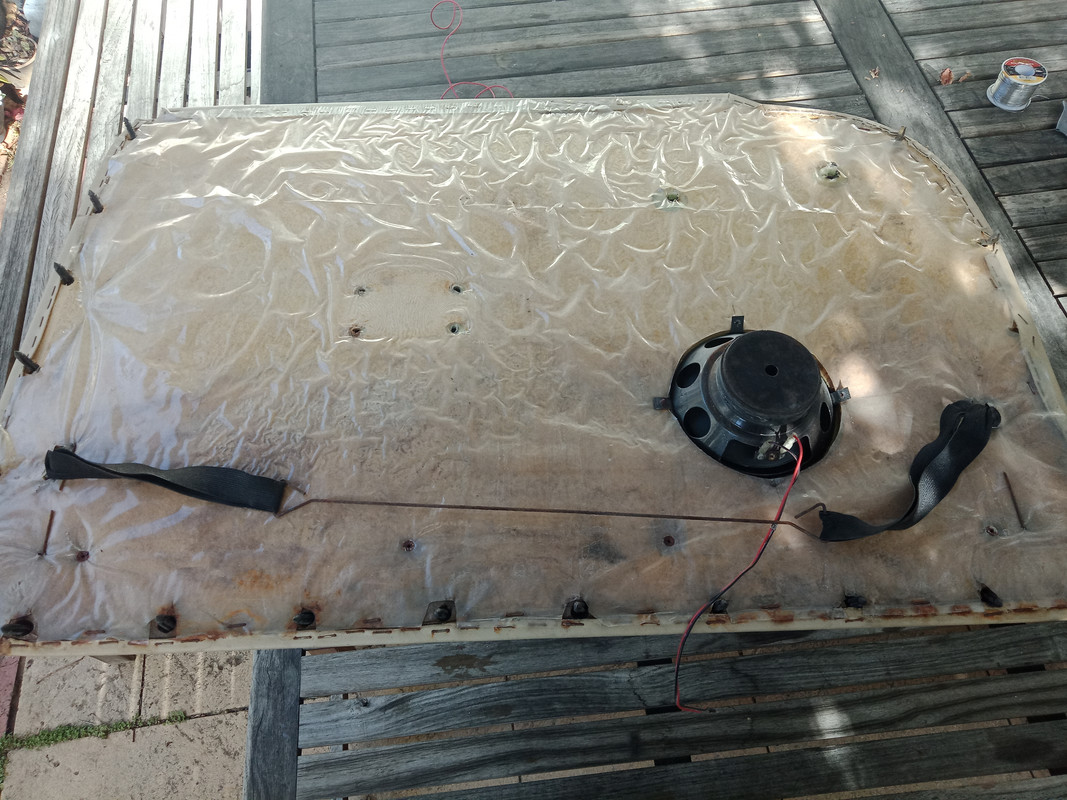 DS door card. Note the re-tensioned elastic map pocket restrainers.  Note the rusty and very dry spring. 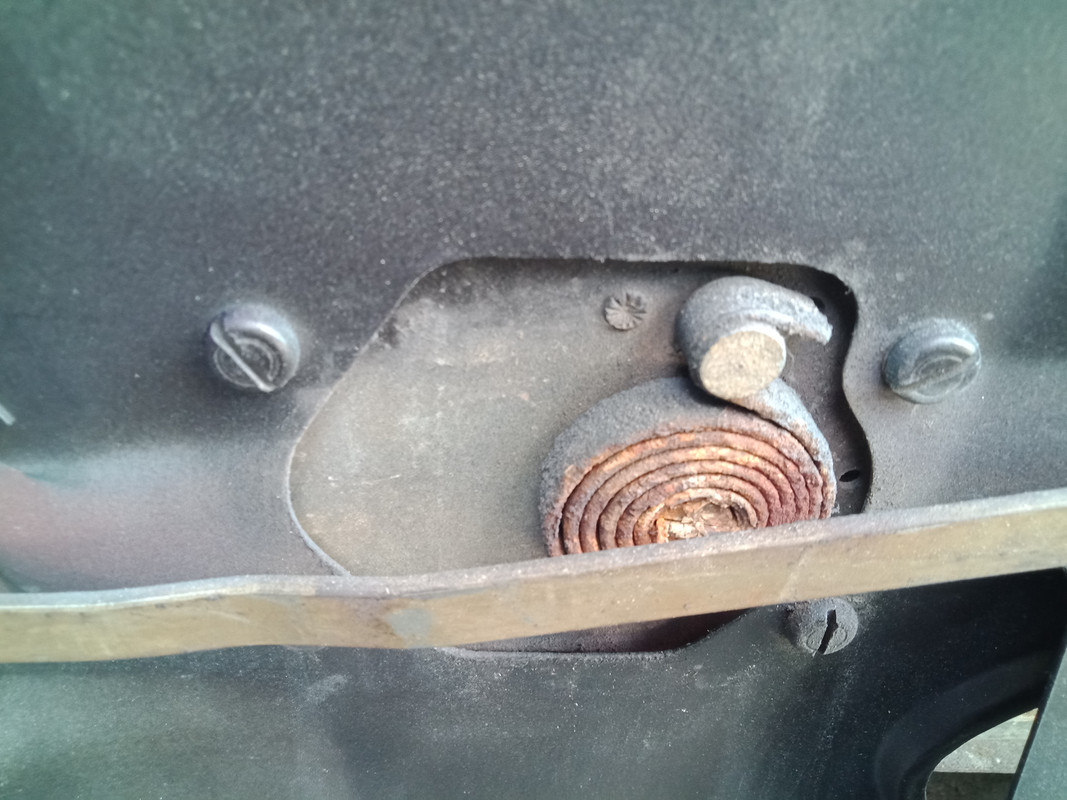 Just wondering what this incision was about? It should have been either completely removed tidied up and/or neatly welded back. 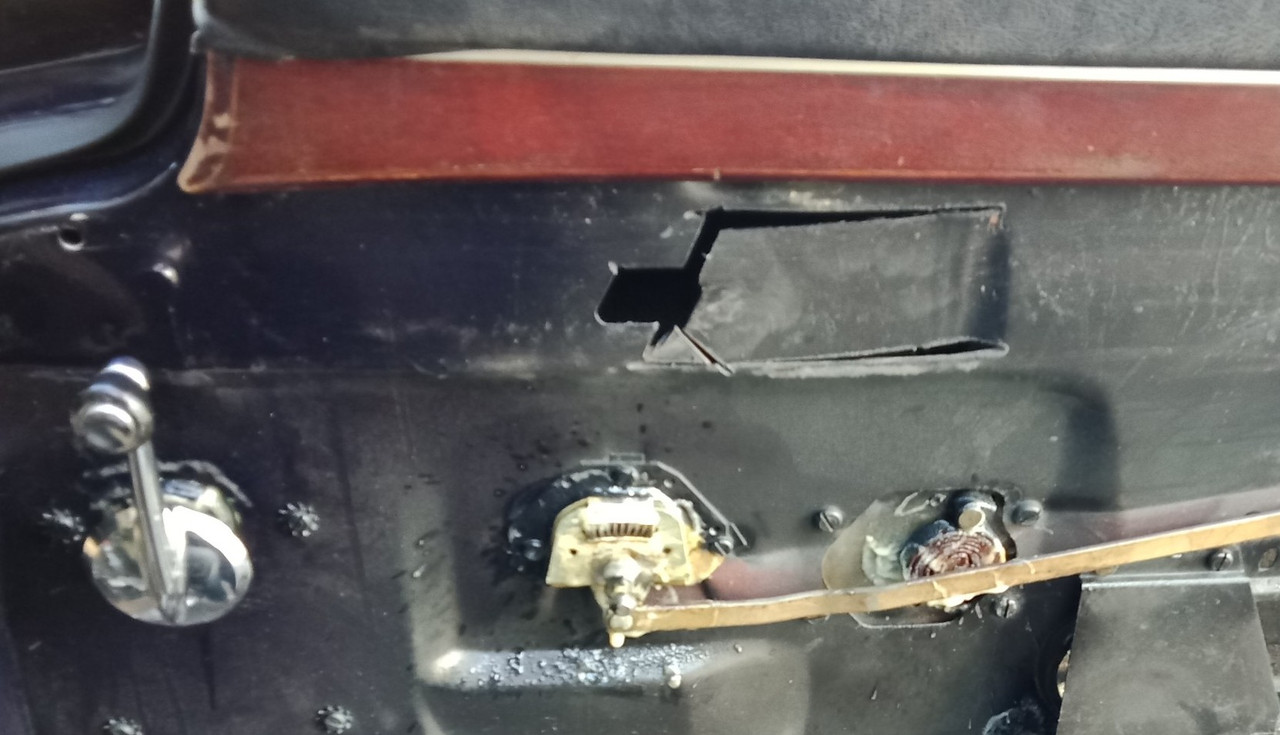 A couple of re-fettled door arm rest securing bolts. Originally 4 large phillips head type UNF thread screws were used. 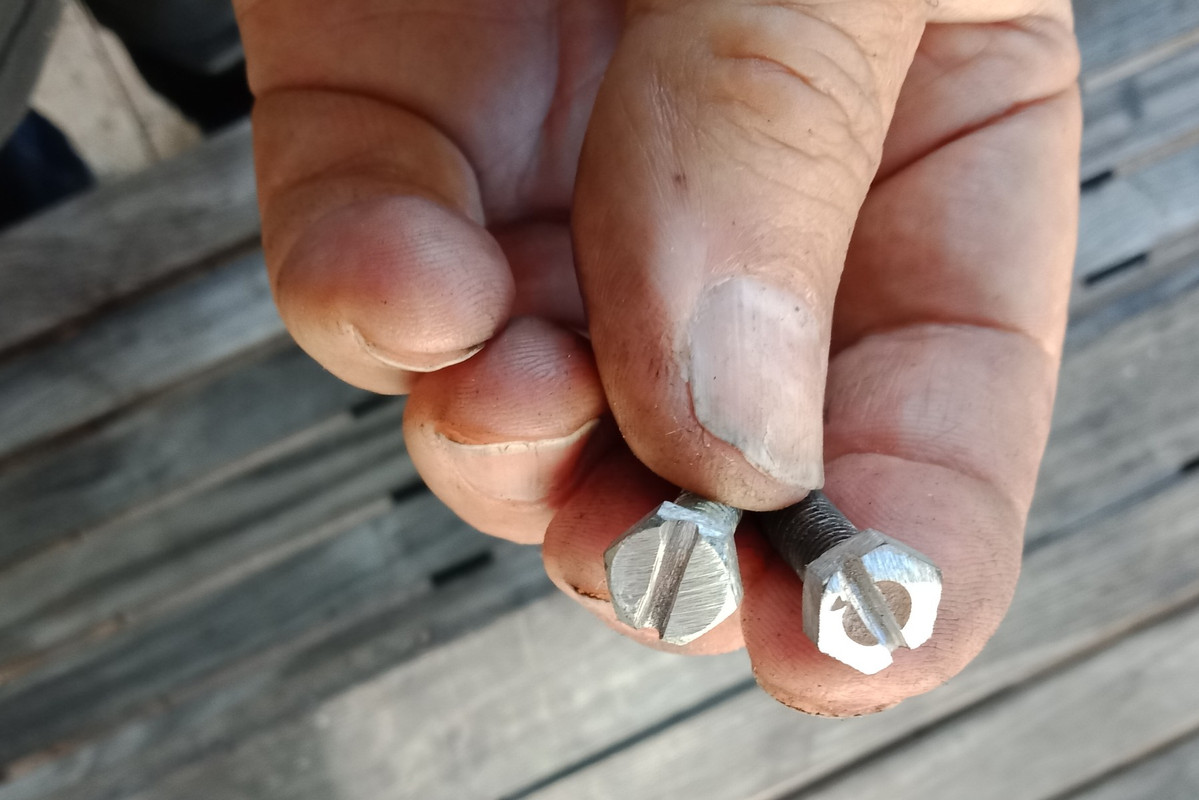 A bit of repair work on the DS door card securing plugs  Another dry component. DS. This is the mechanism that assists the door restraining bracket 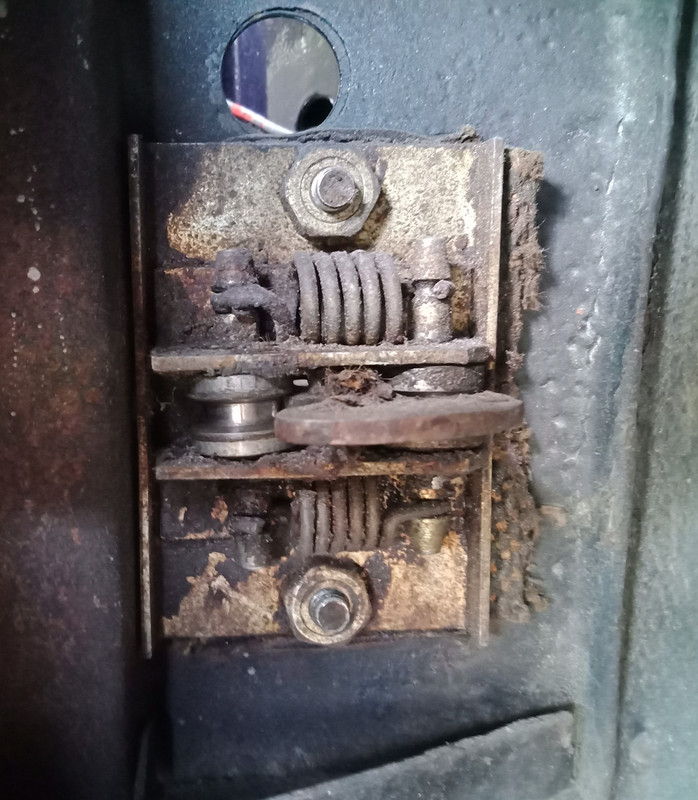 The same mechanism after receiving some lithium grease.  A bit of waste left inside the door cavity. 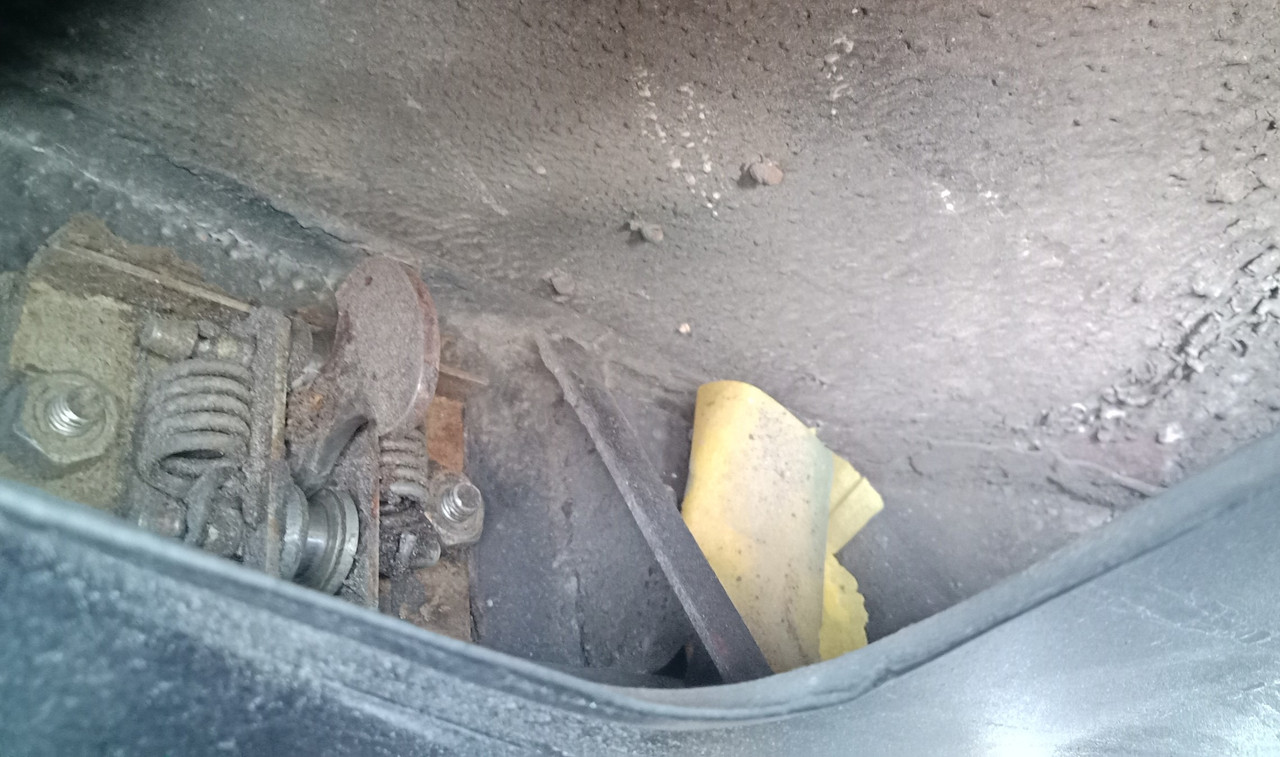 The DS door card back in place. Note (Mike) no more limp and languishing map pocket. 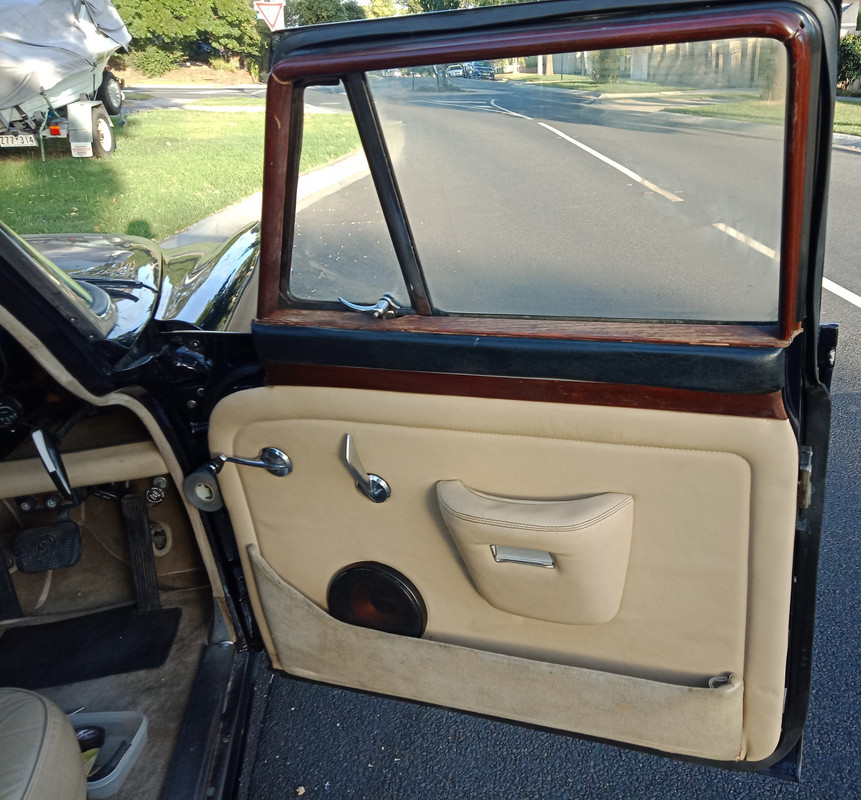 One last comment. The window and door handles have a little horseshoe shaped clip. The top of the horseshoe clip (the round section is always fitted up so that it can be retrieved with a small hooked section of wire through a small slot in the handle. Have a guess which way the panel shop fitted the clips?
|
|
percy
Rover Rookie

Posts: 72
|
Post by percy on Feb 15, 2022 14:01:40 GMT
Good work. As you say, the inner moving parts rarely see any attention as they're only exposed when a repair is taking place. Interestingly, the plastic membrane is usually stuck to the door frame and not to the back of the door card. I think the sealing action would be better when it's close against the frame although probably not that important after 50 years if the card's survived this long! Also, I assume you managed to slip the card from under the bottom wood fillet as it's sometimes easiest to loosen/remove the wooden frame first. It took me a while to realise that the horseshoe clip can be put on BEFORE the handle is replaced. It just clicks in position. I used to use long -nosed pliers to position it and a little hook to remove it.That car is very lucky to have you as a friend!
|
|
|
|
Post by Phil Nottingham on Feb 15, 2022 17:23:09 GMT
I use a hook to pull up the handle clips but they also easily release by pressing down the top of the hook
|
|
|
|
Post by enigmas on Feb 15, 2022 22:47:50 GMT
It looks (to me) as though the door cards have been reupholstered at some stage as there is a mix of securing clips on the back Percy. Unfortunately, it seems most "generalist" repairers don't bother to spend time on the detail work of a repair especially on areas that aren't readily visible. Hence the mix of fasteners, unlubricated hinges, latches, internal mechanisms, unconnected wiring and small details of door and window handles fitted at differing angles. Phil, when I remove door handles from my coupe (the same attachment method as a sedan) I use a 6" piece of thin TIG wire (it's quite firm like piano wire) and bend a very small hook on one end. 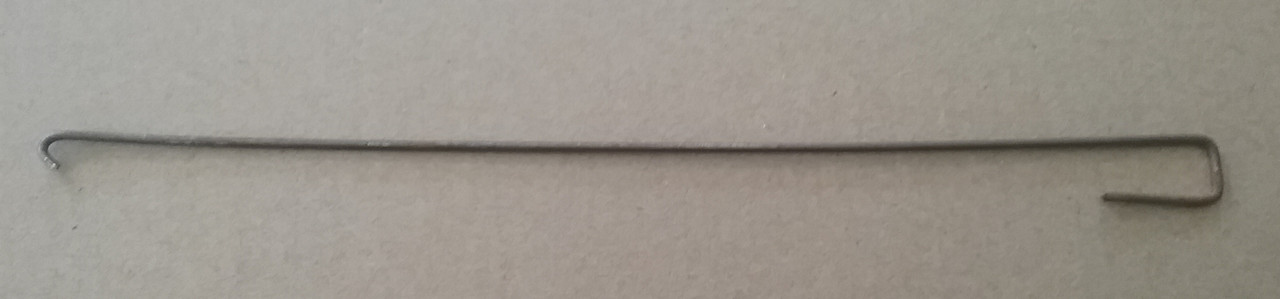 |
|
|
|
Post by Phil Nottingham on Feb 16, 2022 5:36:05 GMT
It looks (to me) as though the door cards have been reupholstered at some stage as there is a mix of securing clips on the back Percy. Unfortunately, it seems most "generalist" repairers don't bother to spend time on the detail work of a repair especially on areas that aren't readily visible. Hence the mix of fasteners, unlubricated hinges, latches, internal mechanisms, unconnected wiring and small details of door and window handles fitted at differing angles. Phil, when I remove door handles from my coupe (the same attachment method as a sedan) I use a 6" piece of thin TIG wire (it's quite firm like piano wire) and bend a very small hook on one end. I use similar - an old Choke inner |
|
|
|
Post by johnwp5bcoupe on Feb 16, 2022 8:59:54 GMT
It looks (to me) as though the door cards have been reupholstered at some stage as there is a mix of securing clips on the back Percy. Unfortunately, it seems most "generalist" repairers don't bother to spend time on the detail work of a repair especially on areas that aren't readily visible. Hence the mix of fasteners, unlubricated hinges, latches, internal mechanisms, unconnected wiring and small details of door and window handles fitted at differing angles. Phil, when I remove door handles from my coupe (the same attachment method as a sedan) I use a 6" piece of thin TIG wire (it's quite firm like piano wire) and bend a very small hook on one end. I use similar - an old Choke inner Snap  |
|
|
|
Post by enigmas on Feb 16, 2022 9:13:54 GMT
Front Parcel Tray & Front Speaker Fascia Finished.Not sure if this is what you wanted Mike...but this is what I resolved for Winston's centre fascia. There's a small speaker behind the mesh screen and the parcel tray "upper" cover is also back in place. It's held up at the front edge by 2 tabs (to be painted black) using the small bolts that hold the radio/CD player in place. The tabs could be replaced by a folded angle bracket that reaches from one side of the player to the other. This too could be painted black or even chromed for a splash of bling under the player. The other tab is visible at the inside front edge of the glove box when the door is opened. To remove the upper parcel tray cover first remove the tabs, then undo the speedo trip meter adjuster securing nut (this is a flat circular nut with 2 opposing grooves on the face like the dash switches use) and then push it up and out of the way. Then the upper parcel tray cover can be removed with a modicum of aggravation and the occasional expletive. The 2 bolts that retain the radio/CD player facia housing could easily be changed to "stainless dome head allen key bolts" if desired. Any profession industrial nut & bolt business would have these in stock. Simply remove one existing bolt and take it as a sample.  PS. The 2 small parcel tray lights and small switch also work and are sited at either end of the parcel tray.
|
|
|
|
Post by enigmas on Feb 17, 2022 6:18:26 GMT
Bad TabsTake 2. Okay, so on reflection I didn't like the aesthetics of the 2 tabs on either side of the radio/CD player. To my eye they stood out like the proverbial. My next option was quite easy to fabricate from some remnant building materials. I do like recycling stuff in new ways. 😉 Here it is...the pictures illustrate the new piece and how it fits.  Cleaned, etch primed and painted. Ready to fit.  Done. I can live with it now. 😎👍 
|
|
|
|
Post by johnwp5bcoupe on Feb 17, 2022 8:49:44 GMT
Well done Vince as usual For me the speaker grill is a bit in your face I would spray it Black  |
|
tonys
Rover Fanatic

Posts: 419
|
Post by tonys on Feb 17, 2022 9:11:15 GMT
Excellent work & progress, all credit to you.
Only the other day I saw lots of photos of a friend's car (not Rover) that had been restored, at significant cost,and I was shocked to see how it has deteriorated, primarily underneath, after just a couple of years and a few thousand miles. Really disappointing.
It looked lovely and shiney and 'as new' when he collected it but the bits you couldn't really see are now raising their head and there's plenty of evidence of poor preparation and re-using items that should have been renewed, especially bearing in mind what he paid. He's now looking to resell it and will be lucky to get 50% of what was paid.
With regard to the radio speaker grille, if it was mine I think I'd also be tempted to see what it looks like in black, but that's not to detract from the excellent work done. Well done.
|
|
|
|
Post by enigmas on Feb 17, 2022 10:38:32 GMT
Well done Vince as usual For me the speaker grill is a bit in your face I would spray it Black I kind of like it John...it's a very Wolseley 6/90 dash board speaker face, but whatever happens after it leaves my hands is up to Mike and his take on P5 dashboard aesthetics. Only thing John, if you painted the screen black you'd also paint the small speaker behind it black. The small screw on the right is the ground wire for the radio (not my work), but that needs to be painted black. I've got to leave a few fun things for Mike to do during his weekends when he eventually gets the car home. 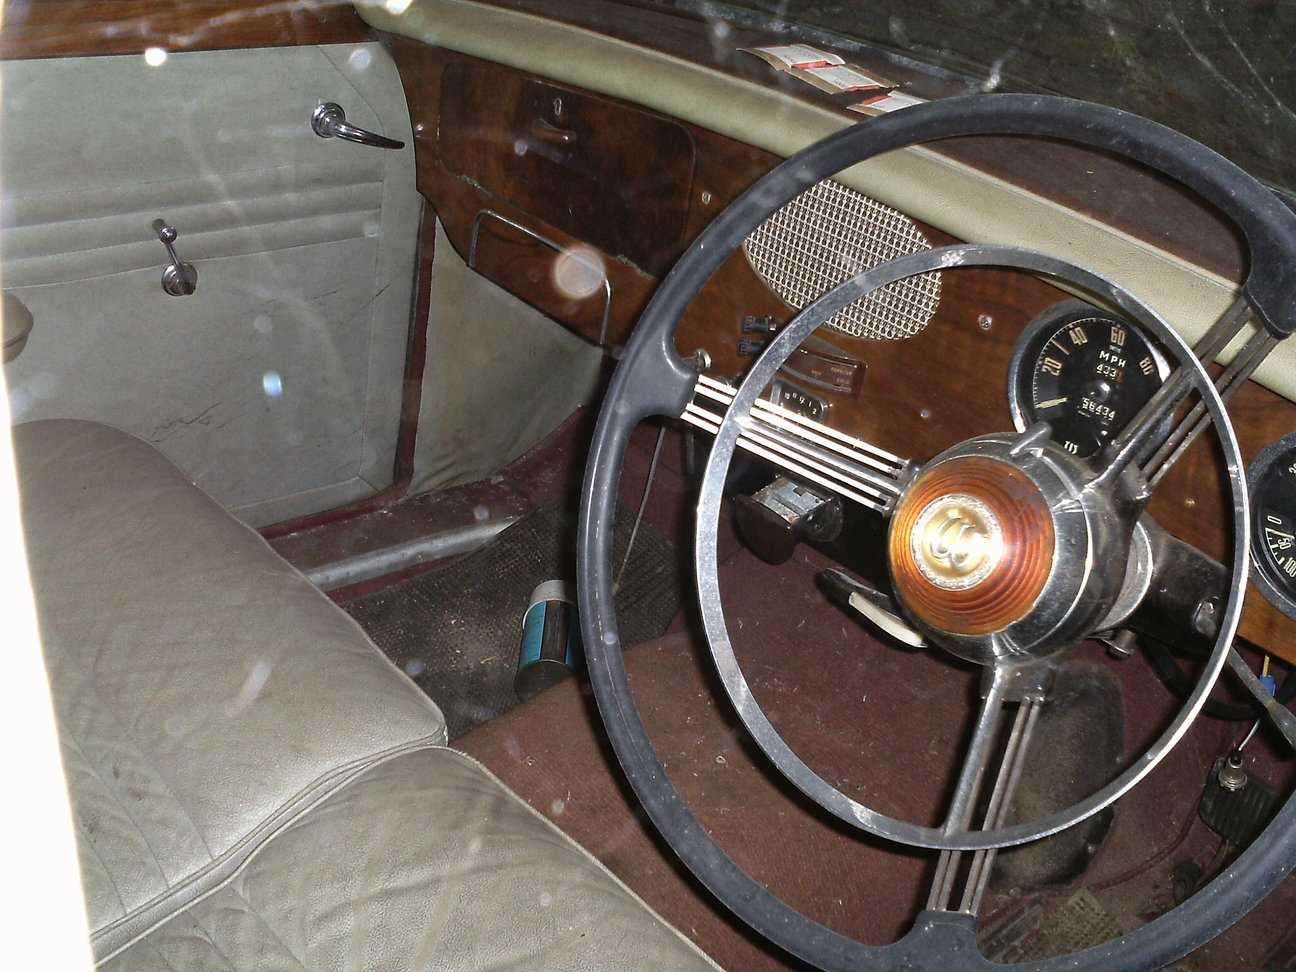 |
|
|
|
Post by enigmas on Feb 17, 2022 11:00:30 GMT
That's very upsetting about your friend's car Tony. Unfortunately when the work is farmed-out, you really need to ensure either you or someone you trust is monitoring what is done and how it's done. Trust with restoration work is a big issue.
Quite a lot of the work that I'm doing/have done on Winston should have been done properly by the panel shop when they reassembled the car.
|
|
|
|
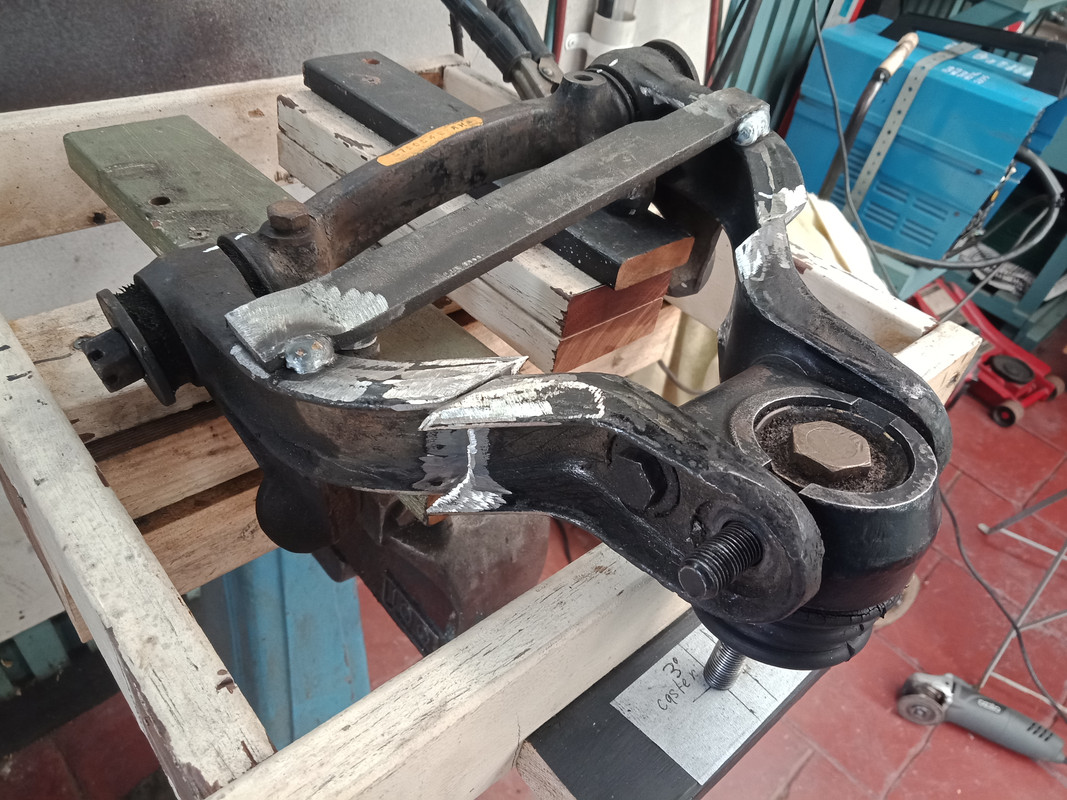
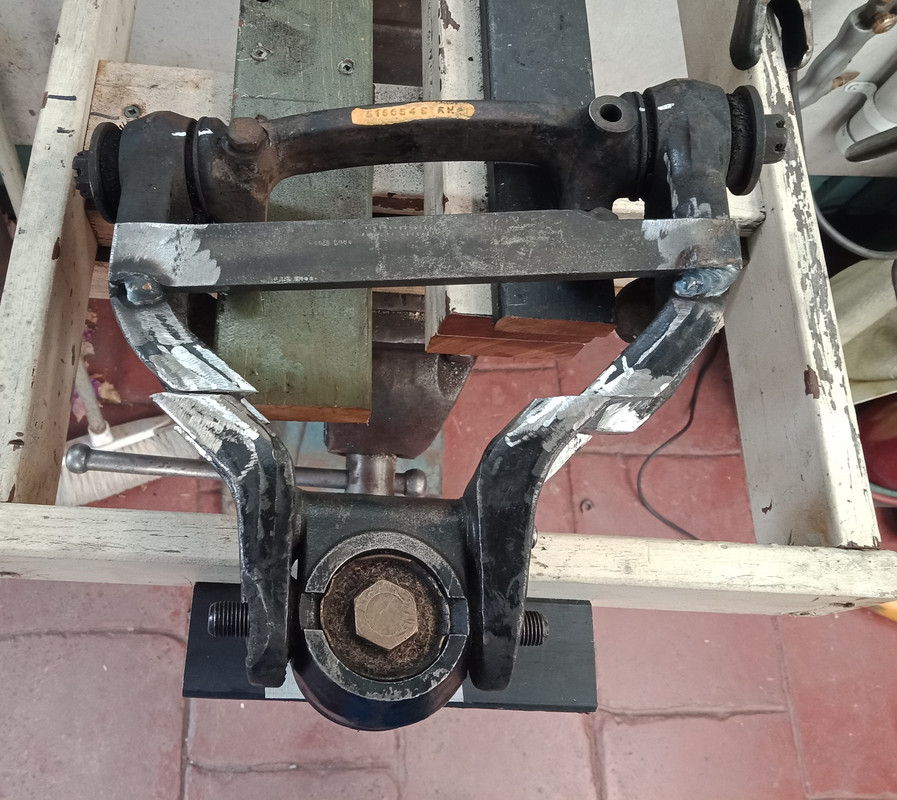
Post by enigmas on Feb 18, 2022 8:05:55 GMT
Caster JigHere's something not quite yet finished fabricating/setting-up for the next task. 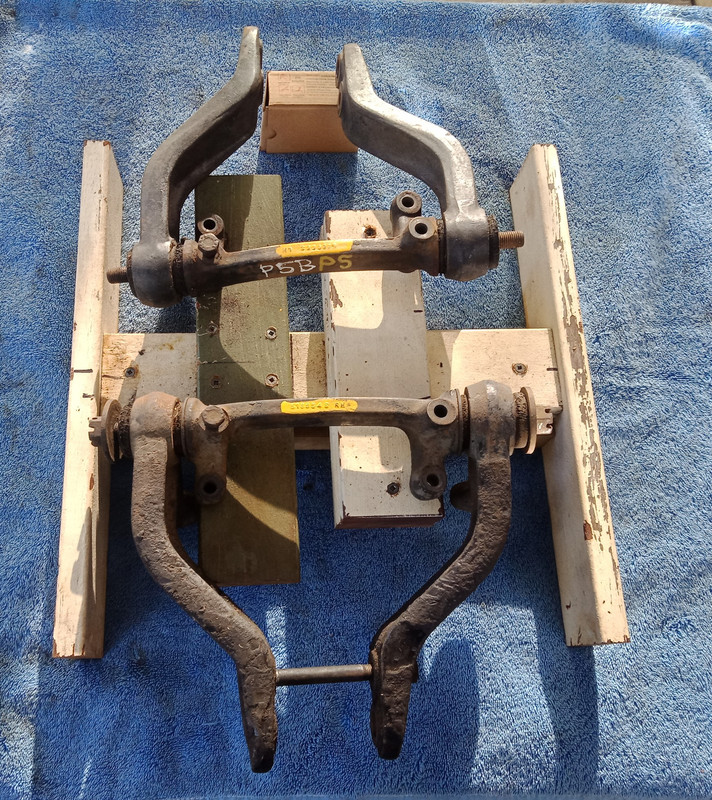
|
|
boz
Rover Rookie
Posts: 12
|
Post by boz on Feb 18, 2022 20:42:12 GMT
Vince,Your work is very thorough and detailed, it's very interesting to see the progress of what started as a weekend job, well done, Boz
|
|
|
|
Post by enigmas on Feb 19, 2022 0:49:26 GMT
Thanks Boz,
Yeah, live and learn. If you do something for long enough, you figure out what works and what doesn't.
E
Good luck with your Wolseley adventures too. 😎👍
|
|
|
|
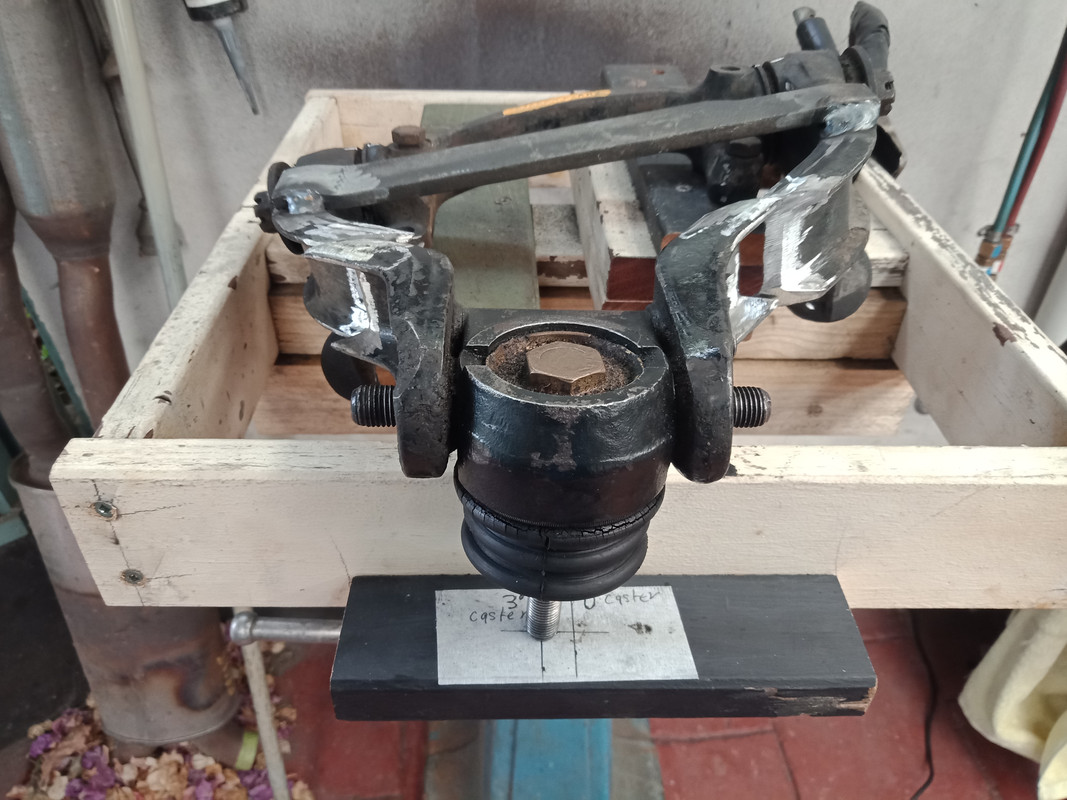
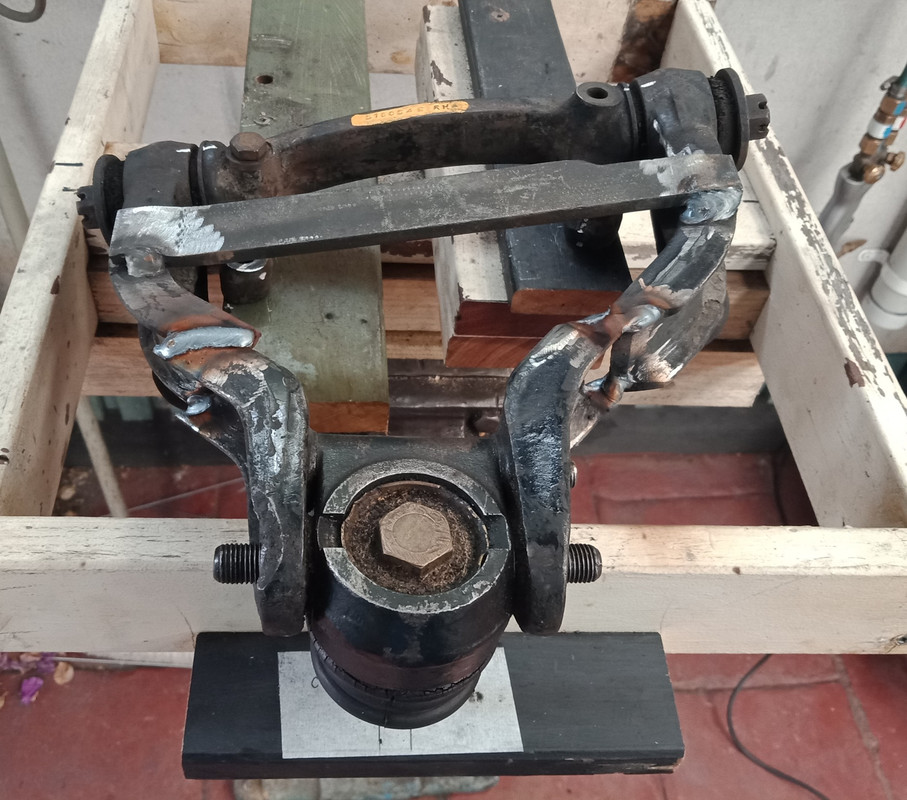
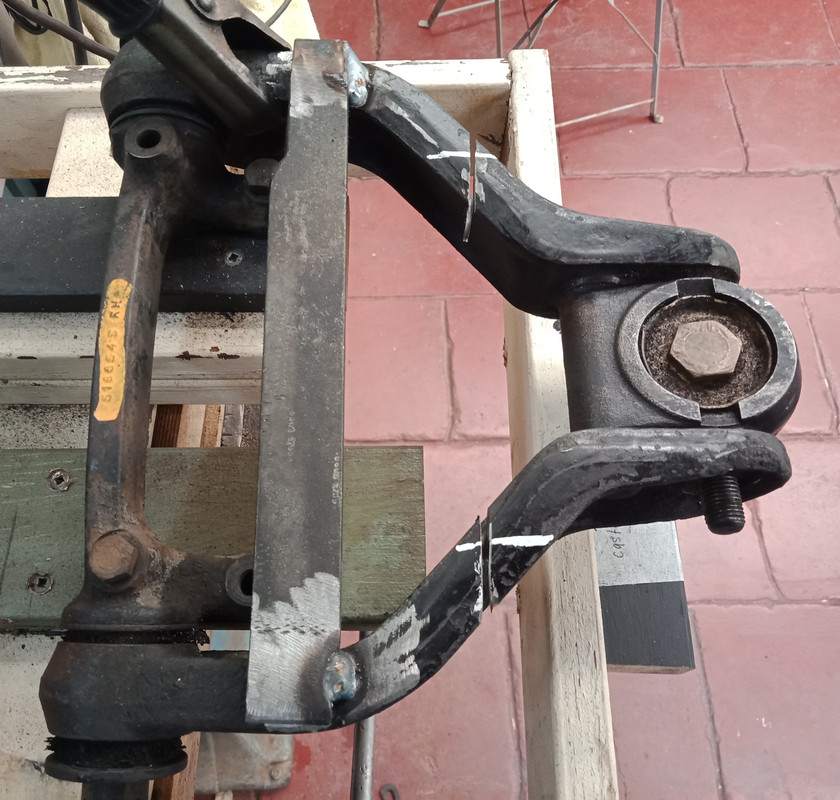
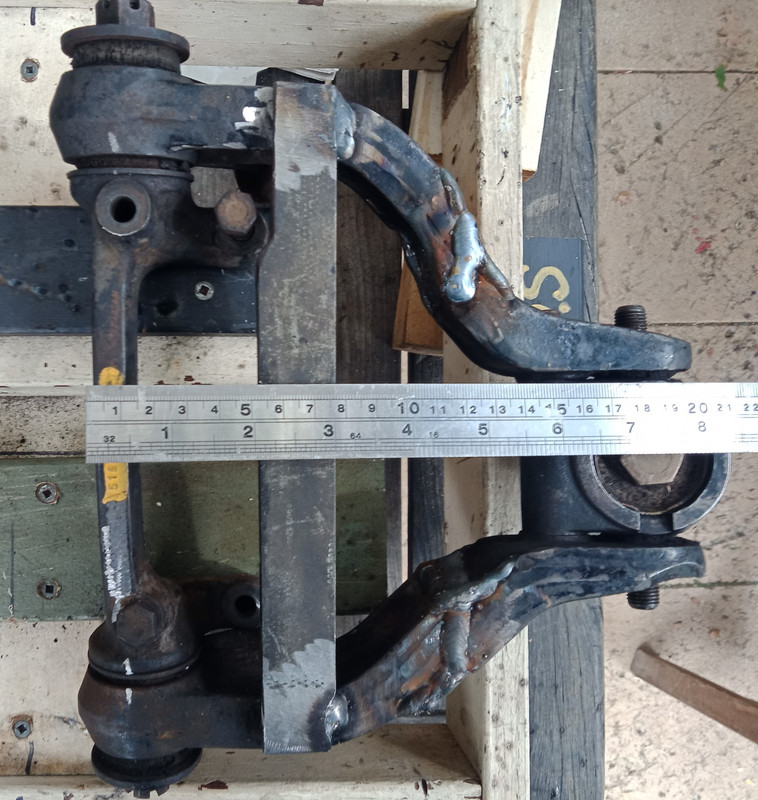
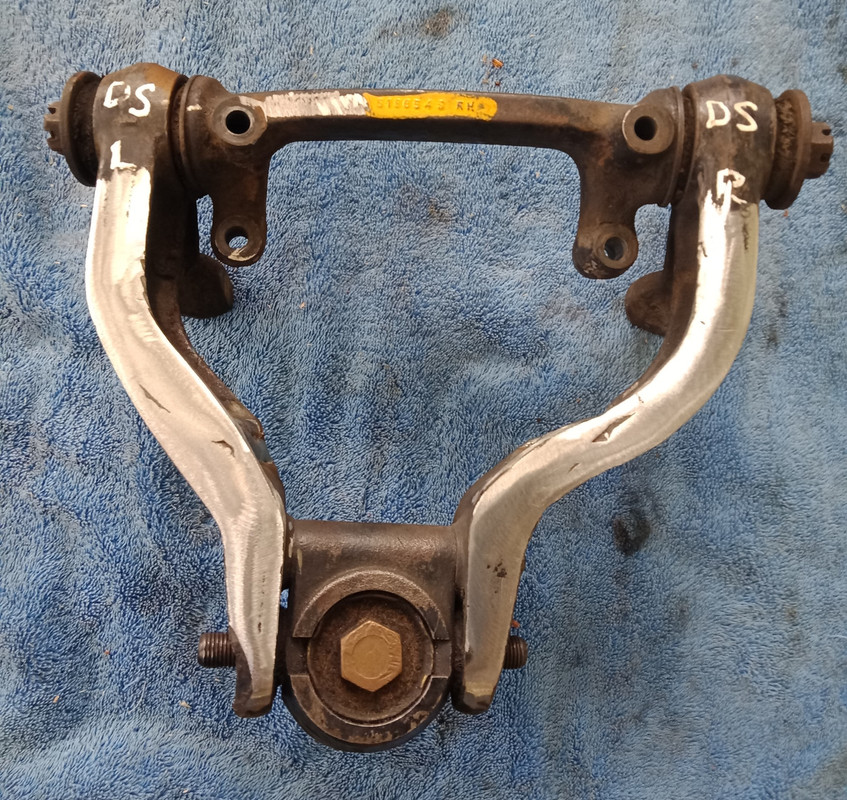
Post by enigmas on Feb 19, 2022 13:02:00 GMT
A little bit more work on the "caster jig" this morning. 3/8" movement to the rear yields about 3° of positive caster.    |
|
|
|
Post by Sam Bee on Feb 19, 2022 22:33:36 GMT
If you do a search on this site you will find quite a detailed .discussion on this topic. There was a kit issued by Rover from about 1971, which ay car was fitted with. In fact the spacers where 1/4", said to give about 3.5 degrees of caster.
|
|
|
|
Post by Sam Bee on Feb 19, 2022 22:40:00 GMT
I have just found this photo of my spacer.
|
|
|
|
Post by enigmas on Feb 20, 2022 1:57:14 GMT
The spacers don't add 3.5° of positive caster Sam. You might get 1.5° if you're lucky. The rear most wishbone also needs to be moved rearward a similar amount. Otherwise all that's occurring is the rear wishbone bushes being loaded against the spacer.
You can discuss/pursue the issue with John W if you require more clarification he had something similar to the factory spacers in mind on the back burner.
I did a similar modification on my coupe 28 years ago because I didn't like the vague lack of straight line stability at speed. It's more of an issue on the V8s due to the lightweight alloy engine up front. I know 3/8" provides a minimum 3° because I had the front wheel alignment checked on a modern electronic alignment machine after doing the mod and have a printout in my files somewhere.
Don't believe that the factory settings (geometry) built into the subframe are perfectly accurate side to side as there's no built-in adjustment from any of the front end geometry apart from toe-in or out.
As an aside if you want more positive caster there are other easy ways to achieve it, but none of them are obviously ideal.
1. Lower the rear of the car.
2. Raise the front of the car.
3. Fit larger diameter wheels to the front.
PS. Hooking a caravan on the back will also do the job.
|
|
|
|
Post by enigmas on Feb 20, 2022 6:26:44 GMT
|
|